Create and customize your own DIY Lighted Christmas Tree Wreath for the holidays!
It’s been a while since I did a craft project, but this one has been on the back burner for quite some time. I remember seeing a Christmas tree-shaped wreath several years ago and thought it would be fun to recreate it using my craft stash.
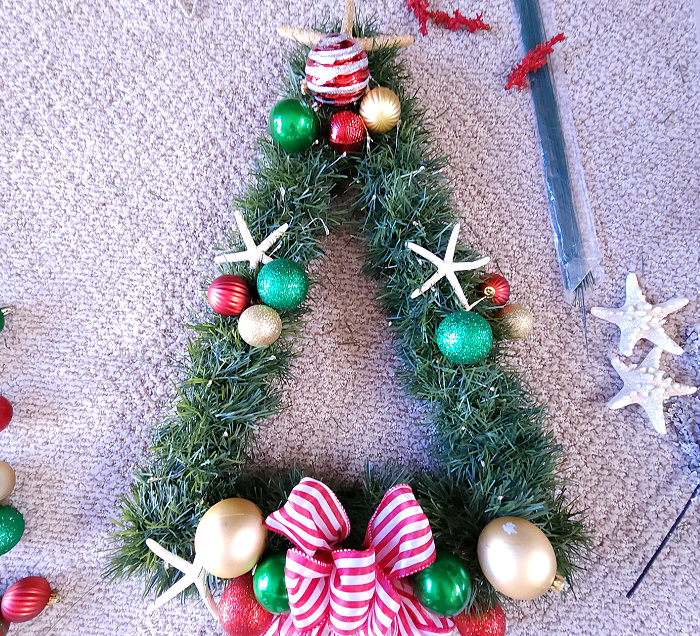
Note: I took these images while I worked on my living room floor to put the wreath together. These are the raw images and might not be the best quality, but I hope they inspire you to make a Christmas tree wreath.
Lighted Christmas Tree Wreath
Supplies:
- Foam Poster Board (20″ x 30″) or cardboard – Should be large enough to create a large Christmas tree wall hanging.
- Green tree garland, unwired – This will be used to wrap the poster board/cardboard. Purchase at Walmart or locally if you can because it’s usually cheaper than ordering online.
- Ribbon – 2″ wired ribbon in your color choice.
- Floral wire (optional) – I used floral wire to attach the ornaments to the wreath as I wanted to be able to change them out. Floral wire can be skipped if you choose to glue the ornaments or decorations onto the wreath.
- Firecracker Light Pack – I prefer firecracker lights as the lights spray out and can be moved into place easily, but other fairy lights can be used too.
- Garland Ties or green zip ties – Needed to attach the light battery pack or use floral wire.
- Embellishments – various Christmas ornaments and picks (most of mine were purchased at the Dollar Tree).
Equipment:
- Exacto knife – Used to cut the poster board into the Christmas tree shape.
- Glue gun/Glue sticks – At least 2-3 glue sticks will be used.
- Scissors – Cut the garland
- Ruler or straight edge – To create the Christmas tree shape.
How to Make a DIY Lighted Christmas Tree Wreath
Cut the Christmas Tree Wreath Base
Step 1. Take a ruler and mark out 15″ for the bottom of the tree or decide how wide you want your base and measure it out. Find the middle and mark it (7.5″). From the middle mark, draw a 22″ straight line up OR the height you want your tree. Then, from the top of the 22″ point, draw a line to the bottom point of the tree base to make a triangle shape. Next, make an inner triangle that is 1.5″ in from the outside triangle lines.
Step 2. Now, take the Exacto knife and cut the inside and outside triangle lines to create the Christmas tee wreath base. When the wreath triangle is cut out, remove about an 1″ off the top point of the triangle to create a flat edge (see image).
Add the Green Garland
Step 3. Glue the end of the green garland to the back of the triangle base form. I started at the bottom base corner and began to wrap up towards the point of the Christmas tree. To secure the garland, add glue to the base triangle each time it is wrapped around. Continue to wrap the garland around the foam base until it is entirely covered with the green garland. Cut off any excess garland.
Create a Bow
Step 4. Using a 2″ wired ribbon, choose the style of bow you would like to add to the wreath. I watched the video above to create a modified Mary Casey bow. To attach the bow in place, use a floral wire and twist into place.
Add Firecracker Lights
Step 5. Attach the battery pack to the middle of wreath form, behind the bow. I used one garland tie threaded through the middle of the bow and around the battery pack to keep it in place. This way, the battery pack can be removed to replace the batteries.
Step 6. Wrap lights around the Christmas tree shape. When you make it back to the battery pack, the end can be secured by a floral wire or wait until the ornaments are added and secure it under the ornaments.
Decorate the Christmas Tree Wreath
Step 7. Gather all the items you want to use for decorating the wreath. Do a dry-fit test and arrange items BEFORE attaching anything onto the wreath. This allows you to move things around until you get the desired look.
Step 8. Once you decide where everything needs to be placed, either hot glue it OR attach the items using floral wire. To create ornament clusters, I strung three ornament balls, in various sizes, onto floral wire. Then, I twist tied it around the wreath form to secure it (think closing a loaf of bread with a tie). This way, I can change out the decorations when I want.
Step 9. Optional – Fill in the wreath with various floral picks or berries. I hot glued glittered berries onto the wreath and added berry picks. Note: I did not glue the berry picks in place and instead tucked them under the garland wrap. If the wreath will be on a door that is constantly used, the picks should be glued in place.
Step 10. The final step is the add the wreath hanger. To do this, I pushed apart the green garland to find the foam board. Then I added a good amount of glue and pressed in the ribbon ends to create a loop for hanging.
Completed Christmas Tree Wreath
Now, all you need to do is hanging your wreath and enjoy!


