Want to make a quick, inexpensive, and easy wreath for Halloween? Head to the dollar store and grab a wire wreath form and a black plastic tablecloth to make this Halloween plastic tablecloth wreath.

It’s the third Tuesday of the month and it’s time for the October Pinterest Challenge! If you aren’t familiar with this challenge, it’s basically a group of bloggers that get together each month to try a pin we’ve pinned to our boards. It’s a way of motivating ourselves (and you too) to not just pin, but to make it happen! You can see all of our pin projects at the bottom of this post, so check them out and see what inspires you!
To join next month’s #pinterestchallenge, click here to sign-up ⇒ November Pinterest Challenge
Halloween Plastic Tablecloth Wreath
My inspiration for this wreath came from a plastic tablecloth wreath tutorial from 2011. The original pin used strips of plastic tablecloth cut into 8″ x 2 1/2″ strips that were tied onto a wire wreath. Super simple, but a bit tedious.
Supplies:
- wire wreath form
- black rectangular plastic tablecloth
- spiders
- white webbing
- hot glue gun/glue sticks
- double-sided tape
How to:

For my Halloween Plastic Tablecloth wreath, I decided to cut the giant strips using the natural folds in the tablecloth. Note: The strips can be cut into smaller widths with the same result.
[click_to_tweet tweet=”$5 Halloween Plastic Tablecloth Wreath using dollar store supplies. ” quote=”Halloween Plastic Tablecloth Wreath with dollar store supplies.”]

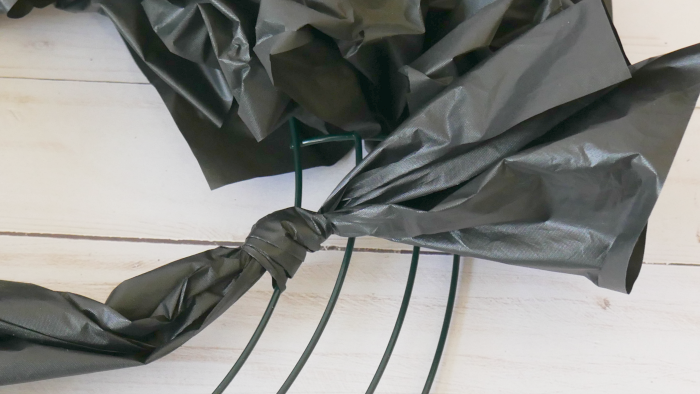
Knot the tablecloth strip onto the wire form. It can be tied to the inside or outside wire.


Pull up about 2 1/2″ of the tablecloth up between each wire ring to form ‘bunny ears’. Continue to create ‘bunny ears’ until the outside ring is reached. When the outside ring is reached, wrap the plastic around the outside wire once or tie a knot. Continue making ‘bunny ears’, working back towards the inside of the wreath. When you come to the end of the tablecloth strip, tie a knot to the wire form and continue the process until the wreath form is covered. There will be about 2 1/2 strips per section and this should be enough to hold the loops in place and fill the wreath.
Note: There is nothing holding the loops in place, except for the initial knot and end knot.


Fluff up the strips by opening up the strips. Trim any excess ends to the same length as the loops. Leave as is or embellish it with spider webbing and some glitter spiders.

To attach the webbing, I used double-sided tape to attach it to various areas around the wreath.

Finally, I used hot glue to add the spiders. To prevent the plastic from melting, add the glue to the spiders and let it cool down before attaching the spiders so the plastic.
Note: This wreath is best used indoors or in a covered area that isn’t exposed to outdoor elements.
View the other Pinterest Challenge Posts:
- January 2018 – One Skillet Chicken with Lemon Garlic Cream Sauce
- February 2018 – Dollar Tree St. Patrick’s Day Wreath
- March 2018 – Bourbon Chicken with Vegetables
- April 2018 – Mini Hoop Seashell Wall Hanging
- May 2018 – Giant Mochi Ice Cream
- June 2018 – Matcha Mousse
- July 2018 – Savory Vegetable Pancakes
- August 2018 – Jumbo Jello Gummy Bears
- September 2018 – Halloween Candy Popcorn
- October 2018 – Halloween Plastic Tablecloth Wreath
- November 2018 – Apple Pie Hotteok
- December 2018 – Christmas BINGO Gift Exchange Game
Now let’s see what other things Pinterest inspired! Head over and visit the other hosts to see what they crafted, cooked, built, or tried!


I love the sparkly Spiders a lot. And the spiderweb. I bet it took quite a while to make all those bunny ears but I can guarantee you it was well worth it. Your wreath looks stunning. I will save it to my wreath board and hope to be inspired by it next year round.
Thanks. This wreath is actually super quick to make and can be done in about an hour.
Very fun! Love a good thrifty craft. Visiting from Merry Monday.
Wow! It’s amazing what you can do with a few things from the Dollar Store! Love the spooky spiders!
At first glance I had no idea it was a tablecloth. This is so Halloweeny (I don’t think that’s a word), but I love the Halloween vibe! I tied plastic tablecloths on my Halloween lights for the porch and it looks so cute. It’s amazing what you can do with a tablecloth.
Great idea. Love your Halloween wreath!!
This is such a great idea. I love the texture the tablecloth gives to the wreath. The spider web and spiders are the perfect Halloween touch.
What a fun idea for a Halloween wreath! It turned out great. Love the addition of the spider webs.
How perfect is this! I never would have thought to use a plastic table cloth but it is perfect for a spooky wreath. The purple pops off of it finished nicely by the cobwebs. Very creative!!
What?! You’ve blown my mind.. I would never have thought that you could make a wreath from a plastic tablecloth. This is fabulous!! Pinned.
Erlene, you know how I love to make wreaths and door decorations! This is a new one on me. Thanks for the great how-to post. It’s a clever way to make an inexpensive, spooky Halloween wreath.