
Winter is coming to an end and it’s time to decorate for spring! So today, I’m going to show you how to make a spring tulle rainbow wreath!

It’s time for the February Pin Challenge! The purpose of the Pinterest Challenge is to motivate us to not just pin, but to make it happen! This month’s challenge is all about Spring Wreaths.
There were several wreaths that inspired this Spring Tulle Rainbow Wreath. The general idea came from a fabric rainbow wreath I found on Pinterst, but I used tulle instead of fabric. I also wanted to convert this wreath into a St. Patrick’s Day wreath, so I’m sharing how to add a removeable pot of gold onto it too!

How to Make a Spring Tulle Rainbow Wreath
Create a pretty Spring Tulle Rainbow Wreath that you can convert into a St. Patrick's Day Wreath. This wreath is made for use indoors or under a covered area. Video tutorial included.
Materials
- 1 - roll of each color (6" tulle) - red, orange, yellow, green, blue, indigo, and violet
- 3 - rolls of 6" white tulle (only 2 rolls if making the St. Patrick's Day version)
- 1 - 2" x 15.6" foam wreath
St. Patrick's Day Wreath - additional items
- 1 - 7" x 8" wide black plastic cauldron
- white batting or some other type of stuffing (paper works)
- Black paper stuffing
- gold coins
- 1/4" black gross grain ribbon
Tools
- ruler
- scissors
- ball head pins
- pen
- hot glue gun and glue sticks
- tape
- 4" x 6" and 7.5" x 13" cardboard template (use old boxes)
St. Patrick's Day Wreath
- hot knife
Instructions
 Cut out a 4" x 6" and 7.5" x 13" piece of cardboard. The 4" x 6" piece is for the white tulle pom poms. The 7.5" x 13" is for the rainbow portion of the wreath.
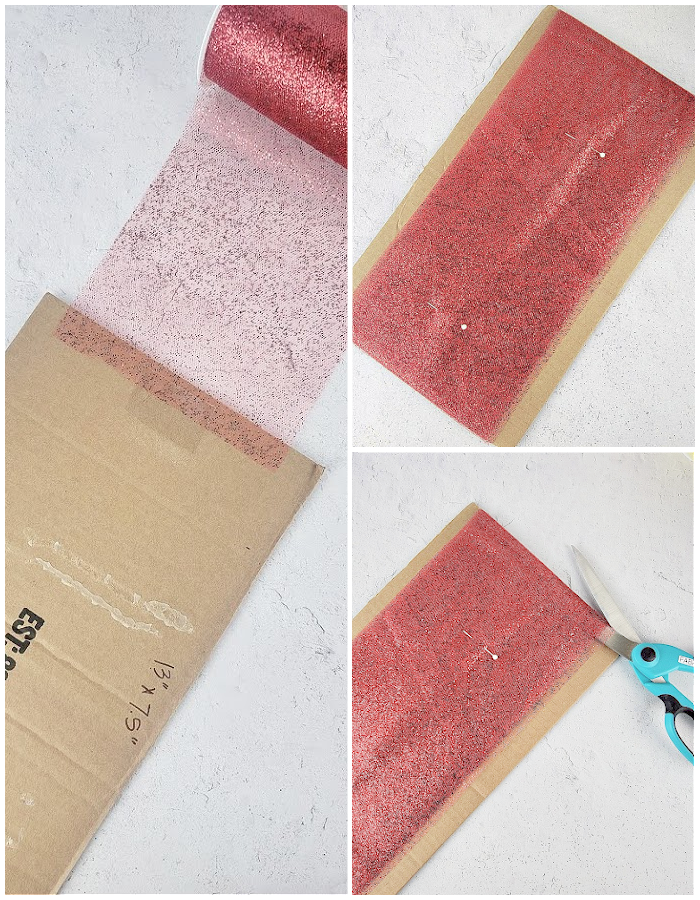
 Tape down the edge of one of the tulle colors on the 7.5" x 13" cardboard, about a 1/2" past the 7.5" edge. Start wrapping the tulle around the cardboard 14 full rotations. Pin the layers of tulle on each side of the cardboard to secure the layers together. Cut the edges of the tulle. This should produce 14 pieces of 6" x 13" tulle pieces. Set aside. Repeat this process for all the colored tulle (red, orange, yellow, blue, green, indigo, and violet.
 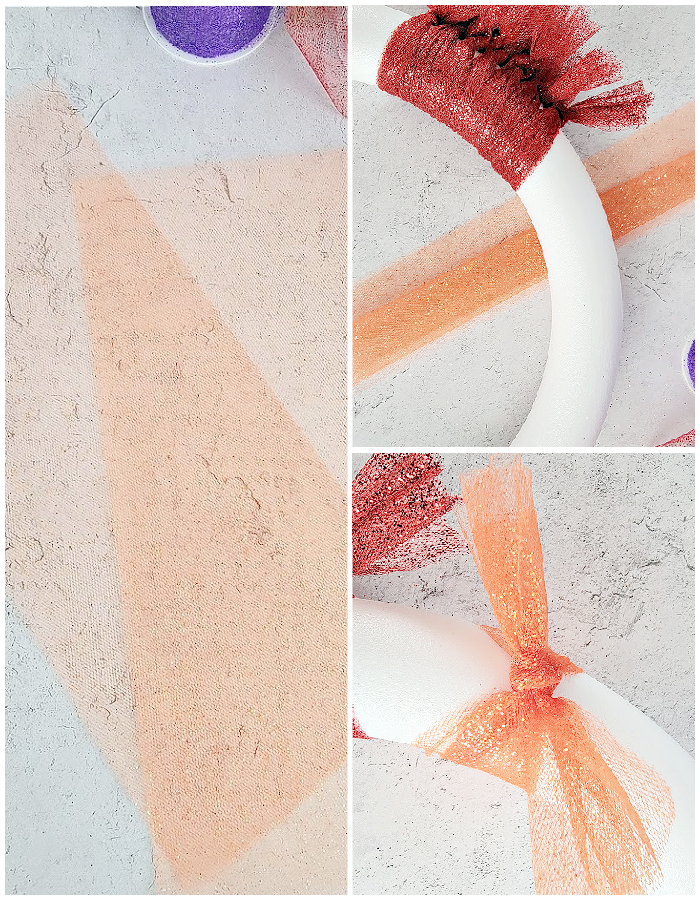 Starting with the red tulle, lay two pieces of tulle on top of each other and tie (knot) around the left side of the wreath. Continue to do this until you have 7 red tulle pieces tied onto the wreath. Push the pieces together. Repeat this process for the remaining colors, moving towards the right side of the wreath. Add the colors in this order - red, orange, yellow, green, blue, indigo, and violet. Tip: Do not tie the tulle strips on too tight. This will cause gaps near the knots and more of the foam wreath will show through.
 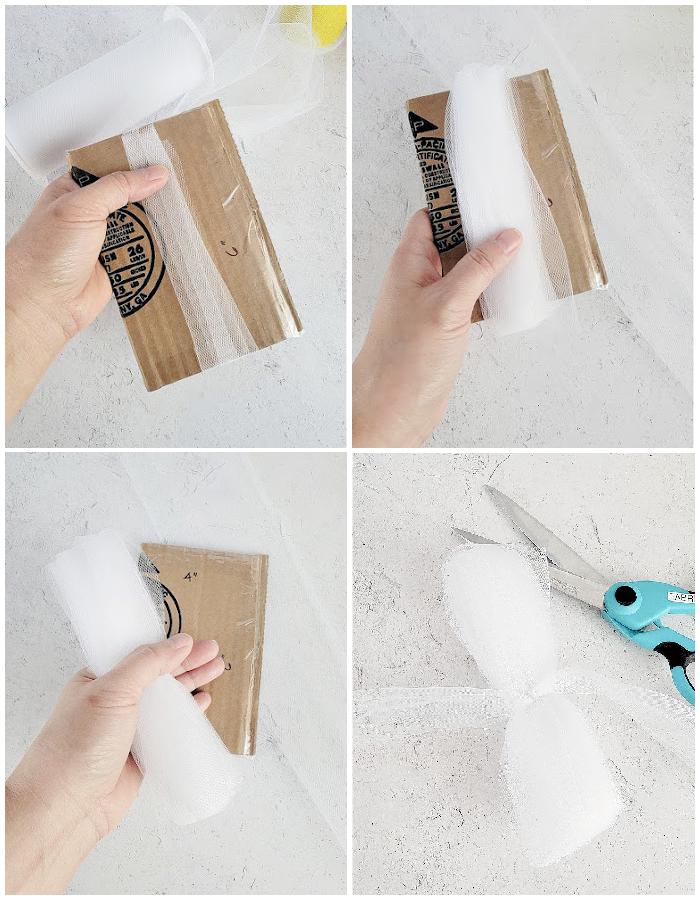 Once all the colors of tulle are tied onto the wreath, set it aside to work on the pom pom clouds. Cut two 15" length pieces of white tulle and cut each piece into three long strips. There should be a total of 6 strips. Set aside. Next, start wrapping the white tulle around the 4" x 6" cardboard, about 15 - 20 times. I like to do 15 times to save on tulle. Slide the tulle off the cardboard and use one of the cut tulle strips to tightly tie around the center of the bundle. Repeat this step 6 more times.
 Open all the loops of the tied tulle bundle and slide a scissors into it. Cut the loops open to form a fan like shape. Do the same for the other side and shape/fluff into a pom pom shape. Repeat this step until all the tulle bundles are shaped into pom poms.
  Tie the white pom poms onto the bottom portion of the foam wreath to create the 'clouds' under the rainbow.
  Take a 6.5" strip of tulle and tie into a loop for hanging. Secure it to the back of the wreath with a ball pin.
- To transform this into a St. Patrick's Day Tulle Rainbow Wreath, watch the video below. Start at 10:37 to see the St. Patrick's Day wreath tutorial.
Notes
- If you want a fuller bottom, pick up another roll of white tulle and add more white pom poms for the clouds.
Recommended Products
As an Amazon Associate and member of other affiliate programs, I earn from qualifying purchases at no additional cost to you. Thank you for your support.
-
 Rainbow Tulle 6 Pack, Nylon, 6" by 150 yd Total, Red/Orange/Yellow/Green/Blue/Purple
 -
 Tulle Fabric Rolls 6 Inch by 100 Yards (300 feet) Tulle Spool,White
 -
 Omnigrid Non-Slip quilter's Ruler, 6" x 24", Neon Green
 -
 7-color rainbow tulle 6 inches wide 25 yards
 -
 FloraCraft Extruded CraftFōM Wreath 2 Inch x 15.6 Inch White
 -
 Fiskars Craft Scissors
 -
 St. Patrick's Lucky Coins Plastic Shamrock Leprechaun 3-Leaf Clover Coins for Party Decoration Favors, 144pcs/Gold and Green
 -
 Cauldron with Handle, 8", Black, Candy Bucket for Halloween
For more Pinterest inspired projects from this month’s Pinterest Challenge hosts, check out the links below ↓

Now, let’s see what the other hosts have created ⇓⇓
February Pin Challenge 2021 - Host Projects


More Spring Wreath Ideas...


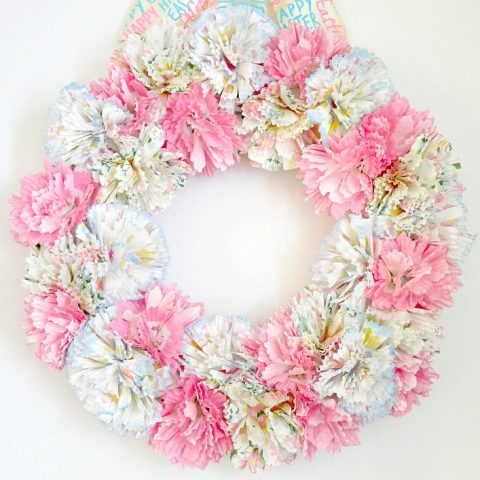
Pastel Spring Coffee Filter Wreath
How to make a pastel spring coffee filter wreath using dollar store coffee filters and food color.


What a pretty wreath! My little girl loves all things rainbow, so this would be perfect for her bedroom door!
Love your cute rainbow wreath – awesome idea! Pretty!
Your spring wreath is too cute and adorable, Erlene! I am a big fan of tulle and love how you used it to make a wreath! And I like that it’s a one for two wreath – perfect for both spring and St. Patrick’s Day!
I love how colorful and bright this wreath is! The puffy clouds at the bottom are perfect. My daughter is in love with this and is asking for one. So cute.
This is so pretty! Pinned for future reference. I adore it.
This is so cute!! Pinning!
Tania