
What is Smart-Fab? Well, according to the Smart-Fab homepage , “Smart-fab is an alternative to paper and cloth. It’s an innovative non-woven fabric, available in a range of brilliant, non-fading colors. Smart-Fab is easy to cut, fold, glue, staple, and sew. You can even draw or paint on it”. To me, it reminds of the hospital disposable gown fabric 🙂
Watch this video for more information on Smart-Fab.
Before receiving this product, I had never heard of or used Smart-Fab. Out of the 15 available Smart-Fab colors, I was given three sample rolls (2ft x 10ft each): dark pink, sky blue, and yellow. I received the rolls a few days before Easter in a narrow and long 4ft. box. Since I didn’t have enough time to make something for Easter, I decided the colors would make a wonderful Smart-Fab Spring mantle makeover.
I always wanted to do a large flower paper wreath, but wondered how it would hold up in storage. Paper is fragile, tears, and can be easily crushed. Smart-Fab is soft and pliable yet strong and durable. It doesn’t rip or fray and can be twisted and ruffled easily. It’s even water resistant! I knew that this was the perfect medium to make my large flower wreath – a Smart-Fab Spring Wreath.
Smart-Fab Spring Wreath Tutorial
Supplies
- Smart-fab in your chosen colors
- 14″ styrofoam wreath
- wooden skewers
- cotton balls
- fabric glue (I used low temperature hot glue, but this is not recommended as it can burn a hole in Smart-Fab)
- ruler
- black permanent marker
- scissor(s)
- pinking shears
- sewing machine or needle/thread
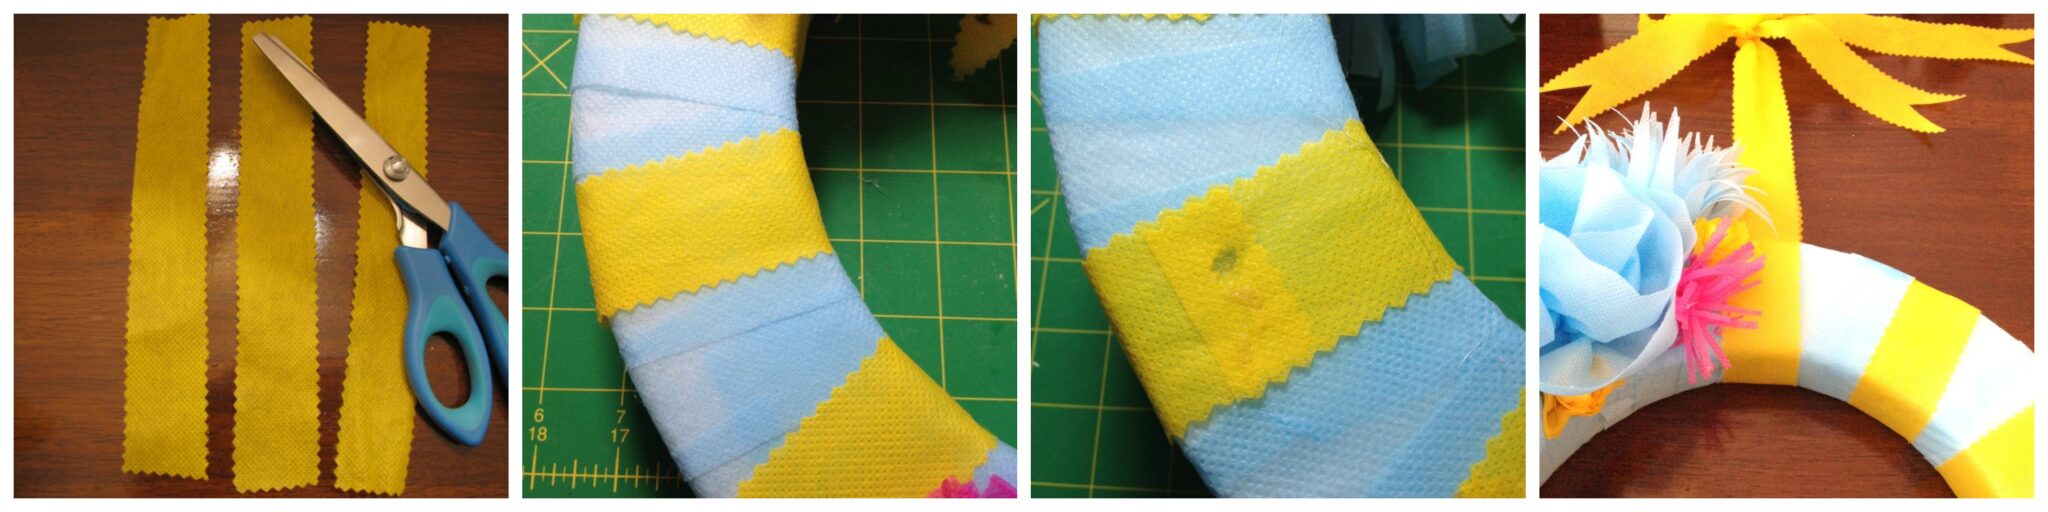
Step One – Covering the wreath

- Cut out at least 10 2″ x 24″ strips to cover the styrofoam wreath. Depending on how much you overlap your strips, you may need to cut more.
- Glue the end of the strip down and begin wrapping until the entire wreath is covered. Set aside.*I only wrapped my wreath once and it was pretty shear. If you prefer a more opaque look, wrap your wreath twice, overlap your strips closer together, or double up the Smart-Fab.*
Step Two – Making the flowers

- Cut 3″ x 24″ and 4″ x 24″ Smart-fab strips. One strip will make one large flower. Cut as many strips as needed to decorate your wreath. *I used a total of 12 large flowers and cut 6 of each size.*
- For the smaller flowers, choose another a second color and cut at least 6 – 1 1/2″ x 12″ Smart-fab strips. One strip will make one small flower.
- For more small flowers, choose a third color and cut at least 3 – 1 1/2″ x 12″ Smart-fab strips.
- For each flower you plan on making, cut a 2 1/2″ x 2 1/2″ square in the same color for the centers.

- Take strips of Smart-fab and roll into approximately 4″ flat rolls.
- Cut one edge in varying designs. *Use the pinking shears and regular scissors.*
- Using the largest stitch length, sew the uncut edge of the strips.
- Pull on the loose thread and gather strips till it is almost half the original length (13″). Trim threads and set aside.


- Cut the wooden skewers into 2″ lengths. You’ll need one 2″ skewer for each flower.

- Take a cotton ball and split into two.
- Run a small amount of glue on the end of the 2″ skewer and place cotton ball on it. Once the cotton ball is applied, run another strip of glue near the bottom of the cotton ball (see second picture). *I used low temp. hot glue, which is not recommended by Smart-fab, but it worked for me. Do not touch the metal tip of the glue gun to the Smart-fab or it will burn a hole in it.*
- Wrap one 2 1/2″ x 2 1/2″ square onto the cotton ball. Apply more glue as needed to secure all the edges of the cut square. This makes the center of each flower.

- Take one of the flower centers and glue the gathered strips onto the bottom of it. *I also used low temp.*
- Repeat this step until all the flowers are made.

- Place the flowers. Use the pointed side of one of the skewers and make a hole where you want the flower to go. *This step is important since Smart-fab does not pull apart easily.*
- Place glue on the bottom of the flower and place into wreath. *I used fabric glue here because it allowed me time to move the flowers if needed.*
- Stop here with just flowers or continue on.
Step 3 – Banner

- Choose the color of your banner flags. Pin together three layers of 10″ x 2 1/2″ strips of Smart-fab.
- Sew along one of the long straight edges.
- Using your pinking shears, cut into 6 – 1 1/2″ x 2 1/2″ triangles.
- Cut a 3/4″ x 14″ long strip in the same color as the triangles or in another color.
- Place the sewn edge of the cut triangles into the strip and sew together.
- Use a black permanent marker and write the word “SPRING” onto the banner.

- Cut a 4 1/2″ skewer and wrap with a strip of Smart-fab, leaving about an inch uncovered.
- Tie one end of the banner near the top of the stick and cut loose ends into thin strips.
- Glue skewer and opposite side of the banner into place.

- Cut 6 – 1 1/2″ x 9″ strips with pinking shears.
- Wrap and glue these between the flowers.
- Using the pinking shears, cut 1 – 1 1/2″ x the length needed to hang. Attach to the top of the wreath. *Add a bow for a finishing touch.*

Final Observations – Pros/Cons
Overall, I found Smart-Fab easy to work with. It was easy to cut and sew, draped well, and was easily folded to fit into my silver seashell. I would definitely use this product again.
| PROS | CONS |
| Cuts easily (I cut through 8 layers with ease) | Very Sheer – you’ll have to double or triple layer for opaque coverage |
| Pliable, soft, and drapes easily | Can’t use hot glue gun (although I used low temp) |
| Water resistant | Regular tape does not stick to it well |
| Easy to sew | Pencil doesn’t show up well |
| Paint, pen, and crayon show up well | Paint can seep through |
| Fray, tear, and crease resistant | Using too much glue can seep through |
More Spring Wreath Ideas...


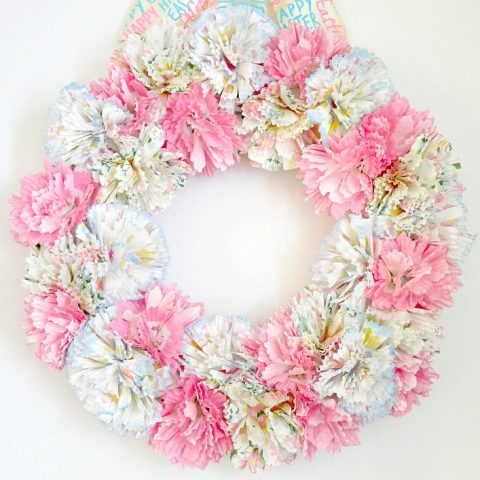
Pastel Spring Coffee Filter Wreath
How to make a pastel spring coffee filter wreath using dollar store coffee filters and food color.


This wreath is so fun and spring-y! Love it and it is a great tutorial!
How pretty, I love the colours you’ve used. Thanks for linking up to Sweet and Savoury Sunday, stop by and link up again. Have a great day!!
What a great looking wreath! I would totally try it out. Thanks for linking it up to Snickerdoodle Sunday.
I’ve never heard of this before – it looks fantastic! I do appreciate you sharing with Home and Garden Thursday,
Kathy
Forgot to mention that I would make flowers. Thanks!
Jann
I have never heard of this product either. Sounds kind of fun! Thanks for sharing with SYC.
hugs,
Jann
Interesting material. I love the way you made the flowers with it! Thank you for sharing at What We Accomplished Wednesdays. Have a great week!
Blessings,
Deborah
Thank you. I love the way the flowers came out too. Smart-fab really is an interesting material and definitely fun to work with too.
Gorgeous wreath – you did an amazing job 🙂 Thank you for sharing
So many possibilities with this stuff. I really love the way your wreath turned out. Thanks for linking up to Tips and Tricks!
Wow…looks good, you did a good job on this!!
Thanks for sharing and linking up!
Such a great idea! So need to try this! Thanks.
Cute! Thank you for sharing on Whatever Wednesday on Thank You Honey!
This looks fun and is nice and “springy”! I will have to try this!
Erlene, I have never hear of Smart Fab either but the colors are so bright and colorful. Your mantle looks like it is all ready for Spring and Summer. Very nice. Stopping by from Jordan’s Onion.
Thanks for stopping by. Smart-fab would be perfect for all the party things that you do. Great way to decorate your tables.
I love everything about your spring mantle, especially your spring wreath! Thanks for sharing at our first Pretty Pintastic Party!
Thanks so much for the compliment and stopping by to visit. Have a great weekend.
Nice! And so many clear pictures to go with the tutorial. Love it! You go girl.
Thanks. It was a fun project and I love the way the flowers came out. Thanks for coming over to visit and commenting.
How cute is this!! 🙂 Saw the link on Hump Day Happenings. 🙂
This is super cute! I’m really enjoying Spring this year. Usually here in Florida we go straight to Summer but we have had a few months of gorgeous Spring weather this year. Thanks for linking up with Hump Day Happenings.
Maybe a flower garland for the granddaughter – she asked for one to hand in front of her door so this might work! Love the post, love the table of pro/cons. Wreath is great too!!
This would be perfect. You can even dunk this in water to wash away dust.
Lovely giveaway! i would make pretty spring hanging flowers for my daughters Birthday! 😀
That would be pretty. Smart-fab would make beautiful flowers and they’ll be crush resistant too.
What a perfect material for outdoor art projects! Thanks for introducing me to a new product that has so many possibilities! Wonderful springtime wreath by the way, love the colors!
Thank you. It would be great for an outdoor project. It’s water and fade resistant.
I would probay make a cute wreath too! I’m a new follower stoping by from the blog hop. Your blog is super cute! Happy Tuesday!
Thanks Leslie for stopping by & following. Hope you stop by again tomorrow for another link up.
Great Review! this looks like a lot of fun for making your own decorations. I would probably attempt to make something for my nieces wedding. LOVED the pro and con table. It was really great!
Thanks. I’m glad you liked the pro/con table…I debated about doing it. I think Smart-Fab would be great for decorating weddings. It’s so easy to work with and unlike fabric, you don’t have hem it.