It’s graduation season and time to make leis! Graduates love money leis, so this fluffy money lei is the perfect graduate gift.

I can’t believe my youngest son is graduating from high school this year! I can’t tell you how many leis I’ve made for my kids and their friends…it’s a lot. Supplies for leis can get costly, so this year, I wanted to make a money lei with inexpensive supplies (not counting the actual money). Lucky for me, Pinterest didn’t let me down and I found the perfect money lei pin for inspiration.
Fluffy Money Lei
The original instructions didn’t really show much on the ‘how to’ part, so I used fake printed money to test out how the lei would look. This is my prototype and the instructions on how to make this fluffy money lei.
How to make a one hundred dollar fluffy money lei.Fluffy Money Lei Supplies
Ribbon colors will vary depending on the school colors, so choose the colors you need.
- 100 – crispy one dollar bills (some banks may require you to put in an order for crispy one dollar bills, so request this early)
- 65″ cut of 7/8″ organza ribbon (base of lei and what everything will be attached onto)
- 3 colors of curling ribbon cut into 12″ pieces (I used 73 blue,74 green, and 72 silver)
- scissors
- ruler
- 25 – 3/8″ beads (optional)
How to Make a Fluffy Money Lei
For those that are visual learners, I made a Fluffy Money Lei video. Scroll down to view.
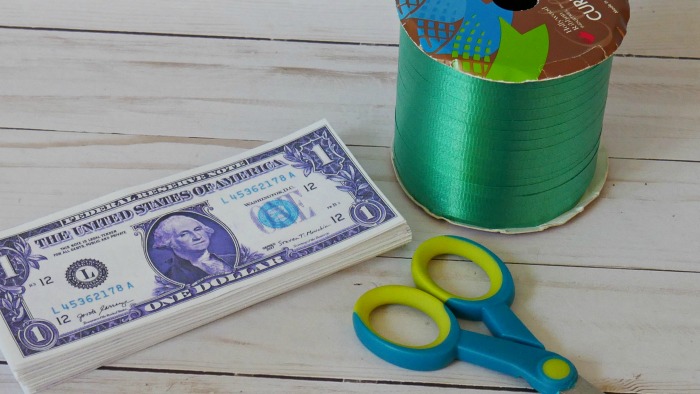
Step 1. The most time consuming part of this lei is the prep work. Before assembly, cut all the ribbon to length. For this lei, I cut the curling ribbon into 12″ length pieces. I used 74 green pieces, 73 blue pieces, and 72 silver pieces.
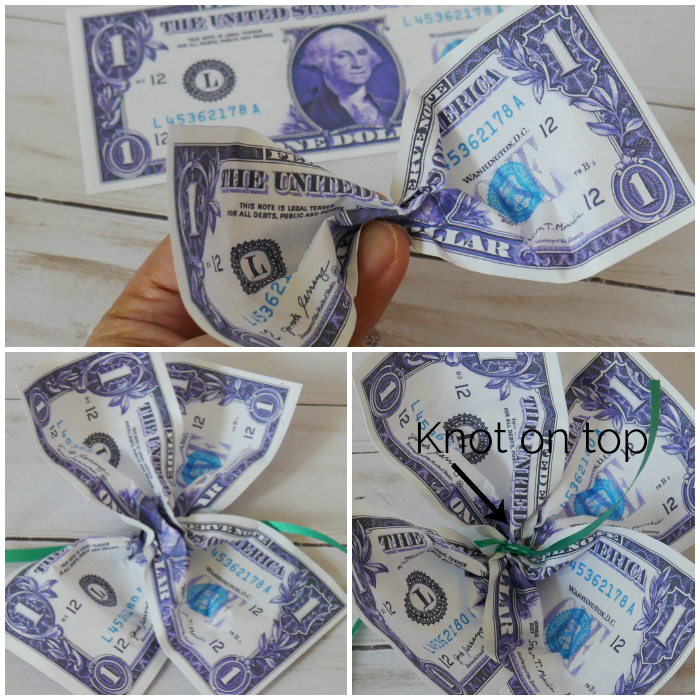
Step 2. Next, put together the money flowers using the green curling ribbon. A total of 4 bills will make one flower – two bills for the bottom petals and 2 bills for the upper petals. To make the lower petals, pinch the bottom of two dollar bills to make a bow shape. Stack the bills together and tie a green ribbon around the center (don’t knot it yet). Twist the bills to make an x-shape and make a tight knot with the ribbon. Not shown in the picture, but also tie a blue ribbon onto the petal. Continue until 25 lower petals are assembled.
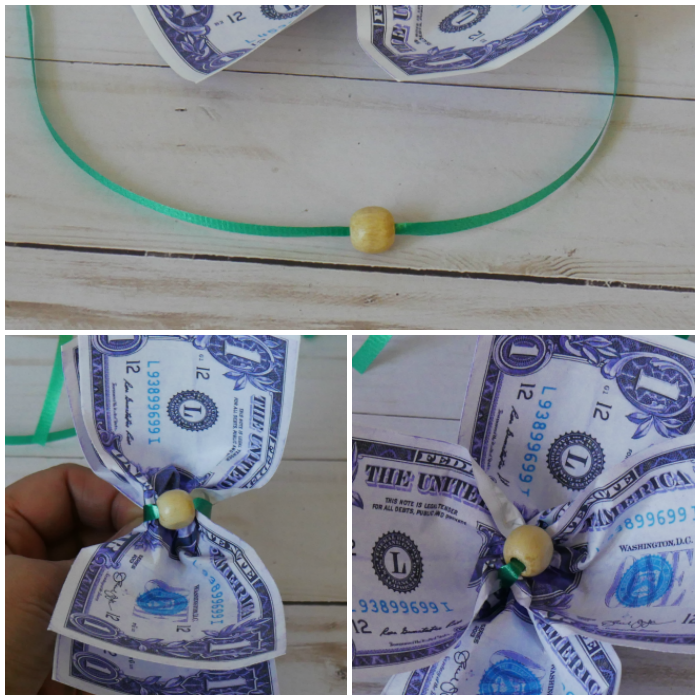
Step 3. To make the upper dollar petals, place a wood bead (optional) onto the green curling ribbon. Repeat the steps above to make the x-shape for the petals, but tie the knot in the back of the petal. Make 25 upper petals.

Step 4. Stack the petals with the bead petal on top of the lower dollar bill petal. Then, using the upper petal green ribbon, tie the upper petal to the lower petal.

Step 5. Make a knot about 12″ from one end of the organza ribbon. Tie one of the money flowers onto the ribbon and slide it up to the knot. Next, tie on three silver curling ribbons, two blue curling ribbons, and one green ribbon. Slide them all up against the the money flower and tie on another money flower. The money flowers will naturally start to lay in a zig-zag pattern to create a full lei. Repeat these steps until all the money flowers are attached to the organza ribbon. To end the lei, tie a knot after the last money flower to prevent everything from sliding around. Trim any excess organza ribbon to length.
Note: Do not tie the curling ribbon knots so tight that you cannot slide them on the organza ribbon. Also, make sure the organza ribbon doesn’t get twisted when adding on the money flowers and ribbons.

When all the money flowers and ribbon are added to the organza ribbon base, it will produce a fluffy money lei!
I hope you enjoyed the tutorial and put your own twist on it. I can see adding candy to the inside of the flowers, between the flowers, using different ribbons, using colored papers, and so much more!

Now, let’s see what the other Pinterest Challenge hosts have created ⇓⇓

More Lei Ideas…
- The Easiest Eyelash Yarn Lei
- Candy Lei with Candy Box
- Easy Accordian Fold Money Flower Candy Lei
- DIY Flower Money Lei via Organized 31
- Money Lei – Maile Lei Style via Organized 31


That is such a cool graduation gift. One of these days, I’m going to make a gift for someone with dollars. I need to make one that reflects the SC Lowcountry.
This is such a great end of the year idea!! Super cute and practical!
Thanks. Yes, hard to beat cash for a graduate gift.
I’ve seen a few of these in graduation photos of the last week or two. Now I know how to make them! I’ll pin it for when my daughter graduates in a few years – since $100 isn’t something I’d give just anyone for graduation. 😉 Though I do like some of the suggested comments about ways to create them using less money.
Thanks for hosting the Pinterest Challenge again this month!
Congratulations to your new graduate! A money lei is an awesome gift!
This is so unique and amusing! Pinning to my wreath board.
Thanks. I guess this technique could be used on a wreath too.
What a fun gift for a graduate. They would love this and it’s a fun and cute way to give money. Congratulations to your son!
Thanks. I grew up giving leis, so it’s a must for any graduation 🙂
What a fabulous gift idea! What graduate doesn’t need a little extra cash? Pinned.
Thanks. Cash is the best gift 🙂
I want one! Such a clever idea for a graduation gift because those young grads do want money! So fun too!
They sure do! It’ll help with the college costs 🙂
This looks like such a fabulous gift!
Sadly we don’t have a note here in the UK that would be suitable, our smallest note is £5 so this would be pretty costly, Maybe one flower could be real money and the rest printed like you’ve done here. You’d just have to make sure the recipient knew which was the real one!!
Actually, I was just thinking of making some $25 dollar ones and using plain colored paper for the lower petals. So it can totally be made with less money if you use colored paper.
this would be such a cute craft to make for any type of party. Love this tutorial you provided for us to read.