This month, I’ve joined the May Upcycle Challenge to transform paper, wood, or cardboard into something new. So of course, this was the perfect challenge to transform a disassembled wooden bead necklace into DIY Wooden Bead Dangle Earrings.

![]() Before I get to the tutorial, let’s meet the other blogging gals who joined this month’s challenge…
Before I get to the tutorial, let’s meet the other blogging gals who joined this month’s challenge…

DIY Wooden Bead Dangle Earrings
The wooden beads used in this tutorial were from a thrift store bead necklace. I originally planned to to make a bead lei, but I hated the way it looked. So, the beads have been sitting in a plastic bag for a little over a year in my craft stash. Thanks to this challenge, I now have new wooden bead dangle earrings for the spring/summer season!

Supplies:
- fishing line
- 2 – flat nose pliers
- scissors
- 2 – 5mm gold round beads
- 2 – 3/8″ wooden beads
- 2 – gold crimp covers
- 4 – 25mm gold tubes
- 2 – gold fish hook earrings
Directions:
View the video tutorial at the end of these directions.


In this order, string a gold tube, gold bead, wooden bead, gold bead, and tube onto the fishing line.
Note: I tried using stretch bead cord, but it was too large for the crimp bead hole. Fishing line works best for this tutorial.
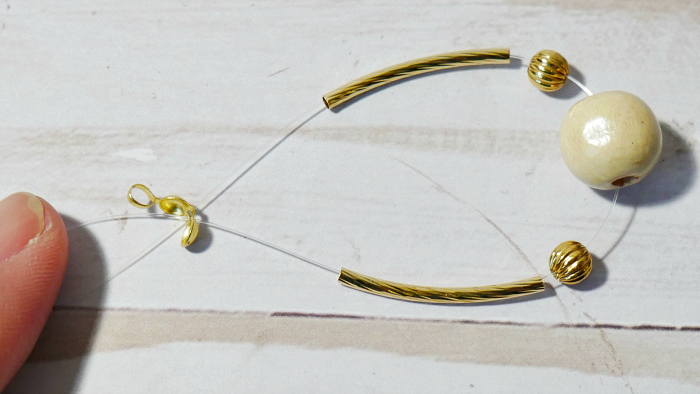
Cut the fishing line, leaving at least 2″ of extra line on each side. Slide both ends of the fishing line through the bottom of the crimp bead cover. Adjust the 5mm gold round beads to sit right next to the wooden bead hole. Then, take the ends of the fishing line and tie a simple knot, making sure the crimp bead cover is flush to the ends of the tubes.

To make sure the knot doesn’t come loose, tie another knot by looping one end several times through the knot hole before tightening.

Cut any excess fishing line as close to the knot as possible. Gently close the crimp bead cover to hide the knot.
Before adding this to the fish hook earrings, you’ll need to twist the eyes of the fish hook earrings to face forward. I forgot to take photos of this part, so watch the video to see how it’s done. Once this is done, add the earring bottoms to the fish hook earrings. Repeat all the steps to complete the second earring.

I love the way these DIY Wooden Bead Dangle Earrings came out. In less than 10 minutes, I have a new pair of spring/summer earrings!
DIY Wooden Bead Dangle Earrings Video Instructions
Before you leave, make sure to check out some of the other upcycle ideas.


I am in love with these earrings. These look so expensive. I am going to try my hand at these. Thanks for the tutorial.
They are so pretty and classy.
I always keep the beads from old necklaces and intend to make them into something new. It happens occasionally but you’ve reminded me how quick and easy it is!
Thank you. I use to always donate old jewelry, but I think it’s probably better to try upcycle now since it is so easy!
They feel so beachy. Or is that me? I think you did a fabulous job lady. Posted to my Jewelry Bohemian board and tweeted using your tweet widget thingy. I need the tweeter. And the earrings. LOL
Yay, I was kind of going for a tropical theme, so I’m glad that these gave off that feeling Thanks for tweeting. BTW – I use social pug for tweets.
These are so pretty! They will go with so many outfits for the summer. Thrift store finds are the best.
How pretty and what a great way to use the beads from the necklace. I love your detailed tutorial in the video.
Thanks. It’s my first jewelry video.
What a resourceful way to recycle an old necklace, Erlene! And the earrings look fabulous, too!
Thanks Gail. I have a ton of beads left, so hopefully I can find other things to make.
Your earrings are so pretty! I love the beads you chose. -Marci @ Stone Cottage Adventures
Thank you. I want to make more with different types of beads too.