This post is sponsored by Oriental Trading. All opinions are my own.
Summer ends in less than a month, but who says you can’t have a summer vibe all year? Not me, I’m all for a year long summer look and I’m transforming my dining area with tropical chair covers!

Before I get to the tropical chair covers tutorial, make sure you check out my Faux Haku Lei tutorial. Okay, so I know you may think tropical chair covers don’t really fit into the upcoming fall season, right? And if you’re a tropical decor lover, it can be a challenge to decorate for the fall and winter season when your home has summer vibes. Well, I’m going to show you that these tropical chair covers not only look great during the summer, but can work all year long. Just check back in mid September to see how I incorporate these tropical chair covers in my Halloween display!
How to make DIY Tropical Chair Covers

Tropical Chair Covers
How to make tropical chair covers with burlap, raffia, and stencils.
Materials
- 1 - burlap fabric bolt #13724180
- 1 - natural raffia fringe decoration #34/296
- 1 - Martha Stewart Global Stencil
- 1- white acrylic paint
- 1 - stencil brush
- tan thread
- fabric marker or felt tip pen
- cardboard
Tools
- sewing machine
- hot glue gun/glue sticks
- ruler
- scissors
- painter's tape
- optional - pins
Instructions
 Measure the back width and length of chair backs. Add 1" to the width measurement. Use the folded edge of the fabric as 'top' edge of the seat cover. I measured and cut my covers to measure 20" x 20".
 Place cardboard between the fabric. Place tape along the top of the fabric as a guide for the stencil. Optional - add tape below the stencil template to prevent paint from getting onto fabric. Stencil on the pattern using an up and down motion with a semi-dry brush. Do not use too much paint or a brushing motion as the paint will seep under the stencil. It's best to build up the paint in layers if needed. If you have never used a stencil, practice on a scrap piece of fabric first.
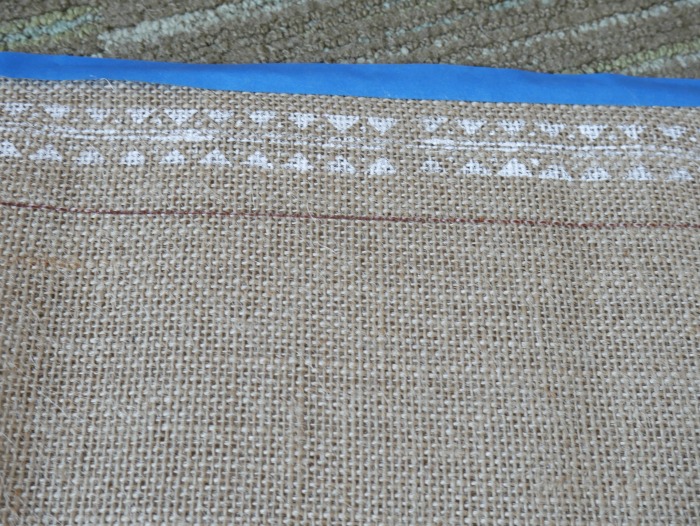 Determine how far to place the raffia trim below the stencil print. Use a ruler and pen to make a line under the stencil print. I measured about 1" below the painted on stencil pattern. Add hot glue to the line and press on the raffia trim. Let dry.
 Remove the cardboard. Flip the right sides of the chair covers to face together. Starting from the bottom sides of the chair covers, sew the sides together using a 1/4" seam and zigzag pattern towards the top. Make sure to keep the raffia away from the seam when sewing. Optional - pins side seams together before sewing if needed.
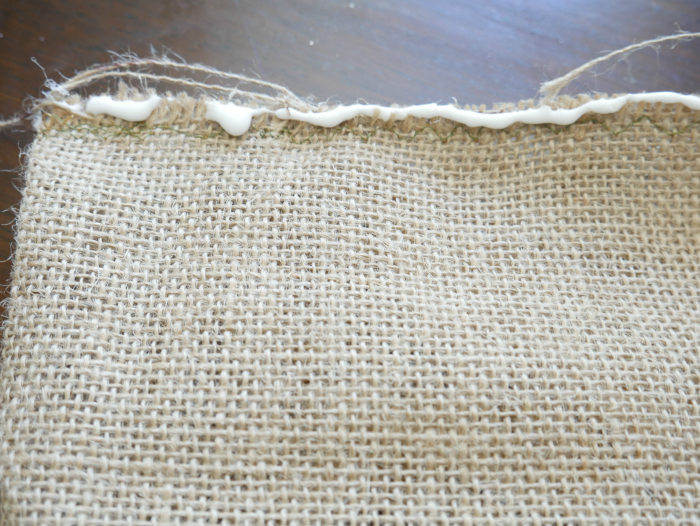 Add glue to all the raw edges of fabric, including the edges of the open end to prevent fraying. Smooth out with your fingers and let dry. Make sure the open end edges don't get glued shut. Once dried, trim off any loose fibers.
  Flip over the chair covers and it's ready to dress your chairs!
Notes
- Supplies from Oriental Trade have the item/product number listed for ordering.
- Create one chair cover and test to make sure it fits before cutting more covers.
- Note these are not machine washable and should only be spot cleaned.


love this idea – the perfect way to add a tiki vibe to your own backyard!
I love this idea!! I can totally see doing this for a party at my house. How fun! My daughter would be all over it too. I saw your post at the Create Bake Make party:) pinning:)
Hi Kathleen, Thanks for stopping by. I’m so happy that you like them 🙂 Definitely fun for a themed or summer party.
What a great idea and tutorial Erlene. These would look great with my Palms, Parrots & Paradise tropical table. Pinning for next year!
Thanks Debbee. I love your tablescape and these would totally work with your theme.