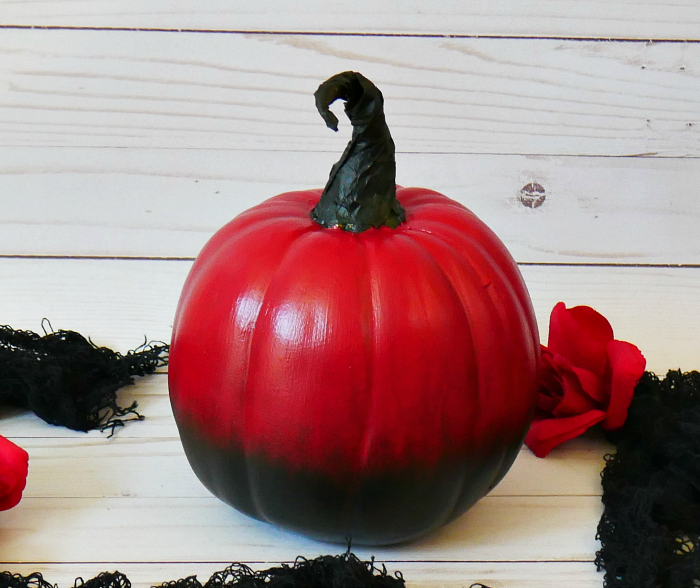
Today, I’m sharing how to make a red ombre pumpkin to finish off my 3-part pumpkin series!
This red ombre pumpkin is the medium sized pumpkin in the series and you’re probably wonder why I posted the tutorials out of order, right? I shared the smallest, DIY Glam Glitter Pumpkin, first and the largest, DIY Black Rose Pumpkin, second. Well, it’s because this medium-sized pumpkin was the hardest! It was a pain in my patootie to get the right look! However, since I made all the mistakes, it should be a breeze for you 🙂
[click_to_tweet tweet=”Make your own designer look pumpkin with this Red Ombre Pumpkin tutorial. #halloween #pumpkincraft” quote=”Get a designer pumpkin look with this Red Ombre Pumpkin tutorial. “]
DIY Red Ombre Pumpkin
Supplies:
- cream or black craft pumpkin (I used a 6.5″ cream pumpkin that I painted all black)
- black chalkboard paint
- cardinal red Folk Art acrylic paint #2990
- 3/4″ paint brush
- 2″ thin sponge brush
Optional for stem~
- paper bag or butcher paper
- pipe cleaner
- hot glue gun/glue sticks
- scissors
How to Make a DIY Red Ombre Pumpkin

Step 1. Paint the pumpkin black with chalkboard paint. I used a 6.5″ craft pumpkin from Micheals craft store and painted the entire pumpkin with a coat of black chalkboard paint. Optional – I also attached a faux paper stem. Go here to see how it’s done –>>HERE.
Note: If using a black pumpkin you can skip painting the pumpkin with black chalkboard paint.

Step 2. With a flat wide paint brush, add red paint to the upper 3/4 of the pumpkin. Let dry. Repeat this process two to three times until you get the red coverage you like. FYI – make sure the paint is completely dry between coats or you risk lifting off the previous coat.
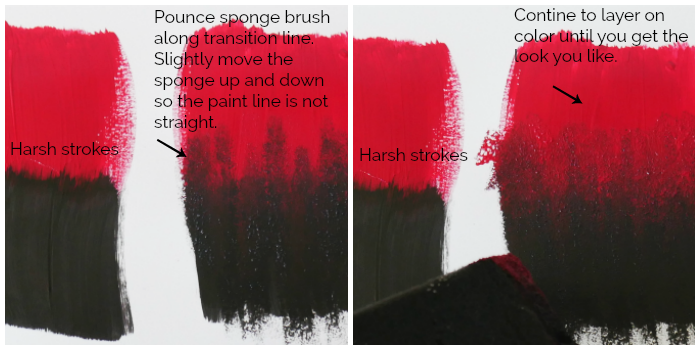
Note: This is where my problem with the look of the pumpkin began. I hated the harsh brush strokes between the red and black paint.
How to Get the Ombre Look

I forgot to take pictures the next steps, so I’m showing the steps on a piece of paper. It’s the same process and will result in a soft color transition.

Step 3. To soften or blur the transition between the red and black paint, switch to a foam sponge brush. At the tip of the foam brush, break off very tiny bits to create a jagged tip. This will further help to disguise straight lines.
Step 4. On a paper or palette, add red and black paint right next to each other (see picture). Dip the sponge brush into the paint so that half the sponge is red and half is black.

Step 5. Dab/pounce onto the pumpkin in the transition area. DO NOT brush on. Continue to dab the paint around the entire pumpkin. Let dry.
Note: If the colors are getting muddy, stop and let the paint completely dry. Once dry, layer on more paint until you get the look you desire.
Paint the Stem

Step 6. Paint the paper stem black.

Here are the 3 designer pumpkins all completed! I hope you enjoyed this 3-part pumpkin series as much as I did!


LOVE!! You are killin it this year with Halloween! Love the look of this pumpkin. Sharing #MM
Kim
Thanks Kim! This is such a compliment coming from someone I consider the Halloween queen!