• About Me
    • Contact me
    • Featured On
  • Advertise/Sponsor
  • Disclosure & Privacy Policy
    • Summer Giveaway Terms & Conditions

My Pinterventures

Daily Adventures Inspired by Pinterest

  • My Pinterventures
  • Blog
    • 100+ Link Parties
  • Food
    • Recipes
    • Kitchen Tips
    • Recipe Round-ups
  • Crafts/Projects
    • Spring – March to May
    • Summer Crafts – June to August
    • Fall Crafts – September to November
    • Winter Crafts – December to February
    • Pinterest Tested
  • Life & Home
    • Cleaning & Organization
    • Health & Wellness
    • Family Fun
    • Product Reviews
  • Shop
    • Gift Guides

DIY Halloween Glam Glitter Pumpkin
You are here: Home / Blog / DIY Halloween Glam Glitter Pumpkin – 1 of 3

DIY Halloween Glam Glitter Pumpkin – 1 of 3

  • Share
  • Tweet

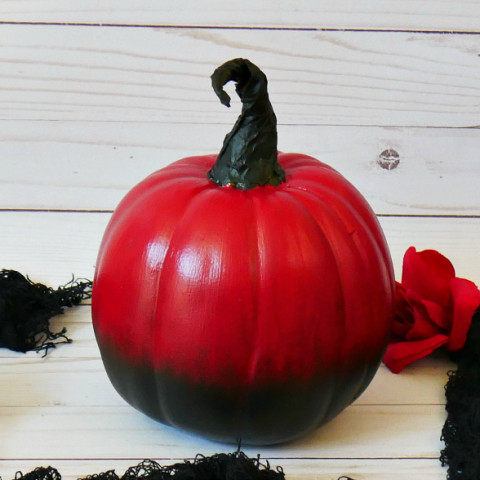
Get ready for a 3-part pumpkin glam series! Today, is the first pumpkin tutorial…DIY Halloween Glam Glitter Pumpkin using a foam dollar store pumpkin!

DIY Halloween Glam Glitter Pumpkin

The inspiration for this 3-part pumpkin glam series is the Grandin Road glam designer pumpkins. These 3 pumpkins are gorgeous and I’m going to attempt to make all three! The Grandin Road pumpkins range in cost from $24 to $59, but since I’m doing Halloween on a budget, I’m sharing my version of the DIY Halloween Glam Glitter Pumpkin – pumpkin #1.

Transform a plain dollar store foam pumpkin into a black glitter glam pumpkinClick to Tweet

DIY Halloween Glam Glitter Pumpkin

Supplies:

  • small Dollar Store foam pumpkin
  • black chalk paint
  • paint brush
  • gold metallic acrylic paint
  • craft glue
  • Mod Podge
  • gold holographic glitter – a must for optimal sparkle!

Optional Supplies:

  • gold holographic sequins – found at Michaels in a 3-pack
  • gold beads
  • brown paper bag or butcher paper – for pumpkin stem
  • hot glue gun/glue sticks  – only needed if using brown paper bag/butcher paper
  • white acrylic paint

Directions:

Dollar store foam pumpkins

Paint the entire foam pumpkin with black chalk paint. Let dry. Repeat with another coat if necessary. Let dry.

Adding glitter to the glam glitter pumkin

Add Mod Podge around the top of the pumpkin in a scallop design around the stem. Do this in sections. While the Mod Podge is wet, sprinkle on the gold glitter. Let dry.

Holographic glitter on black pumpkin

  • Paint the stem a metallic gold. Let dry.

Stop here or continue and add sequins, beads, and a new pumpkin stem. 

For more dimension, I added gold holographic sequins in two sizes and gold beads.

Closeup of the holographic glitter and beads

Using craft glue, randomly add gold sequins and beads on top of the glitter. Let dry.

Update 9/12/2018 – I added large Swarovski crystals from my craft stash for an even more dramatic effect. You can see it —>>> HERE.

Paper pumpkin stem

  • Cut a square piece of the paper bag about 5″ x 5″ in size and crumple it up.
  • Fold the pipe cleaner in half and place in the middle of crumpled paper (see image).
  • Twist paper around the pipe cleaner and cut off any excess pipe cleaner that sticks out at the tip.
  • Cut off the bottom of the ‘stem’ to fit the pumpkin size.

Paper pumpkin stem

  • Use hot glue and attach the paper stem to the pumpkin stem. Press, twist, and shape the stem.
  • Add hot glue to any areas that may need help keeping twisted.
  • Not shown – Paint the paper stem white. Let dry and paint with several coats of gold metallic paint. Let dry between coats.

DIY Halloween Glam Glitter Pumpkin

I just LOVE this DIY Halloween Glam Glitter Pumpkin! These pictures just can’t do this pretty pumpkin justice….it’s so sparkly, shiny, and soooo mesmerizing!

Continue to Content

More Halloween Ideas...

DIY Red Ombre Pumpkin - 3 of 3

DIY Black Rose Pumpkin - 2 of 3

21 Clever Ways to Decorate Faux Pumpkins

Fall Pumpkin Desserts - MM #227


Digiprove sealCopyright secured by Digiprove © 2018
«
»

Blog, Crafts, Decorating, Halloween Ideas, House & Home, Tutorial 3

Get Connected

Subscribe to my newsletter! Get the latest updates and access to the subscriber only printable library.

Comments

  1. Habiba says

    September 10, 2018 at 6:19 AM

    Love, love. love this one. Already pinned it last week. Need to check out the third pumpkin DIY you’ve made, too.

    Reply
  2. Jenny says

    September 10, 2018 at 3:43 AM

    This pumpkin looks great! You can’t even tell its that ugly foam pumpkin from the dollar store. I want to go buy a box of those foam pumpkins and go crazy. My kids would love adding glitter to pumpkins. Your pumpkin series is great! #BringontheCrafts

    Reply

Trackbacks

  1. 30 Awesome DIY Pumpkin Decorating Ideas For This Fall - Home Styling By Maya says:
    October 6, 2020 at 9:36 AM

    […] CLICK HERE for the step-by-step DIY guide! […]

    Reply

Leave a Reply Cancel reply

Your email address will not be published. Required fields are marked *

CommentLuv badgeShow more posts

This site uses Akismet to reduce spam. Learn how your comment data is processed.

  • Bloglovin
  • Facebook
  • Instagram
  • Pinterest
  • Twitter
  • YouTube

Get connected

Subscribe to my newsletter! Get the latest updates and access to the subscriber only printable library.

My Pinterventures does not share your information and will only use your name and email to send you My Pinterventures emails.

Recent Posts

Free Printable St. Patrick's day Game Set

FREE Printable St. Patrick’s Day Game Set

Quick and Easy Meatloaf Recipe slices

Quick & Easy Meatloaf Recipe

Hotteok Recipe - Stuffed Sweet Korean Pancakes

Hotteok Recipe – Stuffed Sweet Korean Pancakes

Spring tulle rainbow wreath

How to Make a Spring Tulle Rainbow Wreath

My Favorite Things 2020 Edition

Valentine's Day Games Printables slider

Valentine’s Day Games – 3 Free Printables

Archives

Copyright & Affiliate Information

All images and text on this site are the property of My Pinterventures. I’m honored to have you feature ONE of my images, provided that you link back and give credit to the original post and my site. Please do not crop, edit, or remove any watermarks on my images. Do not copy any post or recipe in its entirety. Pinning to Pinterest is always welcome and much appreciated.

As an Amazon Associate, I earn from qualifying purchases made through this site. Thank you!

Copyright © 2021 · Darling theme by Restored 316

Copyright © 2021 · Darling Theme on Genesis Framework · WordPress · Log in

All original content on these pages is fingerprinted and certified by Digiprove
This site uses cookies to enhance your user experience. By continuing to visit this site, you agree to our use of cookies. Find out more.