Last week, I started our fairy garden in a pot with the kids and gave a little sneak peek with my Soda Bottle Fairy Garden House post. Today, we finally finished it! We had a few empty spots in our fairy garden that needed to filled and decided to make a Recycled Water Bottle Fairy Garden Well.

While the base of the well is a recycled water bottle, we did take a trip to Michaels craft store and picked up a bag of small pails ($1.99), some blue glass stones ($2.99), and a few other tiny knick-knacks to complete the entire fairy garden.
Water Bottle Fairy Garden Well
Supplies:
- Empty water bottle
- Scissors
- Glue gun/glue
- Small stones
- Twigs
- Twine
- Small pail
- Blue glass stones
Water Bottle Fairy Garden Well Base Directions: 
Cut about 1 1/2″ off the bottom of the water bottle – this will be the base of the Water Bottle Fairy Garden Well.

Using the low temperature on your glue gun, begin to glue a line of stones around the bottom of the water bottle. Keep gluing stones on until you reach the cut edge. If there are empty spots, go back and glue tiny stones into those spaces.

Cut two straight twigs approximately 6 inches – these will be the posts for the well roof. Place a large amount of glue inside of the bottom of the water bottle to hold the two twigs in place and where the twigs touch the sides of the well. Try to get the twigs as straight as possible and evenly spaced out. Hold the twigs in place until the glue starts to harden. Let the glue completely dry.
While the glue is drying, cut another piece of twig approximately 3 inches long and glue across the top of the roof posts – it will have some overhang. Cut two more pieces that are approximately 2 1/4 inches long. Glue these twigs about and inch from the top of each post. Tie twine around the contact points to cover the glue spots.
Pull apart and separate the twine to get one thin piece that is about 8-9 inches long. Tie one end of this piece to the lower side of one of the posts and wrap it around. Take the other side of the twine and wrap it around the center of the top twig. This will hold the water pail for the well.
Roof Directions:
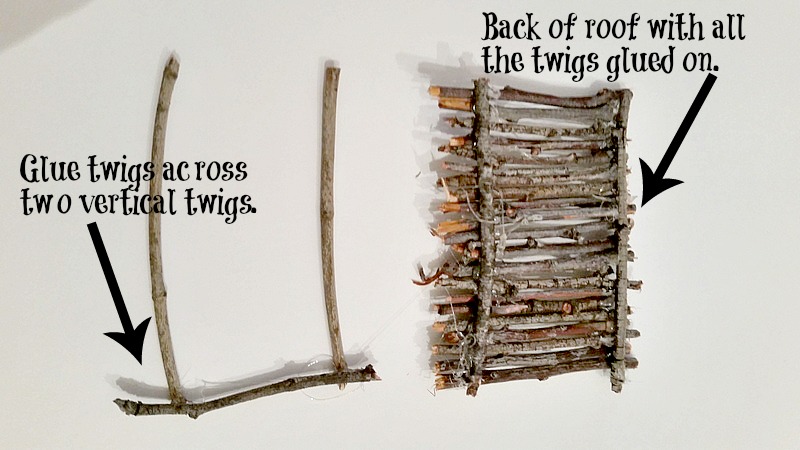
Cut 4 twigs 2 3/4 inches long for the roof supports. Cut as many 2 1/4 inch twigs as needed to fill the length of the roof. Next, place two of the roof support twigs 1 1/2 inches apart and start to glue the 2 1/4 inch roof twigs across them. Repeat this for the second half of the roof. *This will get messy, but you can clean off any excess glue strings by pulling them off the twigs.*

Attach the two pieces of the roof to the horizontal supports with glue. Run a line of glue down the top of one roof piece and attach the two roof pieces together. *The roof will not be touching the top horizontal twig.*

Almost done! Tie on a pail to the end of the twine attached to the top of the well. Next, to simulate water, place blue glass into the water bottle and one upside down inside of the pail.
It’s time to place the well in the fairy garden pot….

See that empty spot and the red-flowered plant? We ended up digging out that plant, which ended up working out great because we used that added space to place the recycled water bottle fairy garden well and our new fairy. Isn’t she cute? Well, that’s not all we added…
 On our trip to our Michaels craft store, we also found some Martha Stewart glitter stickers on clearance and added it to the outside of the fairy house. We also added a cute miniature seed box on top of a pasta bottle cap table that has a wine cork base. Lastly, we added some miniature garden tools and mushrooms to complete the look of our fairy garden pot.

What things will you recycle to make your fairy garden with?


I love love love doing fairy gardens so this is inspired me in a whole new direction of the recycling part I enjoyed your post very much it’s a very cute idea and I just left it and I look forward to seeing more of your inspirations, thank you June
I love how you incorporated the bottles! I’m always a fan of incorporating recycled materials into my projects! Thanks for linking up with the Creative Spark!
This is super cute! I’ll be featuring your fun project at Savoring Saturdays when the party goes live at 7pm on Friday. Thanks so much for linking up with us!
Very cute and whimsical idea! Thanks for sharing at the NEW #PinFest
Thanks for stopping by Chelsea and for the fun party. Sorry for such a late reply, ‘m so far behind.
Erlene, What a fun and creative DIY! Thanks for sharing at #theWeekendSocial. I look forward to seeing the rest of the fairy town as you build it! See you Thursday? theKitchenChopper.com Pinning!
I love this too! So cuuuuute!!!
Thanks again for linking these cute fairy posts to the Teach Me Tuesday Linky Party!
This is so cute! Pinned. I’m always impressed with your creations. Please join us tonight at 7 pm. I can’t wait to see what you have been working on!
Happy Monday! Lou Lou Girls
This is so cute and I shared it on my Three Dawg Lady Designs Facebbok page!
Thanks so much for sharing and for taking the time to visit my blog.
Aww love this idea 🙂 so magical too..
Thanks for linking up to the weekend blog hop 🙂
Thanks. We’re planning on making another one and making a fairy garden pot village.
So cute!! I love this water well for the fairy! How ingenious!!
Thanks. Our fairy is planing a garden, so we figured she needed a well for some water 🙂 We’re planning on making a fairy bakery next. Thanks for coming over.
G’day! Thanks for stopping by our #SayGdayParty! How cute!
Please remember to stop by and comment on other people’s submissions too and of course, hope you are following Natasha and me on Pinterest!
Comments and shares show you care!
Cheers! Joanne @ What’s On The List
Thanks for stopping by Joanne. I already visited, commented, and pinned some of the link ups. Thanks for stopping by.