Want a fun weekend project? Today, I’m going to show you how to make a wire heart ring in under 20-minutes!

I don’t wear a lot of jewelry, but I love rings. There’s just something about looking down at your fingers and seeing something pretty that just makes me smile.
While perusing Pinterest, I came across a plethora of wired rings and fell in love with pretty much everything. However, since Valentine’s Day is coming up, I decided to try to make a ring with a heart theme.
I tried making several Valentine’s Day themed rings and finally settled on a double heart ring. I like this simple design because the ring is finished by wrapping the ends of the wire around the shank, which helps to make the ring sturdier.
Wire Heart Ring
Supplies:
- 18 gauge wire
- flat nose pliers
- round nose pliers
- wire cutter
- ring mandrel (large pen or lipstick tube)
- ruler
How to Make a Ring Out of Wire

Wire Heart Ring Tutorial
How to make a wire heart ring - wirework ring.
Materials
- 18 gauge wire
Tools
- flat nose pliers
- round nose pliers
- wire cutter
- ring mandrel (large pen or lipstick tube)
- ruler
Instructions
 Cut approximately 7 inches of wire. Hold the round nose plier about 1 1/2″ down from one end and curl the wire around the nose of the pliers – I just use my fingers to cross the wires around the nose.
  You should end up with a shape that looks like the picture above for the center of the heart. Tip: The round nose plier is tapered and you will want to wrap the wire around the top portion of the nose.
  Place the round pliers on the sides of the loop and pull the wire around the pliers. Again, use the smaller portion of the nose to make the small hearts.
  Cross the wires until you get the shape of a heart.
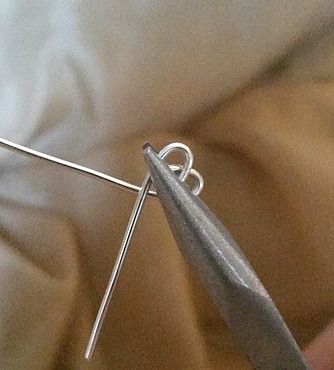 Change to the flat nose pliers and hold the heart near the pointed end.
 Take your round nose or another flat nose plier and wrap tightly around the straight wire 3 to 4 times. Use the wire cutter to cut off any excess wire and use your flat nose pliers to flatten any sharp edges.
  Wrap the wire around the mandrel to get the right size. You can also use any round object that is the same size as your finger (lipstick tube, pen, etc…).
 Start your second heart center at the end of where the first heart ends – at the last wrapped wire. Repeat the steps to make the heart.
  Place ring back on mandrel to reshape. Tadah! A simple looped wire heart ring!


Such a pretty ring. Thank you for sharing.
I love this ring. It would make a great gift. You make it look pretty easy to make. I may have to make a run to Michael’s craft store for supplies : ) Thanks for the pics.
You make this looks so easy! I’d love you to share your diy at my weekly party if you’d like to stop by.
This is such a super cute ring! I love it! I’m so glad you showed me how to make my own. 🙂 Thanks for stopping by and linking up at Totally Terrific Tuesday!
Hi Erlene, I found this post on Home Matters Party, how cute they are, and such a nice job. I have made a few rings with wire myself, they are fun! Great inspiration!!
Have a great weekend, Karren
I’m with you I love rings, before I had my children I decorated almost every finger. I love this great job, followed you here from The Weekend Social.
I think you already know this 🙂 But here’s your “official” notification that your lovely ring has been featured over at the #HomeMattersParty this week! Thank you for the awesome submission! We hope to see you again next week 🙂
Very cute, Im featuring this on my Valentines gift round up. The post will go live sometime tonight.
~Allie
I haven’t made jewelry in a long time, I need to get back in the game!
This is a nice and simple project! 🙂
Thanks for sharing at Talented Tuesday Link Party!
This is such a great tutorial for a super cute ring! Thanks for sharing it with us at the #HomeMattersParty this week. We hope you will link up again next Friday.
~Bonnie
I’m really starting to get into making my own jewellery and this ring is too gorgeous for me not to make! Thanks for providing such an easy-to-follow tutorial 🙂
Let me know if you make one. I’d love to see it 🙂
This is so pretty and your instructions are so easy to follow as well.
Thanks Stella. I’m glad you find it easy to follow. I tried my best to make sure I took a lot of pictures.
Oh, how easy! I love this, it’s super cute. It would make a fun Valentine’s Day gift. Thanks for sharing at Oh My Heartsie Girls WW. 🙂
~Lorelai
Life With Lorelai
Thanks for hosting the party and allowing me to share.
Looks great Erlene 🙂 I always wanted to try wire jewelry but haven’t started yet.This posts makes me to do so. 🙂
You’re so talented. I’m sure this would be a breeze for you to make.
So cute!
Thank you 🙂
You make it look so easy! I’m guessing I would go through many attempts before I would come close to making a ring as pretty as this. I do want to try it though!
It’s not very difficult. It took me only two tries to get it exactly how I liked it.
I really adore these heart rings, they would be the perfect craft for my teenage daughter and I!
By the way, that turquoise ring in the middle is gorgeous! I have a bit of a thing for southwestern inspired jewelry 🙂
Thanks Renee. My girls love these dainty rings. I made the turquoise ring for fun 🙂
This is adorable! I love the look of it, great idea.
Thanks Emily. I love the dainty look of this ring too.
Wow! This is a great craft! I am pinning this for later. This would be a great gift to make!
I think this is such a cute gift and something that people will be surprised that you made.