“This shop is part of a social shopper marketing insight campaign with Pollinate Media Group® and Sharpie, but all my opinions are my own. #pmedia #EverydaySharpie http://my-disclosur.es/OBsstV"
While top to bottom house cleaning usually marks the start of Spring season, organizing seems to signal the Fall season at our house. Since the kids are back in school and out of my hair, I decided to take the opportunity to get serious about organizing my blogging schedule. Honestly, I haven’t used a planner to organize myself for quite some time, but with the holiday season coming up and so many ideas floating around in my head, getting control of my blogging chaos was a must.

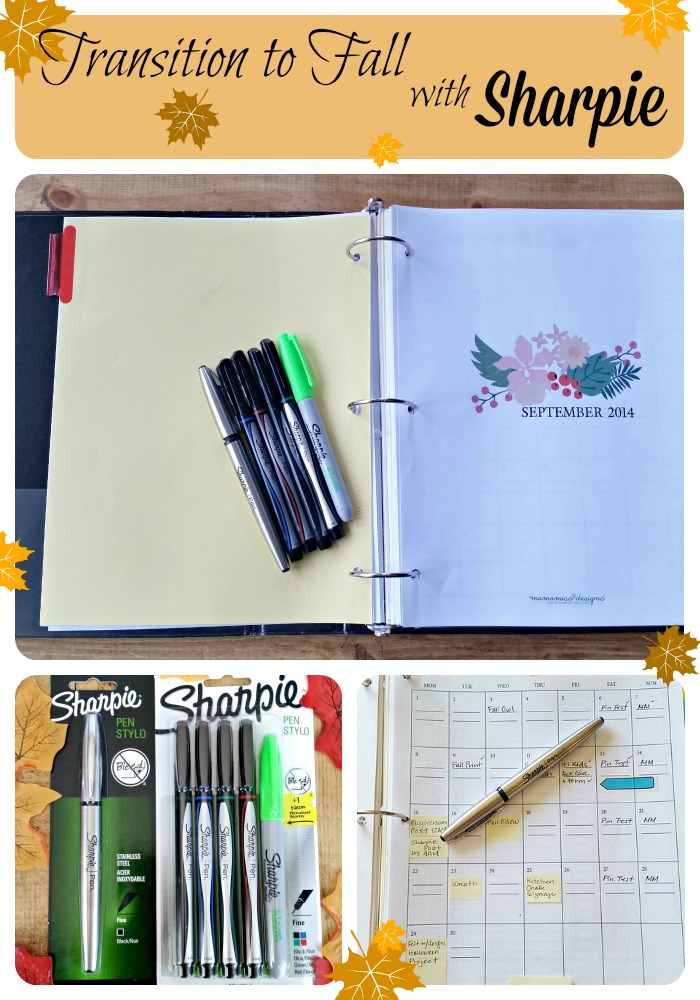
Supplies to set up a planner:
- Dividers
- Sharpie Stainless Steel Pen
- Sharpie Pens Assortment
- 1 1/2″ binder
- Your chosen printed blogging schedule (print out your own or buy one)
- sticky notes (optional) & tabs
I’m ashamed to admit, but my original binder was a mish-mash of different printables from various sources and looked like this…

I know. AWFUL! I had different printables from around the web and had always just grabbed whatever pen or pencil was closet to jot things down. Unfortunately, this led to a very messy and disorganized planner.
I had most of the supplies to get started on hand, but I needed new pens. Something that would provide smooth and bold lines, while having permanent ink. Why was permanent ink so important? Well, I drink a lot of ice water while blogging and sometimes drops of water end up on my planner pages. As you can see from my messy planner, the ink on some of my old pens bled and ran all over, making it impossible to see what was written. Not good.

To get started, I headed down to Walgreens to pick up some pens that would be used exclusively for my blog planner. Now, I already LOVE Sharpie markers and paint pens. I use them regularly in my crafting creations, but have never really used Sharpies for writing. So it was exciting to find a stylish Sharpie Stainless Steel Pen and Sharpie Assortment color pen pack to help me get my planner in order. Both styles of pen are permanent, won’t bleed through your paper, and provide nice clean lines. Oh, not to mention, the Sharpie Stainless Steel pen has a soft grip for added writing comfort and is refillable!

Now, everyone has their own preference on the layout of their blog planner, so I won’t tell you how to organize yours…I’ll leave that up to you. I will, however, share a few ways that I used my new pens to help organize mine and maybe it will spark some ideas on how to organize your planner.
After setting up my planner, one of the first things I did was to write all permanent weekly blog post onto the monthly calendar in black. For example, my weekly link party and weekend Pinterest reviews. Next, I wrote planned blog posts and ideas onto sticky notes and placed them on the dates that I planned to post on. Writing on sticky notes gives me the freedom to change things around without making a mess on the planner.
It’s not shown, but I also used the red Sharpie pen to write post deadlines in my planner too. This is especially useful when you are working with brands or affiliates that have strict guidelines on post dates.

To help me keep track of social media sharing, I wrote each post in black and used red to check off completed social sharing tasks. Using colored pens to check daily items off allows me to easily see what is completed at a quick glance.
Since Pinterest is one of my largest blog traffic drivers, I feel it’s really important to keep track of post “pinning”. For Pinterest sharing, I again wrote all the posts in black and used the colored pens to code each type of post. I used a green star for food posts, blue for crafts, and red for giveaways. Marking each post with colored stars helps me to quickly determine which Pinterest group boards to share them on – food, crafts, or giveaway boards.
After each post is coded, I wrote down the all the appropriate boards to share my post on. Once this is completed, I’ll periodically share the post on Pinterest throughout the week and make a note of the date it was shared.

I continued filling in all my planner pages and in no time at all, my messy and disorganized blog planner had transformed into a beautiful and organized planner. What a relief to be able to clearly see what I have planned. Now I’m prepared for the fall blogging season and it feels so good! Whoo-hoo!

And guess what? My daughter saw me using these pens and asked to borrow them for her homework too. Here she is using it for her English homework. Of course, I made sure she gave them back 🙂
Thanks Sharpie for helping me organize my blog planner and take a look at a fall leaf book page wall art that I used my new black Sharpie pen on too. Do you use colored pens to organize your daily planner or blog binder? How do you use them?


I much prefer to use Sharpies I really dislike when my pens run! I am looking forward to ordering my next blog planner…hard to believe it’s about time for another one!
If only I knew I’d remember to put them away where the kids won’t get them!
I don’t know why, but when I start thinking about being more organized with my blog, I freak out. Where do I start? What do I really need to work on?
This post was a good butt-kicker. Thanks for showing us the way you do it! I guess I just need to breathe and do it now. 🙂
I love how organized your blog planner looks! The sharpie pens are a wonderful idea. Thanks for sharing. 🙂
You must have read my mind! I was just thinking how I need to get more organized with my blogging planner. I have one, it’s just a mess. Thanks for the helpful tips! I heart sharpies! 🙂
I always get the back to school bug to get organized! I’ve been using different blog planners, trying to find the best fit…I need to find a better way to track social media activity consistently too. Thanks for sharing!