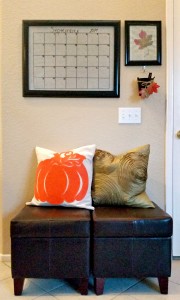
Last week, I gave a sneak peek of an area right inside our front door that needed some fall updating. It’s a place where we sit and put shoes on, leave notes, and keep track of activities. So far, I’ve added a Fall Leaf Book Page Wall Art and made an Easy Fall Pillow. The area is headed in the right direction, but the poor gray calendar needed some attention – it needed a Fall Mini Bunting.
Supplies:
- yellowish cardstock or book pages
- thin cardboard (I used an old cereal box)
- pen or pencil
- painter’s cloth
- mini clothes pins
- tacky craft glue
- small angled brush
- letter stencils (I used Martha Stewart Craft Glass Adhesive Stencils, Typewriter Alphabet)
- paint in your fall color choice (I used Folk Art Multi-Surface 2943 Autumn Leaves satin acrylic paint)
If you don’t have book pages to use, print out your own on some off white or yellowish cardstock. Set this aside.
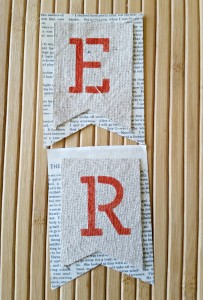
Take thin cardboard and draw a template in the shape and size you would like to use for your bunting. For my bunting, I made a large swallowtail shape that measured 2″ x 2 7/8″ and a smaller version that was 1 3/4″ x 2 1/4″. Use the larger template to trace and cut out enough swallowtails needed from the book page paper and the smaller one for the painter’s cloth. The number of cut outs will depend on the word(s) you want on your bunting. For example, if you only plan on having the word “fall” on your bunting, cut out four large and four small shapes. Since I plan on using the bunting on my calendar for the next three months, I cut out 13 large and 13 small shapes for the letters used in each month.
Place your letter stencils on the painter’s cloth. Take a small angled brush and pounce on the paint – try not to load too much paint on your brush or it will seep under the stencil. Letters I made – 1 “S”, 3 “E”, 1 “P”, 1 “T”, 1 “M”, 1 “B”, 1 “R”, 2 “O”, 1 “C”, and 1 “D”. With these letters, I’ll be able to spell out SEPTEMBER, OCTOBER, and DECEMBER.
Glue the painter’s cloth letters onto the book page shapes. We’re almost there!
For permanent lettering, hot glue the letters to the twine. If you want to be able to change out the letters, use mini clothes pins to clip them onto twine.
You’re done! Now all you need to do is hang your mini fall bunting in your desired spot. Oh, I also changed out the calendar color by covering the inside backing with a green plastic table-cloth and added some fall leaves.
How does it look? Do I need to add anything else?
See how I made the Easy Fall Pillows & Fall Leaf Book Page Wall Art too.


Erlene, LOVE the bunting. Really well done! Thank you for linking it up to our linky party.
What an adorable project. And I love your entry way seating area.
I love this! The different textures really make all the elements pop! Thanks for linking up at the #homematters linky party! We hope to see you again this coming Wednesday!
This is so fabulous! I love the way you get to change out the month with the garland. Thanks for linking to the Do Tell Tuesday party–we hope to see you again!
Thanks for sharing this at Pin-Worthy Wednesday, so cute! I’ve pinned this to our group board.
This could not be more adorable! Your Fall spot is very inviting. I want to come sit there myself! Thanks for a great tutorial! I could repurpose cereal boxes for the cardboard.
So glad you shared with us at the Home Matters linky party.
I love this! It is so cute. Thank you for linking up to The Creative Exchange! We will be featuring your project this week.
xo, Laura
Thanks for letting me know Laura. I’ll be there this Thursday.
What a great tutorial, the bunting looks adorable on the calendar!
Thanks Josie. This was the first time I’ve added this type of bunting to our calendar and I think I’ll continue doing it,but change up the look for each season.
This is so stinkin cute that I actually might make it! Pinning!
Thanks Tiffiny for pinning 🙂 Always appreciate the shares. I hope you do make one…it was a fun project.
I love it! I need to do that to my calendar. For me, I would pull the string a little tighter so the word didn’t hang so low and you could see the first week on the calendar. I like to write in those spaces!
Hi Amanda. I actually did pull it tighter. The tape I was using to hold it in place wasn’t strong enough and I replaced it.
I love the way it turned out! And I have some book pages just sitting around waiting for a purpose. I think I found 🙂
Hope you make one…it’s super easy 🙂
Thanks for coming and linking up at #The Weekend Social. Please be sure to come back next week starting Thursdays at 9PM EST on KitchenDreaming.com ! I hope to see you there!
Oh love it! I loved the whole scene without the bunting but with it is Fabulous. So glad you linked so I could find you! Thank you. I am so going to do this for my classroom! How Fabulous and Fall’ish’!
Love bunting banners!! I was just thinking I see all these shops that sell them, but why not DIY one!! Next project on my list! Found you from the Weekend Retreat link up, love your pillow too!
Hi Diana. You should totally make your own bunting. You can probably make one for free if you have string and some paper. Thanks for stopping by.
This is just super adorable! I love how it turned out – it totally brightens and classes up the calendar. Found you at Creativity Unleashed! 🙂
Thanks Erica for taking the time to stop by!
That is SO cute. I love it! What a neat idea and definitely not overly difficult either. Nicely done! 🙂
Thanks Michelle. It’s really easy and not very expensive since I used scraps of painter’s cloth from another project.
This is adorable! Thanks for sharing 🙂