Update: 2024 This is no longer valid.
For those you that are visual learners, I’ve got a treat for you. Ever wonder how to create clickable image collages for your blog, but haven’t been able to figure it out? Today, I’m going to show exactly how to create clickable images for your blog with lots of pictures!
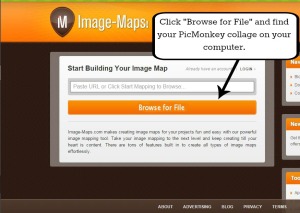
Before we get started, you’ll need to create your picture collage – I use PicMonkey to create my collages. Once your collage is created, save it to your computer and upload it to your media library on your website or image hosting site (Photobucket). Next, go to Image-maps.com* to start making your collage image clickable. Click on the “Browse for File” button and upload the collage image you just created on PicMonkey. *You do not need to login or register to use this site. When your image is uploaded, click on the “Start Mapping” button. Click to continue. Hover your mouse arrow over an image in your collage and right-click it. A mapping menu box will pop up. Click on “Create Rect”. Left click the image you want to frame and a plus sign will appear. Click on it and drag the edges of the frame box to fit your entire image. You will also need to insert the URL of the image blog post (the link where you would like the image to direct your readers) and the title of the image blog post. Repeat these steps until all of your images are mapped.
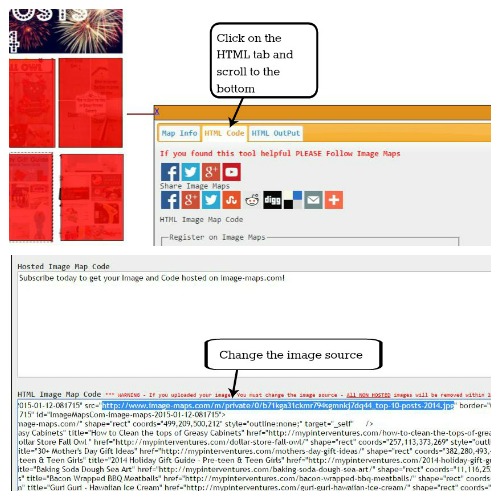
Next, click on ‘Events’ tab and change the target to ‘_blank’ and save.
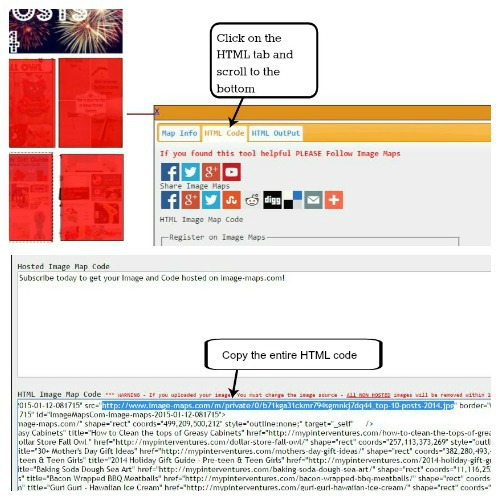
Once everything is mapped, right-click the page and the map menu will pop up again. Click on “Get Code”.Click on the HTML tab and scroll to the bottom of the box – HTML Image Map Code. Copy that code and paste it into your blog post in text mode.

Now, copy and paste the entire HTML Image Map Code and insert it into your blog post in the text mode. The pasted HTML code should show up as a clickable image in visual mode.
Hope you found this tutorial helpful.
Note: Some PIN IT plugins will interfere with clickable images, especially those that pop up in the center of the image.


Thank you Erlene!
I was able to follow everything except the image wasn’t clickable once it appeared in my blog. What exactly is supposed to be transferred or copied and pasted over and where should it go inside of the text area?
I think i’m mostly unsure about where the entire image url is.
This article was awesome! And just what I needed.
I’m not sure what I could have done wrong but wasn’t able to get the image to be clickable. What all should be transferred over? And where in the text body should it be copied and pasted?
I’m going to update this post as some things have changed. When you are creating the ‘rectangle’ over each image, go to the tab ‘Events’ and change the target to ‘_blank’ and save. Do this to every image you are mapping. Then, grab the HTML and copy/paste it to your blog. Note, many “PIN IT” plugins will interfere with image mapping and may need to be disabled for it work.
I pinned this! I will try to do this today! I do like how you have clickable collages in your side bar! All of this technology kind of freaks me out! But I’ll try it! LOL Thanks for the help! Julia
Julia,the ones in my sidebar is a plugin that does it for me. Although, I do like making clickable images for some of my posts.
I love picmonkey, but haven’t tried anything like this! Thank for all the great info; I hope to try it soon. This is a wonderful post, and I appreciate you sharing it on Together on Tuesdays!
Hi Erlene, I’m going to try this. It’s so confusing to me. I’m wondering if you can use this technique for single images? Love to know. Thanks! Can you message me on FB with your response?
Never tried this before, but I pinned it in case I have the need. 🙂 Thanks for sharing, Erlene! 🙂