
For those of you who hoard cereal boxes or any other type of cardboard boxes, this is a fun craft to use up your stash and provide a fun Halloween activity for the kids. No cardboard boxes? No sweat. You can use heavy white card stock too.
This craft activity will make a great Halloween bash activity and provide the kids (and maybe some adults) with something fun to take home. There will be some prep work depending on the type of media you use, so read on for more instructions.
 Supplies:
- several cardboard boxes
- sugar skull template/printer/paper
- paint pens in various colors
- paint brushes
- white acrylic paint
- hole punch or popsicle sticks
- scissors
- pencil
- water bottle caps or something small and round
- glue (optional)
Before getting started with this project, cover your surface with a cloth or newspaper. If the kids are in costume, you may also want to have them wear aprons or trash bags to prevent paint from getting on them.
I chose to make my sugar skulls into a hanging banner and did not cut out all of the eye sockets. However, if you plan on making actual masks, make sure to cut out the eye sockets for the kids :-).
Steps 1 – 5 can be prepped ahead of time.
1. If using white card stock, find a sugar skull template on the web that you like and print out as many skulls as you need and start coloring. You can use this template: http://www.leehansen.com/coloring/Holidays/Halloween/pages/day-of-dead-skull.htm
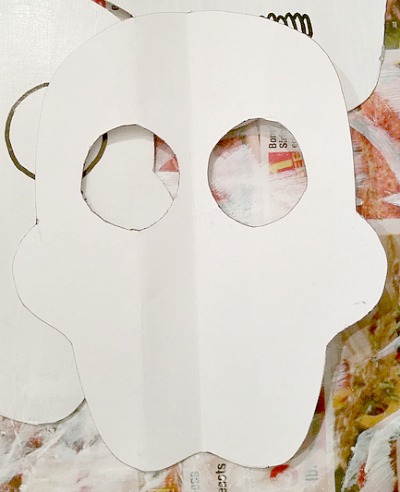
2. If using cardboard boxes, there will be a little more prep work. Print out a skull template on some card stock and cut it out. Use this template to trace the shape onto your cardboard boxes and cut them out.
I made my own sugar skull template and used the cap of a water bottle to trace the round eyes of the skull. I then used this template to trace the shape onto all my cardboard boxes. Cut all the skulls out.

3. If using the cardboard boxes, paint the non-printed side with white acrylic paint and let this dry. You will need to apply 2-4 coats to get good coverage.
4. Take a black paint pen and draw guide lines for the kids to color. I drew in the basics of the eyes, nose, and mouth.
5. If making masks, glue a stick to the bottom of the mask for a handle.

6. Start painting the sugar skulls with the paint pens. Let this dry completely. Tip: Start painting from the top down to prevent your hand from crossing over wet paint. If you do make a mistake, no worries. Just let the paint dry and use a white paint pen to dab over the mistake. Once the white paint is dry, you can continue painting.
7. Punch a hole in the top of the sugar skull if using as an ornament or banner.

There you have it. Fun Sugar Skull Masks from Recycled Boxes or banner ornaments.
What Halloween crafts will your kids be making?


This looks great, I’ll have to do this next year. I Pinned it. Hello from Merry Monday!
I am always amazed at your talents. I just got rid of some cereal boxes I was saving for crafts – but could not figure out how to use them! I have not heard of paint pens before – going to check them out at Amazon!
I’m not sure who is more talented you with your drawing skills or the children with their coloring skills! Fabulous job with repurposing too. So glad you shared with us at Home Matters.
There were some “oops” moments, but overall they did a really nice job coloring. My youngest really got into it and did most of them 🙂
Those masks are amazing and you are so talented! I can only imagine what mine would look like if I free handed it. I would definitely need a stencil. Great job!!
Thanks Alli. Your very talented and I’m sure your masks would be beautiful 🙂
What a super cool idea! The masks look absolutely amazing! 🙂
Thanks Giovanna. My collection of boxes was growing too big and this was a fun way to do a Halloween craft with the kids.