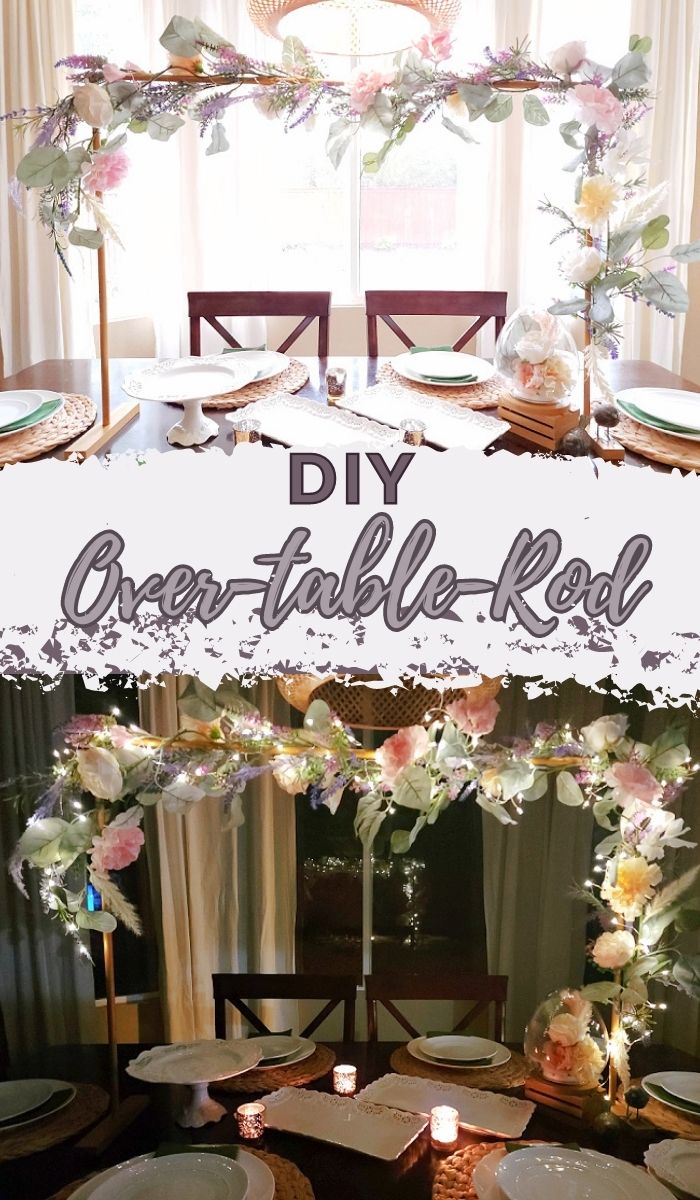
If you like DIY projects and love decorating, you probably already know that you don’t need to pay a lot of money for good-looking decorations. You can pretty much DIY whatever you want at home! That’s why I recreated this tutorial where I’ll walk you through the easy steps on how you can make your own affordable customizable-sized tabletop rod for spring, wedding, and party decorating.

The idea for this DIY table rod came from shopterrain.com. I instantly fell in love with their metal over-the-table rod and how it kept the decorations off precious table real estate. That being said, I wasn’t thrilled with the price ($68 for just the rod) and the way their rod secured to the table ends with c-clamps. It made it inconvenient to seat people there as the rod would be clamped right in front of them. So basically, you are losing two seats around the table.
Thus, I decided to create my version of a table rod with wood so all the seats around the table could be used. And guess what?! I LOVE my DIY table rod! It’s super easy to make, customizable to the size of your table, and the cost with the all the decor is the same as the online store version. Oh, did I mention it comes apart for easy storage too?!
How to Make DIY Table Rod
Supplies:
- 3x – 3/4″ Wooden dowels – 36″ or 48″ dowels (depends on how tall and wide you want your table rod). Also, if you plan on hanging heavier items from the rod, like votives, or a wreath, you might want to use a thicker dowel. Note: the dowels at the lumber store come in 36″, 48″, and 72″ lengths. Poplar wood dowels are the least expensive, so try to get those, especially if you plan on painting the table rod.
- 1″x2″ wood – Minimum of at least 17″ total will be need for the base (buy a 2ft. poplar board). Again, if you plan on hanging heavy items on the rod, plan on making the base longer or use wider width wood. Keep in mind, the tall you made table rod, the wider the base for stability.
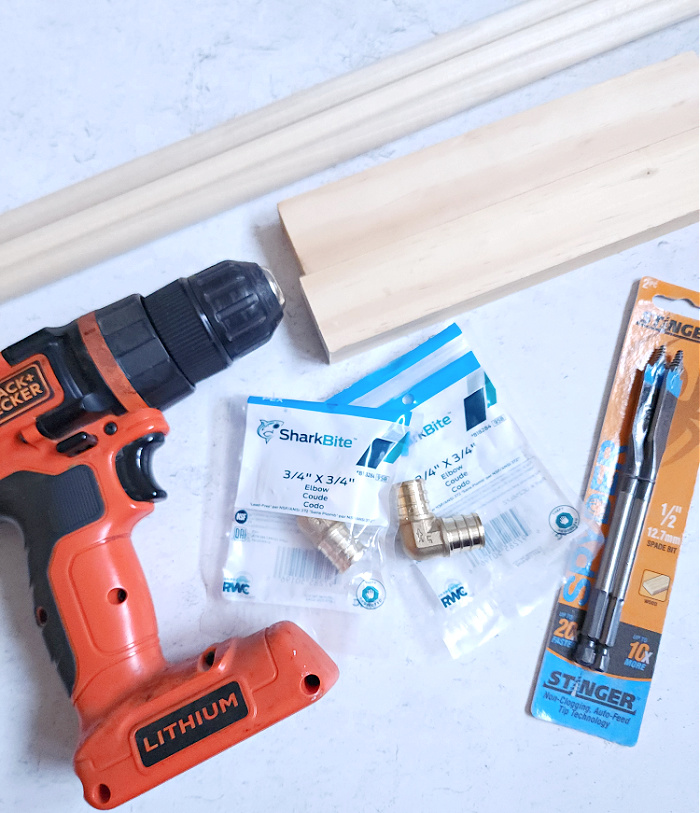
- Heavy Duty Drill or drill press
- 2x – Brass Sharkbite 3/4-in PEX Crimp x 3/4-in PEX Crimp – Find in plumbing department at Lowe’s
- Glue gun/glue sticks – Use multipurpose glue sticks that will stick to wood and metal
- Miter Saw/Saw
- 3/4″ Woodboring Spade Drill bit or 3/4″ drill bit
- Measuring tape
- Pencil
- Floral garlands, fairy lights, or other decorative pieces – I used two floral garlands (Michaels), fairy lights to decorate the rod. A mini wood crate, matching bouquet, and Target egg cloche were used to supplement the decor.
- Optional – Tape (I used clear packing tape)
- Optional – Paint in your color choice and a paintbrush
- Optional – fine grit sandpaper
- Optional – twist ties or floral wire
Directions:
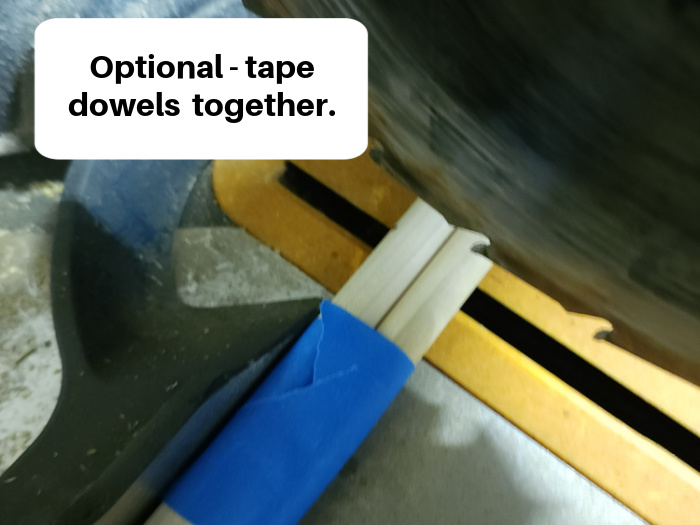
Step 1: Before starting, decide how long and how tall you want your table rod to be. This is an important step because it will determine the cuts on the dowels. Once this is decided, measure, mark, and cut the dowels to length. For my table, I cut a two 36″ dowels to 27.5″ long for the height of the table rod and kept one dowel at 36″ for the width.
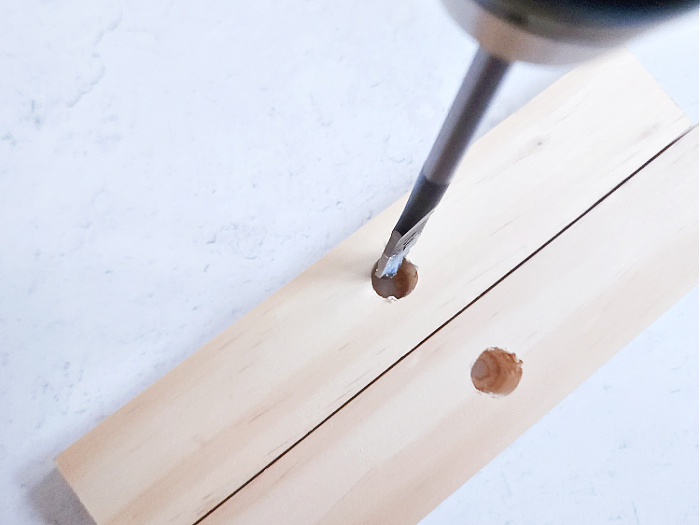
Step 2: Cut two 17″ long pieces from the 1″x2″ board. These will be the base or feet of the table rod. Then, measure and mark the center of each 17″ board. Next, take the 3/4″ boring bit or 3/4″ regular drill bit and make holes in the marked center of each 17″ board. Do a ‘dry fit’ and make sure the dowels fit snugly into the drilled holes. If needed, make any necessary adjustments, otherwise remove the dowels and set aside.
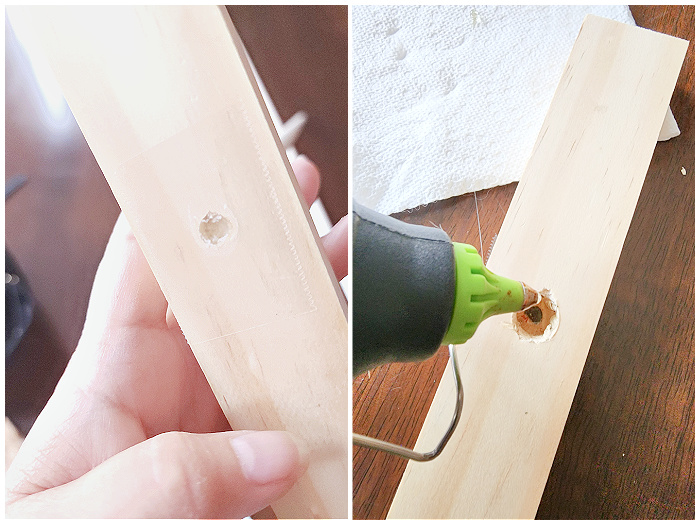
Step 3: Add clear tape to the bottom of the base to prevent all of the hot glue from seeping out. Add hot glue to fill about a thrid of the hole and immediately place the height dowels into place. Make sure the dowels are straight or perpendicular to the base. Hold the dowels in place just until it is soft set. Flip the base over, remove the tape and peel off any glue that has seeped out. Note: The glue should just peel off the bottom if it has not hard set. If needed, remove any leftover glue off with sandpaper.
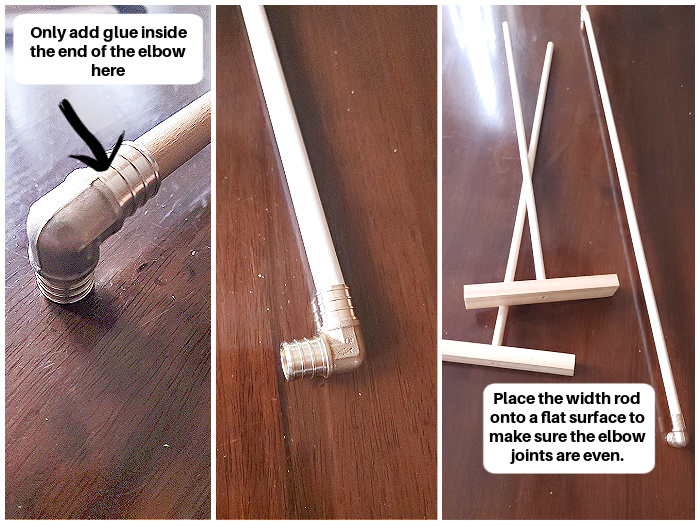
Step 4: Add hot glue to the inside of only one end of the elbow joint. Place this end onto the end of the width dowel. Repeat this step for the other end. To ensure the elbows are on straight, place the dowel down onto a flat surface. The bottom of the elbow joints sould sit flat on the surface. If it doesn’t, quickly make adjustments before the hot glue sets. Remove any glue at the joint. Note: do not put too much glue into the elbow joint. You don’t want the glue to seep down the other end.
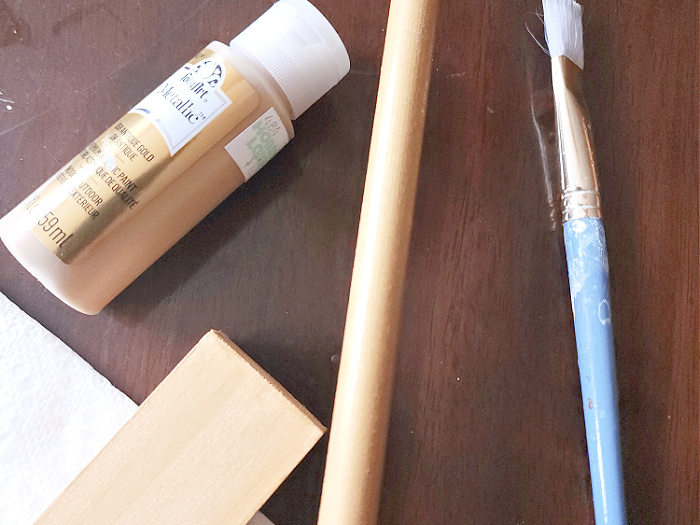
Step 5: If you want to paint the table rod, do so now. Give all the pieces at least 2 coats of paint, letting the paint dry between coats. Note: I painted mine with an acrylic gold paint, but spray paint can be used too. If you decide to use spray paint, paint the wood pieces before gluing them together.
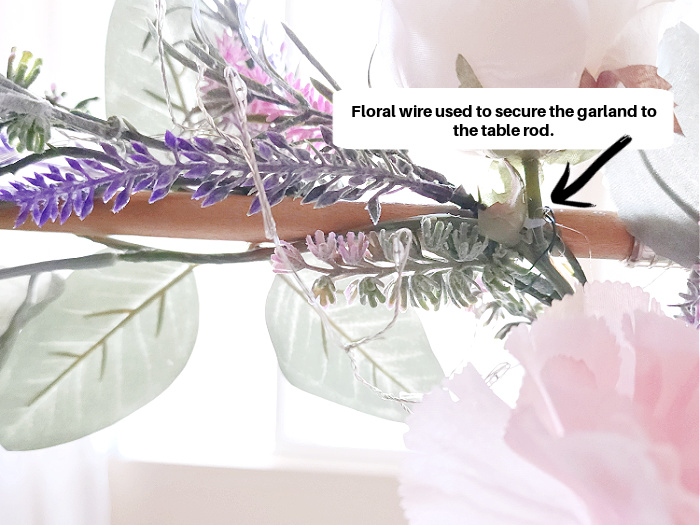
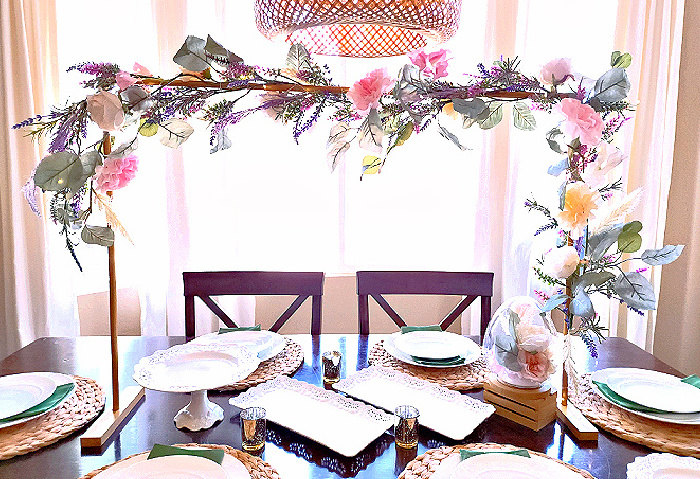
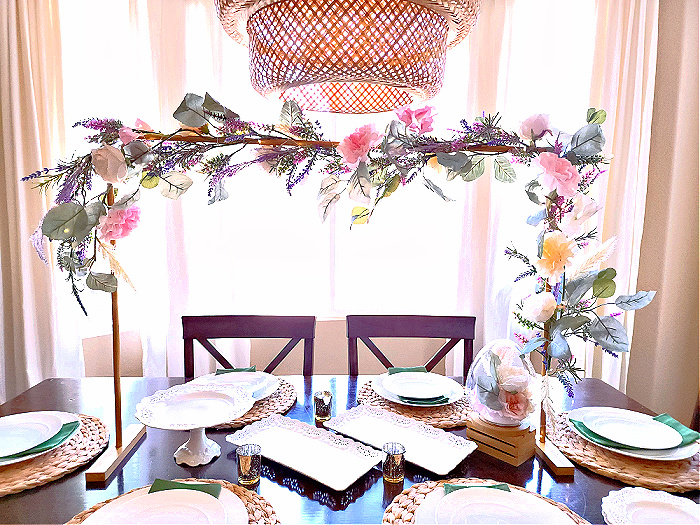
Step 6: Assemble the table rod pieces and decorate with your choice of floral garlands, lights, hanging candles, hanging signs, etc… I wrapped two floral garlands around the table rod and secured it at the two upper corners with floral wire (bread twist ties can be used).
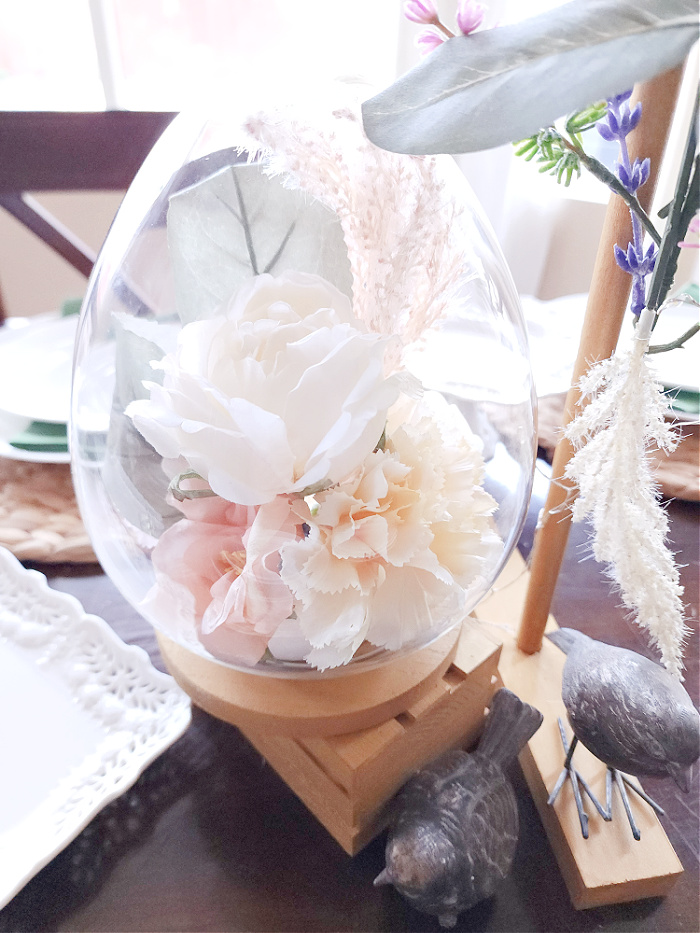
Note: I did an asymmetrical wrap. Optional – I also added fairy lights. To hide the battery pack, I placed it underneath a painted mini wood crate. Then, to finish off the decor, I decorated a $5 Target glass egg cloche with coordinating florals and placed it on top of the mini wood crate.
Other Ways to Use a Table Rod
There are so many ways to decorate and use a table rod. Below are just a few other fun ideas to to make a unique table decoration. Get creative and change out the florals or decorations to fit your chosen party or decor theme. Tip: If using this in an outdoor setting, you may need to screw it into the table or put weights on the base.
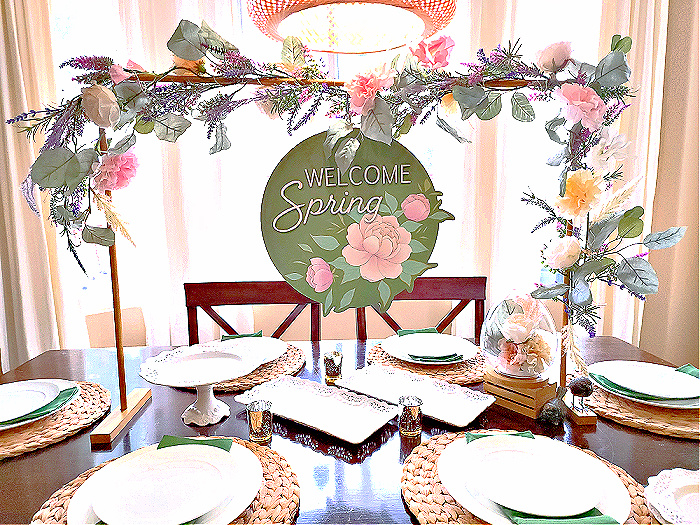
- Hang a light-weight wooden sign in the center (or off-center)
- Add hanging mini paper lanterns
- Add various hanging votives
- Hang a banner across it
All in all, this was such a fun DIY project that can be done any time of the year, but is especially fun to do for the spring and wedding season. The end result looks great and adds a special touch to any table decor.
If you make your own DIY table rod, tag me on instagram with your pictures @mypinterventures.