This shop has been compensated by Collective Bias, Inc. and its advertiser. All opinions are mine alone. #GiftDeliciously #CollectiveBias Being a self-proclaimed craft fanatic, I love getting creative during the holiday season. I can spend hours upon hours crafting. A lot of the times my girls will help join in the crafting fun, but sometimes they aren’t as enthusiastic and need a little persuading. So to help get them in the holiday crafting mood, I decided to surprise them with a cookie crafting session.
Lucky for me, as I walked down the main food aisle at Walmart, I found a bin full of the cutest snack size boxes of Chips Ahoy!, Nutter Butter, OREO cookies, Double Stuf OREO cookies, and RITZ Crackers – perfect for craft snacking, teacher gifts, and stocking stuffers! Some stores have the bins in front of the check-out area, so make sure to check that area too. Since these boxes are so affordable at a $1.50 each, I brought home ten of these snack size boxes! Some for eating and some for crafting Gingerbread & Chalkboard Cookie Box Houses.

While the girls were at school, I prepped the craft table with all of our supplies, OREO cookies, and Chips Ahoy! Boy, were they happy to come home to a craft table full of cookies! My girls were ready to craft as soon as they saw the cookies and even my boys grabbed a few. It’s amazing what a plate of cookies can do, isn’t it? After everyone got their fill of cookies, the girls and I got to work. I had a lot of crafting projects planned, but our first two tasks were to create Gingerbread cookie box houses for teacher gifts and lit chalkboard houses from the empty cookie boxes for home decorations.
How to Make Gingerbread Chalkboard Cookie Box Houses for gifting ~
Supplies:
- Snack size box of Chips Ahoy!, Nutter Butter, OREO cookies, Double Stuf OREO cookies, or RITZ Crackers
- brown wrapping paper or paper bag
- hot glue/glue sticks
- white paint pen or white paint pen
- black chalk paint
- paint brush
- tape
- pencil
- scissors
- ruler
- washi tape – glitter and patterned (optional)
- mini pom-poms (optional)
- ribbon – your color choice (optional)
- pipe cleaners – red and white (optional)
Note – the optional supply items are used to decorate the gingerbread house and you can opt for different decorations.
Directions:

Cut a piece of brown wrapping paper large enough to wrap the cookie box. Secure-close with tape.
 Find the center of the box and mark it. Then depending on how steep you want your roof top, measure down the sides of the box mark it.* Next, connect the marks to create the roof and draw a straight line around the backside of the box to connect the bottom of the roof line.
*Measurements are for a Chips Ahoy! cookie box.

Paint above the roof line with black chalk paint. Let dry.

Use a white chalk paint pen to “ice” the edges of the box and roof line – these lines don’t have to be perfectly straight and should look like squished icing. Don’t forget to outline the door and windows too.
Tip – If you are planning on making multiple gingerbread cookie box houses, create window and door templates from scrap cardboard.

Here is where the fun really begins and you can get crazy with the gingerbread cookie box house decorations. Use your imagination and use what you have in your craft stash to decorate the house. Decorative items were glued, drawn, or stuck onto the house.
How we decorated our house –
- Glitter washi highlights the windows
- Washi tape cut in half is used as a wreath hanger. Make sure the wreath and cut in half washi tape are glued down
- Twisted pipe cleaners make roof top candy canes and wreaths.
- A gold striped washi tape cut in half makes a door kick plate.
- 1/4″ green gross grain ribbon for under the windows.
- Mini green pom-poms accent the roof top candy canes.
- Decorative fences and edging made with chalk paint pen.
[Tweet “Fun gingerbread house wrap for Nabisco snack size cookie boxes. #GiftDeliciously @MDLZ“]

How to Make Lit Chalkboard Houses ~

Supplies:
- empty snack size OREO cookie box
- plastic OREO cookie insert
- gold paint (optional)
- paint brush
- black chalk paint
- battery tea light
- scissors
- ruler
- pencil
- utility knife
Directions:

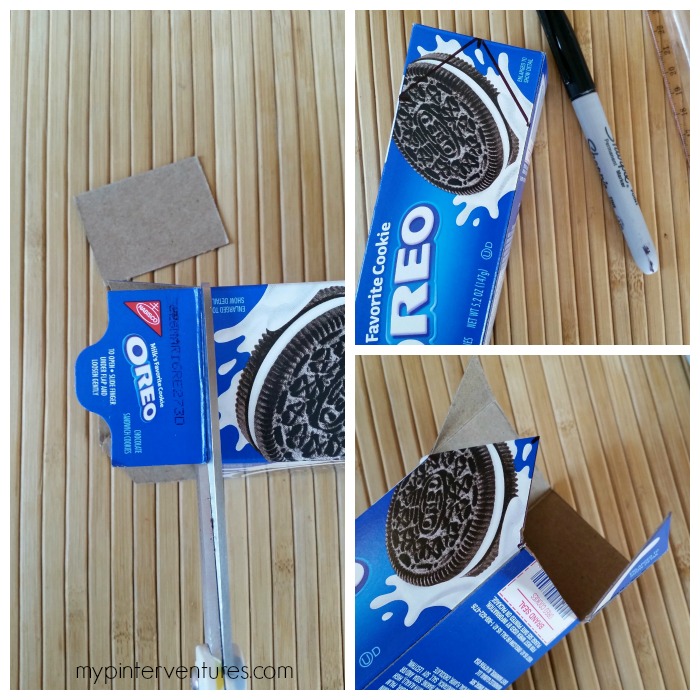
Cut the tabs of the cookie box off, but don’t discard them. You can use them to create templates for the windows and doors. Then create a rooftop for the house and cut.

This is where you can have two options – spray paint the inside of the box gold to help reflect light or use the plastic OREO cookie insert as a light diffuser. I tried both methods and I prefer using the plastic insert. The insert will need to be cut to size, but it hides and diffuses the tea light nicely. To help hide the shape of the tea light, I painted the bottom part of the plastic insert gold – this is the door of the house.

While the gold paint is drying, trace the door and windows onto the box. Cut out with a utility knife (this is for adults only). Originally, I had planned on painting the house white, but unless you use a primer or wrap the box with paper, the print will show through. Trust me, I applied four coats of white paint and I could still see the print underneath. So I moved on to black chalk paint and loved the look!

Once all the paint is dry, insert the plastic tray and place the battery operated tea light inside. Then wait till dark and enjoy your creation!

Hope you enjoyed the crafts! If you would like more snack size cookie box ideas, head over to the Mondelez Delicious Moments of Joy page.
What would you make from a cookie box?


super cute idea! we made gingerbread houses with a kit and it totally sucked . this idea is so much better!!
Thanks, Tianna. These are definitely a lot easier than baking n trying to put together real gingerbread houses.