Impress your guests and family with these melt in your mouth, light and airy cookies.

November Pinterest Challenge

Time again for the monthly Pinterest Challenge. Each month, a few of my fellow blogging gals get together and try to create or be inspired by pins on our Pinterest boards. It’s a way for us to use of all those pins and to not just collect them on a Pinterest board. You can see the other host Pinterest Challenge projects by scrolling to the bottom.
This month’s Pin Challenge theme was all things Christmas. I can’t event tell you how excited I was for this month’s challenge. I’ve been wanting to try meringue cookie for so long and thought now would be the perfect time to try it. The pin that inspired these Christmas Meringue Cookies can be found here >>>Light and Airy Peppermint Cookies. I also watched this video on Youtube >>>Meringue Cookies Recipe. Now, let’s get to the recipe and my results!
Christmas Meringue Cookies
These cookies look a lot more complicated to make than they actually are. I will admit that I’m still trying to master the cooking time, as I believe my oven is running a bit too hot. This made my cookies over bake a bit, which made the insides slightly brown. Even though they were over cooked, they still tasted delicious! My kids said they tasted like a better version of those marshmallows found in Lucky Charms cereal. Anyway, I plan on making more and bought an oven thermometer to make sure my oven temperature is correct.
These cookies look so pretty and would look beautiful on a Christmas dessert table. If you decide to make these, just note that the peppermint stars are the perfect bite size cookies.

Christmas Meringue Cookies
How to make light, airy, and melt in your mouth sweet Christmas meringue cookies. Use various piping tips and coloring gels to make an assortment of shapes.
Ingredients
- 4 large eggs, egg whites separated
- 1/4 tsp. cream of tartar
- 200 grams sugar
- 1 tsp. vanilla extract
Peppermint cookies
- one regular sized candy cane, crushed
- red gel food coloring
Christmas Tree Cookies
- Green gel food coloring
- Christmas sprinkles
Instructions
- Preheat oven to 200°F . Line large 14" x 20" baking sheets with parchment paper. Set aside. Prep one piping bag if you are making just one of the cookie styles and two if making both. I use a Wilton 2D tip.
 Using a stand mixer, add separated egg whites and cream of tartar into the mixing bowl. Using a whisking head, whip the egg whites on low speed and work up to high speed until it starts to foam. It should be a white frothy foam. See notes.
 While still mixing, add in the sugar, a tablespoon at a time. Let the sugar fully mix in before adding another tablespoon. Continue to do this until all the sugar has been added, scraping down the sides of the bowl when needed. Remember, the key is to do it slowly or you'll end up with lots of undissolved sugar crystals.
 Continue mixing until the meringue is thick, glossy, and can hold a stiff peak. You can also test to see if all the sugar is dissolved by rubbing a bit of the meringue between your fingers. It should be nice and smooth with little to no gritty sugar granules.
- Add in the vanilla and continue to mix until incorporated. If you want to add coloring to the entire mix to make your own designs, add it now. If you want to make the peppermint or Christmas tree cookies, follow the instructions below.
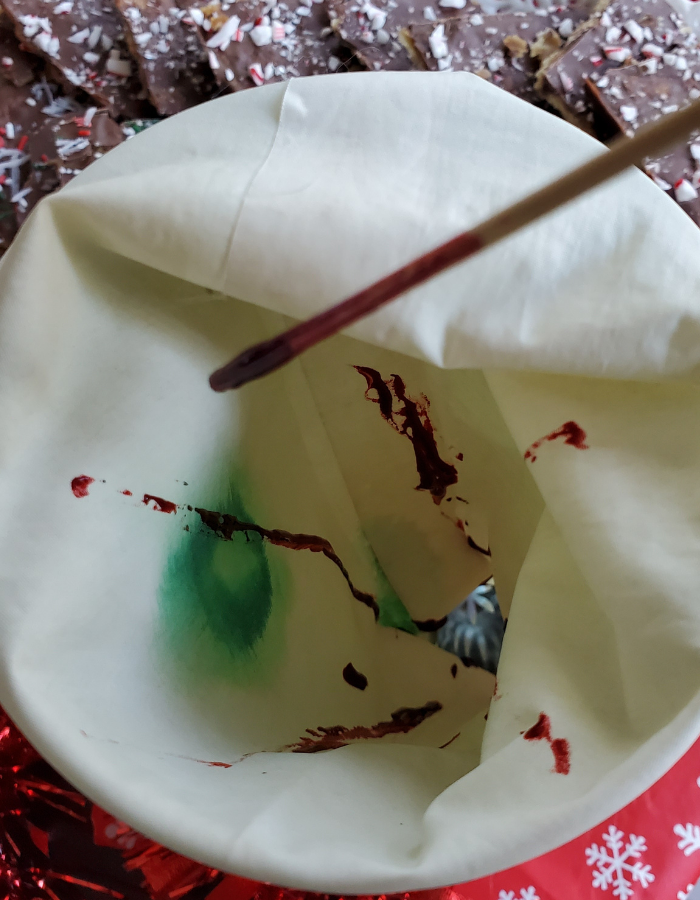 For the peppermint meringue cookies, use a skewer to add red gel streaks to the inside of the piping bag. See image. Then, take half the meringue and fill the bag, making sure there aren't any large air pockets.
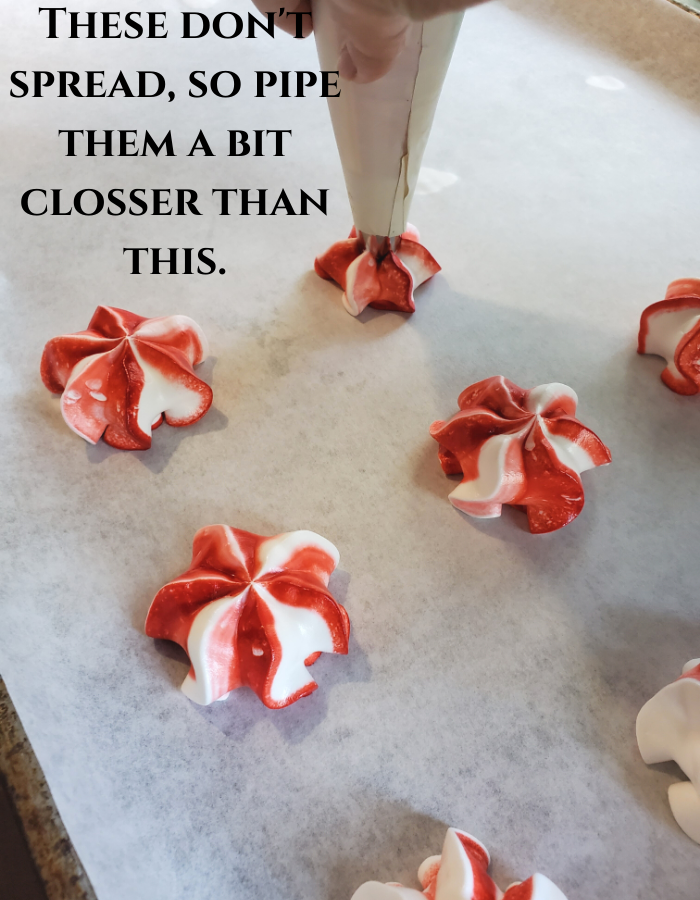 Pipe 2" star shapes straight down onto the prepared baking sheet. Continue to pipe the stars about an 1" apart until all the meringue is used. Sprinkle on the crushed candy canes to the top of the stars. This gives it just enough peppermint flavor without being overbearing.
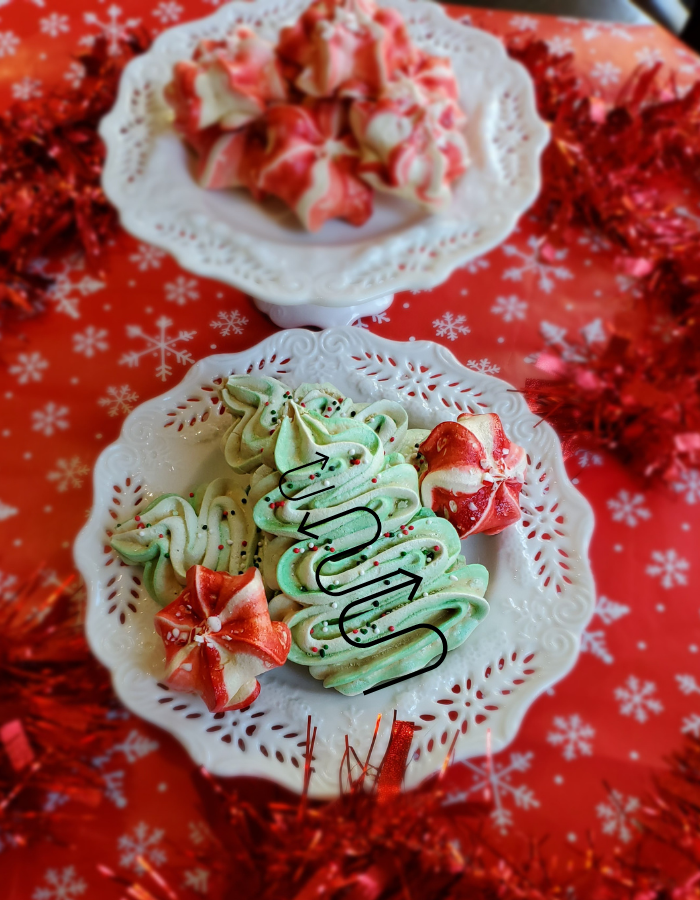 For Christmas trees, add a tiny bit of green gel to the remaining meringue. Mix. Keep adding coloring until you get the color you like. Place in the prepared piping bag, making sure there aren't any large air pockets. Use a back and forth method to create the tree. I go back and forth eight times, decreasing the width with each horizontal line, pulling up on the eighth stroke to make the top of the tree. Of course, you can make the tree smaller too.
 Place baking sheet in the middle rack of the oven and bake for 1 hour. Turn off the oven and let sit for another 1 - 2 hours without opening the oven to dry out. The cookie should sound hollow when tapped on the back. Note: if your oven runs high, the cookie will turn brown. You will need to lower the heat to 175 or 180. Just keep an eye on it. My suggestion is to use an oven thermometer to check for the correct temperature.
Notes
Note: Make sure the egg whites do not have any yolk in it or it will not whip up properly. To prevent accidentally getting egg yolks in the mix, separate each egg one at a time and add it to the mixing bowl. If you crack all four eggs into the bowl, you could risk contaminating all the eggs.
FOR MORE PINTEREST INSPIRED PROJECTS FROM THIS MONTH’S PINTEREST CHALLENGE HOSTS, CHECK OUT THE LINKS BELOW ↓

My Pinterventures • Cookies Coffee and Crafts
Slices of Life • Sew Crafty Crochet • Our Sutton Place
Purple Hues and Me • Sum of their Stories
Life Beyond Kitchen • Mom Home Guide
Our Good Life • Love My Little Cottage
Decorate & More with Tip • Modern on Monticello
Now, let’s see what the other hosts have created ⇓⇓









So so pretty. I tried this stripy meringue idea once and it just didn’t work at all, but looking at your photos I think I didn’t put enough of the food colouring in the piping bag. I’m inspired to have another try this year now.
This was the first time trying this type of cookies and I love it. Don’t know why I waited so long to make these.
These are so pretty and delicious. I have never tried to make these before but I am pinning your recipe to try out.
Lots of fun! I have a friend who makes these every year as part of her holiday tradition. I’m happy to help eat them 🙂
So lucky! I thought these were going to be difficult to make, but they are so easy. Want to try all different shapes/
I want to try these with my girls! They look amazing.
These look delicious! Pinned.
I’m wishing i had some cookies to eat right now. These look so good and beautiful on a christmas cookie platter.