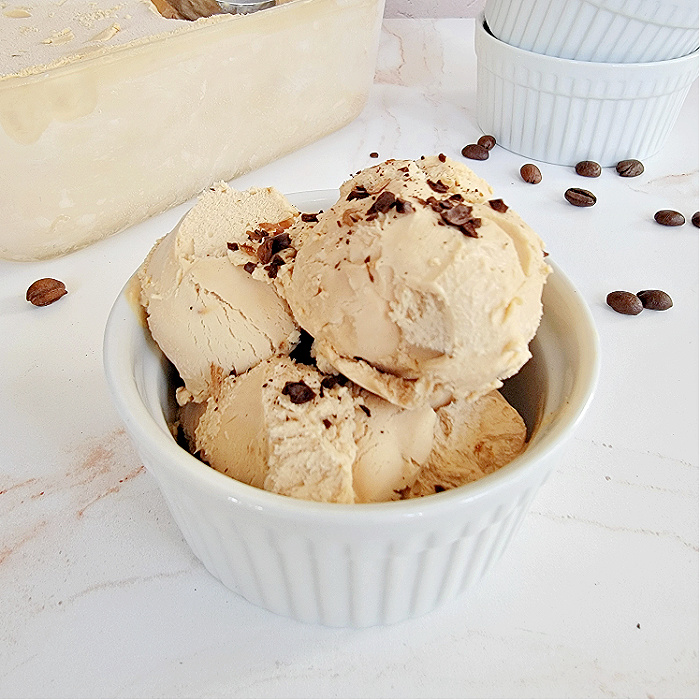
It’s National Dairy Month! To celebrate, I’m sharing a super simple no-churn coffee ice cream recipe!


No-Churn Coffee Ice Cream
I don’t normally drink hot coffee, but I’m all in if it’s cold coffee or in a coffee dessert! That’s why I love this no-churn coffee ice cream recipe. It’s cool, creamy, and just the right dessert when I need a pick-me-up treat.
The flavor of this coffee ice cream reminds me of Vietnamese coffee or an Italian Affogato. Both are delicious and have a wonderful strong coffee flavor. Of course, depending on how strong you like your coffee, it’s easy to adjust the intensity of the coffee flavor by adding more or less coffee flavor.
Besides the awesome taste, making homemade coffee ice cream without an ice cream maker is so easy! All you need is a hand mixer or stand mixer, a large bowl, standard measuring utensils, a storage container, and the 4-ingredients.
No-Churn Coffee Ice Cream Ingredients

This no-churn coffee ice cream is made with only 4-ingredients: instant coffee, heavy cream, vanilla, and condensed milk.
- Instant Coffee – Use your favorite dark roast instant coffee. A medium roast can be substituted, but a dark roast will give a more intense coffee flavor. A dark decaf instant coffee can also be used if you don’t want the caffeine.
- Heavy Cream – Do not substitute the heavy cream. Heavy cream is needed for the fat content, which prevents ice crystals from forming in the ice cream. It will produce the smoothest no-churn ice cream.
- Vanilla Extract – This is optional, but I like to add it since it does add some flavor. If you want to up the vanilla flavor, use vanilla bean.
- Condensed Milk – Condensed milk helps thicken and give no-churn ice cream the sweetness and softeness it needs.

If you want to add more things into the mix, here are a few add-in suggestions –
- Ice cream fudge – swirl this into the mix before freezing
- Chocolate shavings – add on top before serving
- Chocolate syrup – add on top before serving
- Crushed roasted espresso beans – add on top before serving or swirl into ice cream before freezing
- Pour boba over the top with boba syrup
- Graham crackers – crush for topping
How to Make No-Churn Coffee Ice Cream
Before making this no-churn coffee ice cream, place a glass mixing bowl or stand mixer bowl into the freezer for a minimum of 30 minutes to 1 hour. The chilled bowl will help thicken the no-churn ice cream.

Step 1. Place all the ingredients into a chilled bowl.

Step 2. Whisk all the ingredients using a hand mixer or stand mixer. Whisk for about 3 – 5 minutes or when the mixture thickens and you can see the whisk marks in the mixture. Time may vary depending on how cold the bowl and ingredients are before whisking.

Step 3. Optional – If adding in add-ins, gently fold them into the mix. If no add-ins are being added, scoop out the mixture into an airtight storage container. The container should be able to hold 4.5 cups without add-ins and at least 6 cups for add-ins. Place in the freezer for at least 6 hours or overnight.

Step 4. To serve, remove the ice cream from the freezer and let soften at room temperature for a few minutes. Scoop out and enjoy! Note: It’s best to eat homemade ice cream within 2 weeks, but this will last for up to 2 months in the freezer.
No-Churn Coffee Ice Cream
How to make no-churn ice cream with instant dark coffee. Easy no-churn coffee ice cream with only 4-ingredients.
Ingredients
- 2 cups heaving whipping cream
- 1 - 14 oz. can sweetened condensed milk
- 1 T. + 1 tsp. Instant dark roast coffee
- 1 tsp. vanilla
- Optional add-ins and toppings - ice cream fudge (swirl in & topping), chocolate shavings (toppinig), mini chocolate chips (swirl in), boba (topping), crushed coffee beans
Instructions
- Place a glass or metal stand mixing bowl in the freezer for 30 minutes to 1 hour.
- When the bowl is chilled, place all the ingredients into the bowl. If using a stand mixer, use the whisk attachment. Mix on high speed for about 3-5 minutes or when the mixture is thickened. A hand mixer can also be used. The mixture should hold the whisk marks. Optional - If adding extra ingredients, fold them into the mix after it has thickened.
- Scoop no-churn ice cream into an airtight container that can hold at least 4.5 cups or 6 cups if adding add-in ingredients. Place in the freezer for a minimum of 6 hours or overnight.
- When ready to serve, leave the no-churn ice cream out for a few minutes to soften. Then, scoop into serving cups or ice cream cones. Optional to add toppings. Enjoy!
Notes
- It's best to eat homemade ice cream within 2 weeks, but this will last for up to 2 months in the freezer.
Recommended Products
As an Amazon Associate and member of other affiliate programs, I earn from qualifying purchases at no additional cost to you. Thank you for your support.
-
 VanEnjoy Glass Bowl Set in Safe Package - Mini Prep, Dip, Dessert, Ice Cream , Bar Snack Dish Bowls - Set of 4, 6 Oz
 -
 SveBake Ice Cream Storage Containers with Lids 2 PACK - 1.5 Quarts Homemade Ice Cream Tubs, Freezer Containers, Turquoise & Green
 -
 NESCAFE CLASICO Dark Roast Instant Coffee 10.5 oz. Jar
 -
 KitchenAid KSM150PSAQ Artisan Series 5-Qt. Stand Mixer with Pouring Shield - Aqua Sky
 -
 Lord Eagle Hand Mixer Electric, 400W Power handheld Mixer