Welcome to the third annual 12 Days of Christmas Blog Hop!
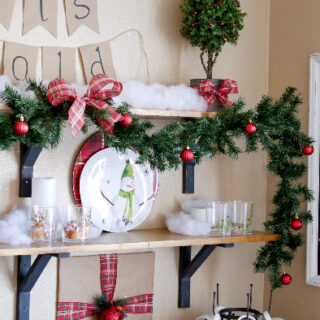
Welcome back to day 2 of the 12 Days of Christmas Blog Hop! Today, we’re sharing recipes or crafts inspired by our favorite holiday movie! And I’m sharing a Believe Framed Bell Sign that was inspired by the movie Polar Express.

Stop by every day from December first through the twelfth for new ideas you can use to make your season brighter! Check out the host projects and the entire 2017 12 Days of Christmas Links below.
Polar Express Believe Framed Bell Sign

This was supposed to be a super easy project for me, but I made a few mistakes that had me wanting to pull my hair out, so I don’t have pictures of entire process…sorry. But I stuck it out because I BELIEVED I could do it…ha! Anyway, follow my tips and this should be an easy project for a large or small Polar Express Believe Framed Bell Sign.
Supplies:
- picture frame
- gold spray paint
- sand paper
- black chalk paint
- ribbon
- 3 large bells (bought at the 99)
- thick tip chalk paint pen
- white chalk
- paint brush
- white muslin fabric
- hot glue/glue sticks
- optional – painter’s tape
- cotton rag
Tips:
- Always sand the surfaces you plain to paint. This makes sure the new paint will adhere.
- Cut a larger piece of fabric than you think you need.
- When painting and writing on fabric, choose a smooth texture.
- Use a Silhouette or Cricut to make a stencil template of ‘believe’.
- Use painter’s tape to help keep your writing level.
How to make the backing & paint frame:
- Remove the cardboard backing of the frame. Set aside.
- Sand and spray paint the frame. Let dry. Do this 3-4 times and set aside.
You can skip the next two steps if you use a large black poster board. My frame was too larg, so I covered the cardboard backing with fabric and painted it. If the backing is made of compressed wood, go ahead and paint that instead.
- Cut a piece of white muslin fabric that is at least 4″ larger than the frame cardboard backing. Temporarily tape the muslin onto the cardboard backing. This will allow for room to adjust the fabric if needed.
- Paint the front of the muslin with black chalk paint. Let dry. Do this 3-4 time until the muslin is completely covered.
If you have a Silhouette or Cricut, use it to design a stencil of the word ‘believe’. My Silhouette is on the fritz from me doing something stupid and I have to fix it. It would be a lot easier with a stencil, but this is how I did it without a machine.
- Add painter’s tape to the canvas to mark where the bottom and top of the letters will be.
- Use white chalk to write ‘Believe’ onto the bottom portion of the painted fabric. I made the mistake of gluing down the fabric and had to add the ‘!’ so that the wording would look centered. This is why using tape to temporarily hold the fabric is better.
- Use the white chalk paint pen (acrylic paint would work too) to trace over the chalk ‘Believe’. Go over the word ‘Believe’ until you get the color saturation you like. Don’t worry about mistakes as this can be cleaned up later. Let dry.
- Use a dry cotton rag to dust off as much of the white trace chalk that shows. DO NOT wet the rag or it will smear the chalk paint pen.
- Use a small paint brush and black chalk paint to clean up any mistakes. Let dry.
How to make the bells:

Middle bell
- Remove the items on top of the bell and set aside.
- String the ribbon through the bell top and glue in place.
- Make a bow with the a separate piece of ribbon and glue on top of the bell.
- Glue back the floral items in front of the ribbon.
- Add bell to the middle of the frame. It should be right above the word ‘Believe’. Glue the end of the ribbon to the back of the frame.
Side bells
- Remove the items on the top of the bell. Set aside to use in other projects.
- String ribbon through the bell top and glue in place.
- Add one bell on each side of the center bell, hanging a bit higher than the center bell.

Whew! It’s done and time to hang!
I hope you liked this project. If you want to check out the Polar Express movie, you can watch the trailer (sometimes the entire movie) on Youtube.
Now, scroll down to see what the other hosts created for their Christmas movie!
Be sure to visit our fellow 12 Days of Christmas Bloggers below for even more creative ideas this holiday season!


You did a beautiful job on this. I love the idea of having seasonal artwork to hang. It is just lovely.
Wow! Ok, first of all, it is GORGEOUS! I would never have guessed all the work that went into, because it looks so effortless! Not to say it looks slapped together, just so cool of you to share the “behind the scenes” of a craft that looks like you aced it without a hitch! Pinned and shared!
I hate when a project is supposed to be easy and doesn’t go my way. This turned out so cute!
Thanks. I was ready to toss it at one point.
What a pretty display.
Thank you.
What a cute project! We love Polar Express. It’s become a family favorite.
I love your honesty! I’ve had a few projects that made me positively crazy. The end result deserves applause, so that’s something!
Oh, this sign turned out so pretty! I love it!
Tania
I love your “Believe” sign! It is so beautiful and festive!
Thank you!
In spite of your troubles, it turned out great! Love the bells hanging down!
Thanks Lauren. I’m just glad I was able to finish…lol.
Such a fun craft. We need to watch Polar Express again, it’s a great Christmas movie. I’m loving your plaid so much!
Thanks Shirley. I reuse this ribbon year after year.