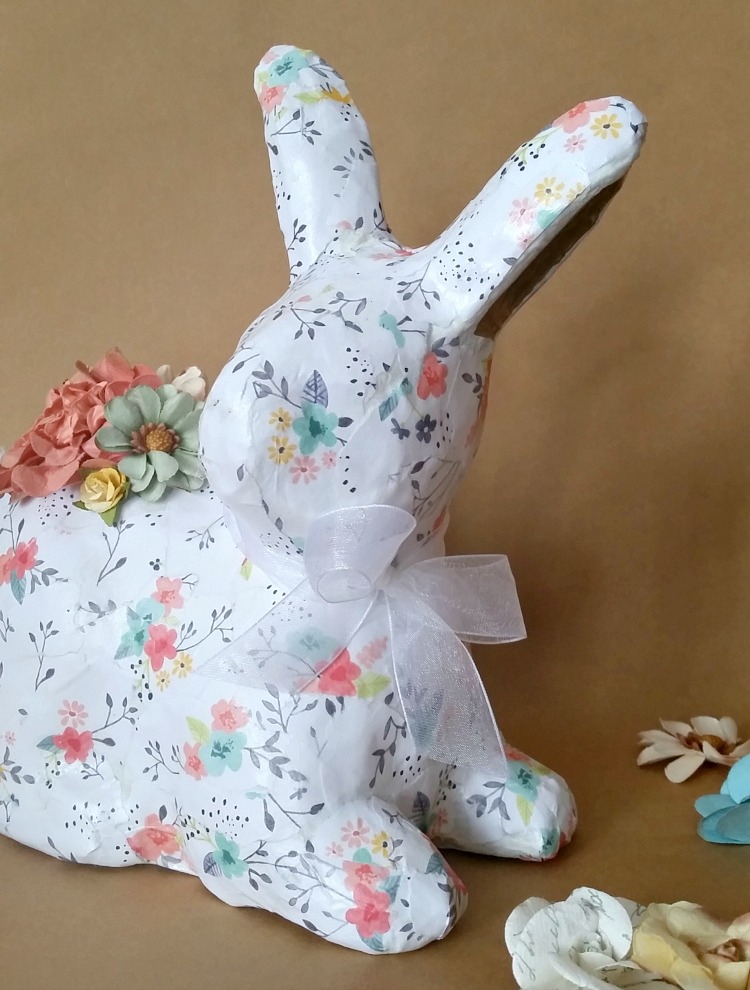
It’s time for another craft de-stash challenge! This time, I’m sharing a Floral Decoupage Spring Bunny to to add to your Easter decor.

- Use items already in our craft stash.
- If needed, a $10 limit for additional supplies.

[Tweet “DIY Floral Decoupage Spring Bunny #craftdestash #craft #spring”]
Floral Decoupage Spring Bunny
Supplies:
- paper mache bunny
- floral paper – Use a floral print napkin if you can find one you like
- paint brush
- Mod Podge
- ribbon
- paper flowers
- chenille pipe cleaner
- scissors
- white acrylic paint
- hot glue/glue gun
- gold Sharpie pen (optional)
How to make a Floral Decoupage Spring Bunny:
The bunny I used for this craft de-stash challenge had a broken ear that was repaired with glue, so it made the perfect base for a decoupage craft. It’s been patiently sitting in my craft area for 2 years! Poor thing waited a long time to be beautified. The only supplies I needed were floral paper and a package of coordinating paper flowers (under $5).

- Give the paper mache bunny 2 coats of white acrylic paint.

- Tear the paper into small pieces.
- Place a generous amount of Mod Podge on the bunny and some to the back of the paper.
- Place the paper on the bunny and apply more Mod Podge on top.
- Repeat these steps until the entire bunny is covered.
- Optional – Do not decoupage over the inner ears if you would like to color them in with gold Sharpie pen.

- Glue flowers onto the back of the bunny.
- Add ribbon around the neck and tie into a bow.
- Wrap the tail with chenille pipe cleaner (optional).
- Color the inside of the ears with gold Sharpie pen (optional).


Now, the once broken and plain paper mache bunny is ready to be displayed in a fun Easter vignette!
More Craft De-stash ideas ~


Another adorable bunny! Such a perfect craft for spring. Pinned.
How adorable! Now I am wondering if I could decoupage my little bunnies that I cut holes in for napkin rings! This guy is so cute! Thanks so much for sharing at Celebrate Your Story!
This is a super cut bunny craft. Love the little flowers in pretty pastels. Gorgeous. I did not realize paper mache bunnies existed. Thanks for the lesson, this idea is gorgeous.
I love this Bunny Erlene it is so darn cute 🙂
Hi Erlene! This bunny is absolutely adorable! It is such a cute addition to spring decor. Great job, you are so creative 🙂 Thank you so much for sharing with us at Dishing It & Digging It & congratulations on being featured this week!
So adorable Erlene and your little bunny looks so much happier now. The colors you used are perfect for Spring and adding the flowers on her back just makes her extra special.
This bunny is just adorable. Shame on you for neglecting it for two years Erlene! 😉 It was long overdue but you made up for it with this lovely decoupage. It combines the best of spring and easter!
Your decoupage bunny turned out so cute! I love the soft print on the decoupage paper. Kudos to you for using up some of your craft stash in such a creative and attractive way!
Man, you can do so much with Decoupage, I love it. I always see these cute papermache things at craft stores and never quite know how to decorate them. Your idea is adorable! Pinned!
Beautifully done Erlene! I would love to have this bunny sitting on my buffet! Thanks for sharing at Snickerdoodle! Pinned.
I really love how this bunny turned out. Such a cute idea!
Decoupage is such fun and your bunny is too pretty. I need a bunny because I totally want to do this!
Thanks Shirley. This was the first time I’ve decoupaged over paper mache and it turned out better than I thought…lol. Definitely try it.
Oh, I love this project! I will start looking at the paper mache forms with a different eye from now on!
Thanks Lydia. There is so much you can do with paper mache forms…the possibilities are endless
What a gorgeous bunny! Love the sweet paper that you chose and the flowers! Just adorable!
I think this is the most beautiful bunny that I have ever seen. Your bunny is so sweet and spring like! You gave a bunny new life. That’s so great !
Thanks for your post.
Decoupage is the craft I never knew I was missing until lately! Your bunny is so sweet and spring like!
That is so cute! I have so much crafty stuff in the stash, I really need to get busy with some of it. Great inspiration.
Hi Erlene, love the bunny project. I clicked your link in the Knick of Time link party b/c it caught my eye. Very cute & looks easy! I’m all about easy.
Thanks so much for coming over Florence. This is definitely an easy project.
I love your bunny! I bet he’s much happier now!
This is adorable, and reminds me of spring. Love your creativity. Would love it if you would share it on my Sunday’s Best linkup.
Ok-I think this is the cutest bunny ever!!
Thanks so much Michelle. I think it turned out better than I thought it would…lol.
What a great way to give a broken bunny new life! I need to try ModPodge!
I love this project, but I do love bunnies. This is adorable and I would leave it out all year long.