

Well, I tried to resist decorating for fall, but my youngest is already asking me to bring out the Christmas tree. Honestly, I thought about it for a second until I realized it’s only September and Christmas is still 3 1/2 months away. So instead of bringing out the Christmas tree, I talked her into doing a fall craft project instead – DIY Fall Pumpkin Owl.

DIY Fall Pumpkin Owl

Since I’m a crafter, I had all of the supplies already on hand. If you don’t have these supplies, don’t worry. Most of the main supplies can be purchased at a Dollar Tree store or 99¢ store.
Supplies:
- 2 Dollar Tree/Store foam pumpkins
- 2 bunches Dollar Tree/Store fall leaf stems
- hot glue gun/glue
- craft glue
- 2 small pine cones – 99¢ store
- felt – brown, red, & yellow or choose your own colors
- two pennies or buttons
- scissors
- skewer (optional)
Directions:
- Pull off the stem from one pumpkin. This will be the bottom.
- Optional – place a short skewer into the center of the top pumpkin before gluing the pumpkins together.
- Hot glue the two pumpkins together.
[Tweet “Fun DIY Fall Pumpkin Owl Craft @mypinterventures #fall #craft”]

- Hot glue small pine cones onto the top pumpkin for ears.
- Use round objects to trace circles onto the felt and cut out. You will need three felt circles for each eye. (The picture shows a large yellow circle, but I changed it to brown and used yellow around the pennies)
- Glue each circle together using craft glue or a bit of hot glue. Do not use too much glue or it will seep through the felt.
- Hot glue pennies onto the felt. Cut out the pennies, making sure to leave a small rim around each penny.
- Cut out a triangle or diamond shape felt piece for the beak (not shown).
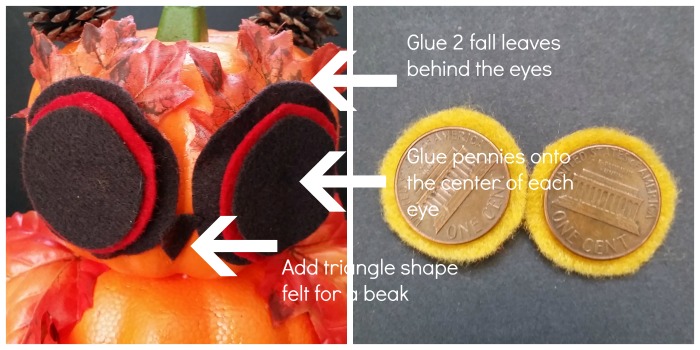
- Add hot glue to just the center of each round eye and place onto the pumpkin.
- Tuck two smaller fall leaves behind the eyes, position, and glue into place.
- Glue the edges of the felt eyes onto the pumpkin.
- Add the pupils and a triangle felt beak.

- Cut off the stems of six large fall leaves.
- Add hot glue to the tip of each leaf and place it on the sides of the bottom pumpkin to create the owl wings. See the picture above for leaf placement.
- Optional – cut out felt scallops and glue onto the front side of the bottom pumpkin.
Will you be decorating will pumpkins this fall?
More fall craft ideas –


This is adorable. How clever to use the pumpkins.
This is such a cute idea! I love anything to do with owls!!!
These are just tooo cute for words Erlene. Love how you used the leaves behind the eyes, it gives the little owls so much character.
Erlene, this is super duper cute! I see these pumpkins every year, but I never would have thought to make something like this. 🙂
Oh my goodness! That is adorable. It’s so cute for fall and Halloween and looks like it’s fun to make too! My kids would love to make these!
I love how kid friendly this craft is- I really think when you involve your kids in the crafts they feel a special kinship with the holiday and will always retain those memories!
So true and I totally agree. She loved helping to make this and has already asked to make a pumpkin turkey too.
This owl is so cute! I can’t believe this is a dollar store craft!
Thanks Erin. It turned a lot cuter than I thought it would…lol.
Oh those pillows are adorable! This year is the first year I have actually decorated even just a tiny bit.
I would have never thought to use styrofoam pumpkins for something so cute!!
Thanks Heather. The pillows are a Dollar store craft too. I sewed mine, but you can use fabric glue too.
This owl is too cute! I need to make him so he can sit out longer than just halloween.
Thanks Ashley. This one will be out all fall long since I won’t be doing any extensive Halloween decorating.
Love this sweet craft! It is so cute!
Thanks fro sharing!!
Hugs,
Deb