
Don’t pass up those doilies at the vintage fairs. Buy them and create your own Vintage Doily Bohemian Dream Catcher.Recently, I’ve been MIA from the blog because my sister came to visit for my oldest son’s graduation. I love her to death, but she’s ummm…twenty years younger than me.
Okay, stop trying to calculate my age. I’m up there.
Anyway, our age difference can make it difficult to think of activities that we can do together. She’s at a different place in her life, however, the one thing we both love is crafting and vintage finds.
Lucky for us, there was a vintage fair open while she was here and we had the chance to attend. We were in vintage and handmade heaven! There were so many beautiful goodies, but it was the bohemian style dream catchers that caught our eyes. We loved the dream catchers so much that it inspired us to create our own vintage doily bohemian dream catchers with a few of the items we found at the fair.
Vintage Doily Bohemian Dream Catcher

Supplies:
vintage doily
lace tablecloth
painter’s cloth or fabric scraps
ribbon/lace in your chosen width + colors
fray check
metal macrame ring
hot glue
thread/needle
layered feathers
hemp cord

Directions:
Covering the hoop
- Cut 1/2″ to 3/4″ wide strips out of the painter’s cloth.
- Apply glue to the small edge of the strip and place it on the hoop.
- Start wrapping the strip around the hoop, placing a dot of glue on every other wrap.
Add the lace
There are several ways to attach the vintage doily onto the hoop. For this dream catcher, I wanted to use lace from a table cloth to attach the vintage doily to the hoop.
- Position the doily on the lace in an area that you like.
- Sew the doily onto the lace with a simple whip stitch. I sewed along the inside circle and around the edges of the doily to attach it to the lace.
Bottom of the Dream Catcher
To create the bottom of the dream catcher, I chose to use strips of painter’s cloth, lace, and gold ribbon. I used lace, ribbon, and painter’s cloth strips that ranged from 1/4″ to 1″ wide. The cut length also varied between 32″ – 39″ long.
- Cut strips of painter’s cloth, lace, and ribbon for the bottom of the dream catcher. I used a total of 16 strips – 3 painter’s cloth, 4 lace, 5 gold ribbon (one for the hanging loop) and 4 white ribbon strips.
- Use fray check on the cut edges of the lace and ribbon to prevent unraveling.
- Optional – to create the frayed edges on the painter’s cloth, remove a few vertical threads from the edges of the cloth. Then, run your hands up and down on the strip to fluff the edge.
- Loop the 15 cut strips onto the hoop in a pattern you like and tighten.
- Loop the last strip onto the top as a hanging loop.

Once all the strips are attached to the hoop, the lace/doily will need to be attached.
- Flip the hoop over to the backside. Center the doily and lace on the backside of the hoop. Run a strip of hot glue over the lace and around the edge of the hoop. Let dry.
- Cut the lace as close to the hoop as possible. Be careful not to cut any of the strips.
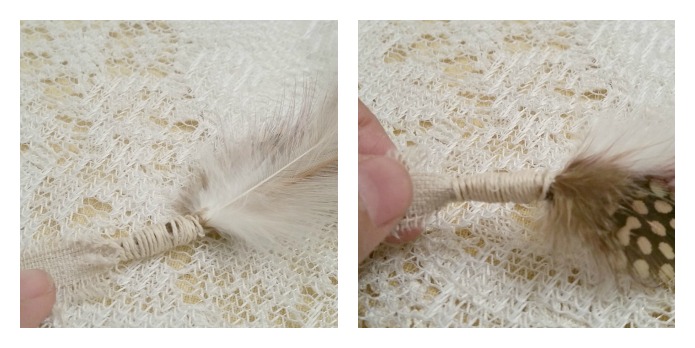
- Glue feather stem onto the backside of a strip. Repeat this three times – one in the center and two on side strips.
- Glue the end of the hemp cord onto the backside of the feather stem and wrap to cover it. Cut and glue down the end of the hemp cord.
Completed Bohemian Dream Catcher
The vintage doily bohemian dream catcher is now ready to hang. I’m so in love!
Here are a few other dream catchers that my sister and I created. I created a second beachy dream catcher while my sister created a smaller bohemian dream catcher.
What materials would you use to create a dream catcher?
More crafty ideas…


These are lovely. I’ve never seen anything quite like them before. I particularly love the all white ones. beautiful!
This is awesome and it turned out so beautiful! Your pinterest creation definitely looks like it has been done perfectly! Thanks so much for sharing your beautiful diy craft!
I love seeing other people’s projects. I’m so bad at doing this stuff myself. It never comes out right! But I found a really cute one online and it goes so well with my daughter’s nursery.
These are really easy to create and I hope you give it a try for your daughter’s nursery. I think it’ll be so special that you made it just for her 🙂
I love the look of the various ribbons all together
they are so gorgeous! what a great idea! Thank you for sharing it us #pintorials
Umm, yes. I am allllll over this! They are gorgeous! I’ve always loved dreamcatchers since my brother would bring one home for me from every PowWow he competed at! But these… so girly and dreamy! Perfect for my new Master Bedroom ideas! <3
Found you at Inspiration Mondays! Thanks for sharing! (I shared on FB!)
Super cute idea. I love dream catchers and would love to try this with my daughter. Now to find doilies!
These are beautiful!
So pretty the bohemian cream catcher, love if you share this on Fabulous Friday Party, If you have a few stop by Fabulous Friday Maria
Oooh, these are lovely, so pretty and such a nice thing to make together.
Erlene, I love how pretty and girly these dream catchers are! Much prettier than the one I had hanging over my bed as a little girl. I want to make one for my daughter’s room now! Thanks so much for sharing this at Dream. Create. Inspire. Link. Have a great weekend and take care, Tara
Thanks for sharing on the DIY Wall Art Blog Hop! I am featuring your Vintage Doily Boho dream catcher on a round up of some great, easy wall art from the blog hop.
Thank you so much for sharing your incredibly creative project on our bowdabra Saturday crafty showcase!! Can’t wait to see your submission next week.
Warmest,
Sandy Sandler
Just popping in from the gallery wall link up. I have been looking into making one of these but did not know where to start. Now that I have directions I can not wait to make one. Thanks for sharing…
Your dream catchers are so lovely, Erlene! And such a neat idea. Thanks for linking up at Creative Spark; I’m featuring these tomorrow. Hope you’ll link up with us again – the party starts at 6am EST!
Gorgeous !!!
Anna
What a lovely spin on the traditional dream catcher. Pinning. Thanks for sharing.
SO awesome- I think we’re going to do this as a fun crafting day after my daughter’s bridesmaids tea luncheon soon. GREAT tutorial- thank you for the inspiration and information!
I featured you lovely dream catchers at this week’s Submarine Sunday Link Party! I hope you’re enjoying the weekend!
Navy Wifey Peters
That’s beautiful, Erlene! Thanks so much for sharing this with us at Savoring Saturdays! We’re taking this weekend off for the holiday – hope you’ll be back with us next weekend! 🙂 Happy 4th!
These are beautiful! You did an amazing job with these. Thanks for visiting & linking up at Oh My Heartsie Girl Wordless Wednesday.
Sarah-Ann @ Living Intentionally Simple
Erlene, they are lovely! I’ve been looking for a vintage project with a Southwest feel to it! Pinned and shared! My oldest and youngest daughter are 12 years apart, they’re close, but one year , one was in K, and the other graduated High school. They do like spending time with each other, so glad you got to spend time with your sister! Thank you for sharing at OhMyHeartsieGirlWW! Have a beautiful week!
Thanks Christine. I remember when my sister and I were younger and people would think I was her mom…lol.
Those are so pretty. What a nifty idea. Sounds like you had a wonderful visit with your sister.
Saw you at Wordless Wednesday.
Kristine 🙂
Thanks for stopping by Kristine. Yes, I had a really nice time with her and can’t wait for her to visit again.
Love this idea, these are great!! pinned!!
Thanks Claire. Appreciate the share!
This is right my my ally! I’m totally pinning this to my “Bohemian Projects” board on Pinterest!
Thanks for pinning. I’m in love with boho style at the moment and will check out your board.
What a fun craft to do with your sister! These look so beautiful, and it would be fun to do a wall display with a whole bunch of different crochet and lace designs for some SERIOUS decorating! 🙂 Love this idea! Thanks for sharing!
Thanks Ariel. It definitely was a fun project to do with my sister. She’s into boho style and kind of rubs off on me.
I have a ton of old doilies laying around that my grandmother made. What a creative way to display them! I love finding ways to repurpose old items that have sentimental value.
I love displaying old items with sentimental value. It has so much more meaning if you use a doily your grandmother made.
The doilies and ribbons add a great touch to your dream catcher design – I would have them in my house anytime! Thank you for your comment on my dream catcher 🙂
Thanks for coming over to visit Agatha. I’m happy you like these.
These are so pretty. Your tutorial was so good! Thanks for sharing at the #HomeMattersParty
Thanks Vickie. Glad you liked the tutorial.
I’m glad you had the opportunity to spend some time with your sister. What a fun craft to do together. I LOVE Vintage doilies too and have been known to buy them at Estate sales. I might piggy back from this and frame some in embroidery hoops.
Yes, it was nice to get to spend some time with her. You’re so lucky to have a stash of vintage doilies. I love them too. Have fun making one with embroidery hoops.
Thank you for the thorough tutorial; I LOVE dream-catchers. I’ve been trying to one with string and get frustrated each time. I love these with the doilies.
Whitney
It is easier to use a doily, but I do like the look of the woven string too. Hope you give this a try.
These are beautiful:-)
Thanks Sherry.
These are soooooooooo beautiful !! To me it looks like a work of art 🙂
Thanks Winnie. I think they look really pretty too. I’m lucky to have found such beautiful vintage doilies to use in these.
These are so cute! We were just at a local shop that sold these, loved them.
Thanks Kim. Did you buy some or are you planning on making your own?
Oh, my gosh, you did a great job on those dream catchers! I really like the beachy themed one. The colors are so pretty! I bet your younger sister keeps you feeling younger, too!
Thanks Alli. I like the beachy themed dream catcher a lot too. I’m thinking of using it for my summer mantel. Hmmm…having a sister so young can sometimes make me feel really old…lol. Although I do miss having her around all the time.
How pretty! I am so in love with this idea! -Marci @ Stone Cottage Adventures
Thanks Marci. You’re very crafty, so I’m sure you could make some really pretty dream catchers too.