I was given this product to review. All opinions are my own.

*Scroll to the bottom for the Easter Egg Chick and Bunny Tutorial*
If you have crafty little ones (or maybe yourself), you’ve probably heard of the popular Rainbow Loom. It started out as a rubber band bracelet making kit (includes loom, hook, and rubber bands), but it can actually make a variety of different things; charms, rings, flip flop straps, mini Easter baskets, and more….the possibilities are endless. It’s a fun little loom that keeps my girls busy for hours. I’m not kidding…HOURS! The only drawback is finding the replacement rubber bands and the cost of the “specialty” color packets. Fortunately, I no longer have to drive around to various stores, which are often sold out, to try to find several colors. I can now save money and buy them online from Rainbow Braid.
Rainbow Braid offers four loom rubber band refill sets; 1200 metallic refill set (this stuff is hard to find), 2400 refill set, 5400 refill set, and the mega 7200 refill set. The loom rubber bands are latex free, compatible with all loom kits, and comes with a 365 day quality guarantee. Each color also comes packaged in individual resealable bags (sticky strip) and goes through a special airing process to help reduce the rubber band smell. How great is that! Hint – Easter is around the corner and who wouldn’t want this in their Easter basket 🙂
The loom refill set that we received was the Rainbow Braid 7200 mega rubber band refill pack, which sells for $35.90 and is shipped FREE! If you order the smaller sets, those will ship free with an Amazon Prime membership. This is an awesome deal folks. If you were to purchase everything in the set individually, you would be paying over $60.00….EEK! This refill set came with 24 colors, 500 clips, and a packet of colored beads. The quality and 24 color choices (see picture below) in this set mega are amazing. The only downside was trying to figure out what to make.


Solids – Red, While, Purple, Turquoise, Purple, Lt. Blue, Dark Blue, Hot Pink, Dark Green, Orange, and Yellow
Jellies (Glow in the dark) – Yellow, Green, Blue, Pink, Orange, and Purple
Glitter Jellies – Pink, Blue, Purple, Orange, and Green
2 clip packets
1 bead packet
Since it’s getting close to Easter, my girls decided to make some Easter themed charms. Here they are assembling their Rainbow Looms and making their projects. This kept them busy for 2 hours! Wouldn’t this Rainbow Braid mega 7200 refill set make a great Easter basket gift? I think so and if you order now, you’ll definitely receive it before Easter.

Shown below are some of the things my girls made using the rubber bands from the Rainbow Braid mega 7200 refill set . We did end up using all of the white for these projects, but haven’t even put a dent in the other packets and can do so many more projects. *See below for an Easter Egg rubber band project*

Carrot – orange jellies and green
Easter chicks – white, yellow, black, and orange
Easter Egg Loom Chick & Rabbit Tutorial
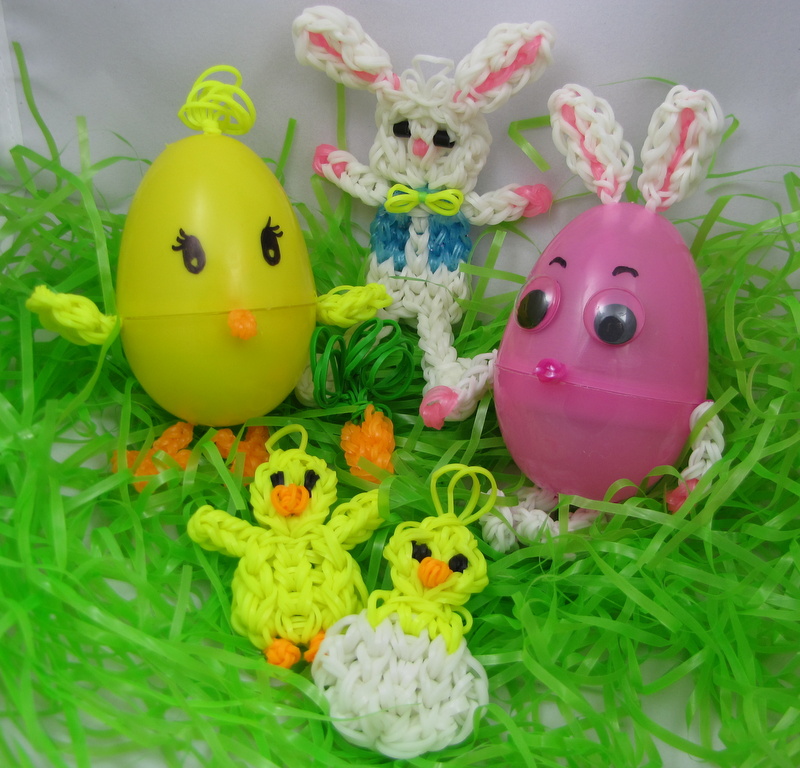
Since my girls were getting creative with the Rainbow Braid rubber bands, I decided to have some fun too. I came up with these Easter Egg characters using some of the colors in the Rainbow Braid mega 7200 refill set.
Tips before you get started: 1. Let the hot glue cool down a bit before pressing the rubber loops into it because it can melt the rubber bands. 2. If you’re eggs are thicker, use the nail on the inside of the shell and hammer from the inside out. This will help prevent your egg from cracking. 3. It will help if you have knowledge of how to finish each piece off with a finishing loop (same loop that finishes bracelets).
EASTER CHICK

For the Easter Chick (shown using a pink egg) – Make a centered hole on the top of the Easter egg. Make the head “feathers” by placing 5 bands onto your crochet needle. Pull those five bands over another band and loop that band through itself to finish (finishing loop). Pull the finishing loop through the top hole and glue down on the inside.
Use the video above to make the Easter Chick wings and feet. Use yellow bands for the wings and orange jellies for the feet. Make sure to add the finishing loop to each of the parts – the loop is what will be glued down on the inside of the egg.

To make the beak, wrap a single orange jelly band around your crochet hook four times. Next, take a single band and double it around itself and place it onto the hook. Slide off the first jelly band onto the doubled jelly band and place the loose end back onto the crochet hook (it should look like picture 4). To finish, take another orange jelly band and place one end on the hook and slide everything onto it. Take one end of the loop and put it inside itself to make the finishing loop.

When each part is made, start to assemble the chick. Follow the picture above for placement and where to glue each piece. Once everything is assembled, take the black Sharpie and draw on the eyes.

Chirp-chirp!
EASTER BUNNY
Use the video above to make the Easter bunny ears, legs, and arms. Make sure to finish each off with a finishing loop.

Make the bunny nose by wrapping a hot pink jelly around your crochet hook four times. Take another band and place one end on the crochet hook and slide the wrapped jelly onto it (it should look like picture 3). Next, take one end of the band and place it into the opposite end to make a finishing loop (picture 4).
Once all your parts are ready, start to assemble the Easter Bunny. Follow the picture above for placement and where to glue each piece. Once everything is assembled, take the black Sharpie and draw on the eyes or glue on googly eyes. Last, glue on the cotton ball to the back side of the egg. *Let the hot glue cool down and get tacky so it doesn’t melt the rubber bands.*

Hippity Hop!
Supplies
Easter Chick
- Solid yellow rubber bands
- Orange jelly rubber bands
- Glue gun
- Toothpick to press bands into hot glue
- Yellow Easter egg
- Hammer & Nail
- Black Sharpie
Easter Bunny
- Solid white rubber bands
- Pink jelly rubber bands
- Hot pink rubber bands
- Glue gun
- Toothpick to press bands into hot glue
- Pink Easter egg
- Black Sharpie
- Cotton ball
- Googly eyes (optional)
Directions
Easter Chick
- Separate the egg. Using the hammer and nail, take the top half and make a centered hole at the top. *Be careful or you might crack your egg. You can also hammer from the inside out.*
- Make “feathers” for the top of the head and pull through the hole in the center of the egg (see pictures). Put a dot of glue down on the inside of the egg, right next to hole and let it cool till sticky. Press the rubber bands into the sticky glue to secure.
- Make a beak using the orange jelly rubber bands (see pictures). Set aside till later.
- Make two wings using the yellow rubber bands. Follow this Youtube instructions and finish off with a final loop. Set aside till later.
- Make two chick feet using the orange jelly rubber bands. Follow this Youtube instructions and finish it off with a final loop. Set aside till later.
- Pull the finishing loop of the chick feet through each of the bottom holes of the Easter egg and glue down.
- Put a dot of glue on the inside center of the bottom egg shell and glue down finshing loop of the beak.
- Put a dot of glue on the inside sides of the bottom egg shell and glue down the finishing loops of the wings.
- Close egg. Use a black Sharpie to draw on the eyes.
Easter Bunny
- Follow these Youtube instructions for the ears, arms, and legs. Finish each part off with a finishing loop. Set aside.
- Take the ears and pull the finishing loop of each ear through one of the holes in the top of the egg. Glue down to secure.
- Put a dot of glue on the inside center of the bottom egg shell and glue down the finishing loop of the nose.
- Put a dot of glue on the inside sides of the bottom egg shell and glue down the finshing loops of the arms.
- Close egg. Glue down googly eyes or use a black Sharpie to draw eyes/brows.
- Take the cotton ball and tear/shape to the size desired. Glue cotton ball to backside of the egg for the bunny tail.
Here are some other projects my daughters made with the Rainbow Braid mega 7200 refill set.

Want more Easter Ideas? Check out my Pinterest Easter Board
Follow My Pinterventures’s board Holidays-Easter on Pinterest.


I had no idea you could make so many things with those little rubber bands! Very cool! Thanks for sharing on the Learn Through Play hop!
Wow! Those are amazingly detailed. Thanks for sharing at the Learn Through Play Hop!
Now this is very creative. I’ve heard of the bands being bracelets but not making characters out of them. My daughters would love these! Thanks for sharing at #ProductReviewParty!
Hi Louida. Thanks for visiting. My girls love this craft too and I can’t believe all the things you can make with bands. I even found a cute little Easter basket that can be made with bands.
Oh I will definitely check these out with my loom-loving son! 🙂
Look how cute!!! I had no idea you could make other things besides bracelets. Your girls did a wonderful job : )
Thanks for sharing on Hump Day Happenings!
Oh those turn out really cute and look like a fun activity!! Thanks so much for sharing at our Easter party!
Those are so cute! We just have a basic bracelet maker, but if we had the rainbow loom, we would try that for sure! Thanks for posting!
If you have one that is staggered, you can make these 🙂 Thanks for stopping by.
Wow…I didn’t realize you could make more than just bracelets with those!
I know right! There are so many creative people thinking of new ways to use this loom. It’s amazing and it sort of teaches the girls how to follow directions, patience, and gives them a sense of accomplishment when they finish a long project.