Create your own Moss Covered Easter bunny with a paper mache form and moss sheets.


I think it’s safe to say that most of us love Pottery Barn. However, for many of us Pottery Barn is a bit too pricey. So, when I saw their live ivy topiary bunnies at $79 and twig bunnies for $179 (very large bunnies), I knew I there had to be a less expensive alternative.
DIY Moss Covered Bunny CraftMy less expensive version is a cross between the two Pottery Barn bunnies with a much lower price tag. The only downside is that this is a VERY messy craft*. You will be covered in moss bits and will need to break out your vacuum cleaner or broom after this project is done.
*If you are highly sensitive to dust or have respiratory issues, you may want to use a mask for this project.
Moss Covered Easter Bunny Tutorial
Supplies:
Make sure to use craft store coupons to save the most money on this project.
- Roll of moss mat
- paper mache bunnies
- glue gun & 4-5 glue sticks
- scissors
- ribbon
- fray check (optional)
How to Make Moss Covered Easter Bunny:

Step 1. Gather your supplies. Unwrap the roll of moss mat and remove any paper backing that remains on the back.

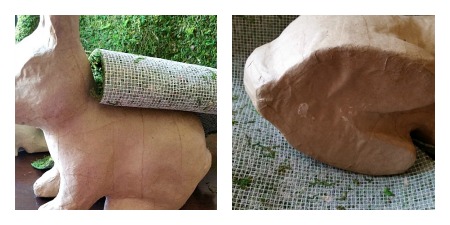
Step 2a. Cut a strip of moss that is large enough to cover the back of the bunny from the neck to the bottom of the bum. I cut my sheet about 6.5 in. x 18 in. Glue down the moss in sections. I started from the top of the back and worked my way down the sides and back. Note: Don’t use too much glue or it will seep through the moss. Use just enough to hold the moss mat down.
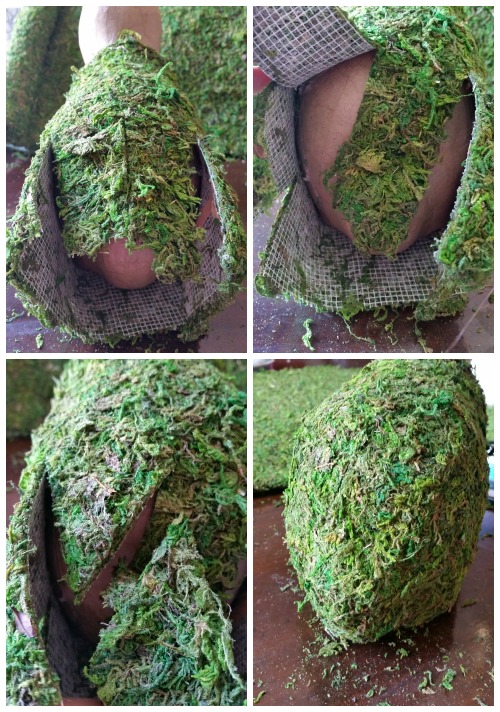
Step 2b. If glue starts to seep through the moss, use the moss bits that have fallen off to cover any glue that has seeped through. I just grabbed a pinch and smashed it down into areas where the glue seeped through the moss mat. Also, don’t throw out any small moss mat scraps because those will be needed to cover other areas on the form.


Step 3a. When you get to the legs or any angles, cut a slit in the moss. Don’t worry if you end up with odd shaped moss areas as this can easily be covered. The main thing is to be able to wrap the moss around the bunny and glue it down. Here are more pictures of how I covered the back of the bunny. I made cuts in the moss mat where I wanted to fold down and wrap around the form. Again, I didn’t worry about odd seams as the seams will not show once the moss mat is glued into place.

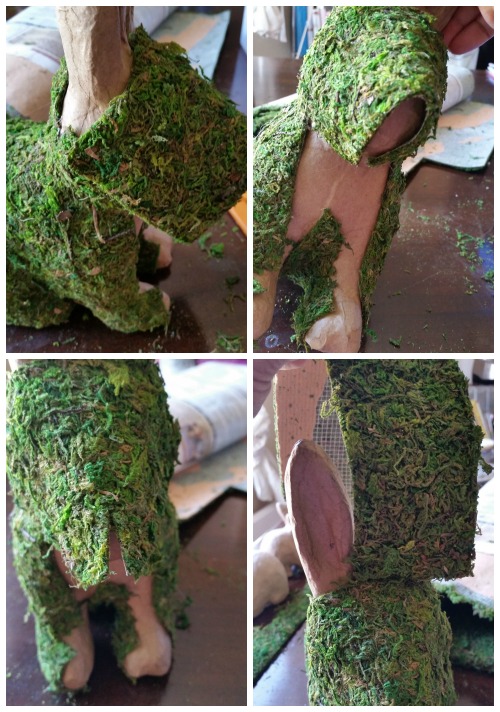
Step 4. To cover the neck and front legs, I used a long 1.5-inch piece of moss mat. Again, cut the mat in areas that are rounded and curved to allow the mat to fit. I also used scrap pieces of moss mat to cover the odd-shaped areas behind the neck. Continue to cut pieces of moss to fit around the face and ears of the bunny. Glue these pieces down. Once the majority of the bunny is covered, there will be small areas that will need to be patched with the scrap pieces of moss mat. Cut pieces to fit into these areas and glue them down.

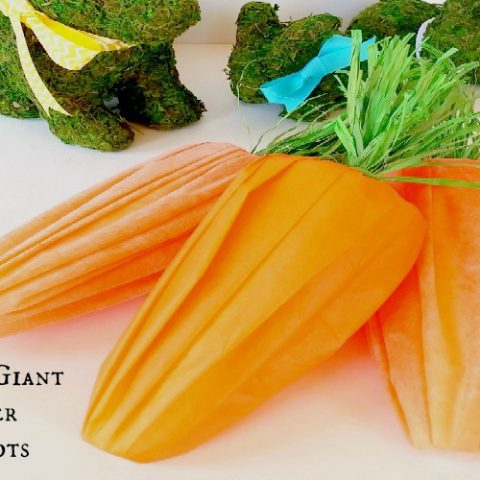
Step 5. Optional – spray with a clear acrylic spray to help prevent shedding (highly recommended). Cut the ribbon and tie around the neck of the bunny. Optional – Apply fray check to the cut end of the ribbon to prevent fraying. Now dust yourself off and enjoy your new moss covered bunny!


If you would like to see more spring crafts, visit the Spring Craft Blog Hop for craft inspiration.
More Spring Ideas…
More Spring Ideas . . .


I love these! Such a cute idea and waaay cheaper to make them yourself. Pinned.
Adorable need to give this a try.
Linda Bauwin – CARD-iologist
Helping you create cards from the heart.
I love these bunnies! I will be featuring them at Idea Box link party this week 🙂 Thank you for sharing!
This looks so incredible! Loving it! Pinned and tweeted. Thanks for being a part of our party. I hope to see you tonight at 7. Lou Lou Girls
Thanks so much for sharing. Will be at the party!
I love these. They came out great. Thank you so much for sharing at Sunday’s Best Link up.
Thank you!
Dropping by to let you know you are being featured at this week’s Share It One More Time Link Party. Loved your project. Thank you for linking up. Cathy
Always honored to be featured, thank you!
I do hope you’ll share your bunny with our new Link Up – Idea box 🙂
xx
Mila
milaslittlethings.com
Thanks for the invite. Will head over to link up.
I absolutely love how your bunnies turned out!! They’re perfect for Spring 🙂 Thanks for sharing at Creative Spark last week; I’m featuring your moss bunnies today. Please stop over to grab a “featured” button and link up with us again!
Thank you for the fun party and feature. Will make sure to come over and link up.
Hello!! Just wanted to let you know I will be using this in a round up (posting soon) from the Teach Me Tuesday party! Very much appreciate you linking up with us 😉
So glad to see you back Bobbi! Thanks for including me in your round-up 🙂
Oh my gosh, these are so cute and I love your tutorial. Pinning this. Thank you for sharing at Share It One More Time. Cathy
Glad you like the tutorial & thank you so much for pinning!
You’re bunny is adorable. I think it looks better than the Pottery Barn one. I love Pottery Barn, but the decor is pricey. Thanks for sharing on Small Victories Sunday link up.
Thanks Rachel. I love PB too, but I like it even more when I can save $$$ making it myself 🙂
Such an adorable projects! Thanks for the idea. My kids would love to do it.
Have fun making these with your kids 🙂
Thank you for sharing your moss covered bunny at The Pin Junkie. It’s being featured today in a spring and Easter round up.
Thank you so much! Love your party and it’s an honor.
Wow, Erlene. You NAILED IT. I think they are a 10 out of 10. Honestly. I am going to hunt for some faux moss. Great share! Thank you for being a part of our party SHARE IT one more time, Saturdays. It wouldn’t be a party without you! Have a great week!
Thank you! It’s pretty easy to find moss and I found the bunnies at JoAnn’s craft stores in their Easter section.
Very cute! I love knocking off PB because I ain’t paying those prices but I sure love their style!
Thanks Lara. Isn’t it great when you can make something you love and save $$$!
I love these! I have seen a few moss crafts but never done them. I guess the moss is freeze dried, right? So they will last more than 1 year? Pinned and scheduled on FB.
I’m not sure how the moss is preserved, but it will definitely last more than one year.
Oh my goodness this is so amazing and perfect I just love it! It’s a wonderful craft for spring 🙂
Thank you. I added these to my spring mantel and it definitely looks like spring 🙂
Stopping by from Sunday’s Best. The bunnies turned out adorable and a big saving too. I love DIY projects that look just as good as the original version. Thanks for sharing!
Thanks for the fun party and for stopping by my blog.
I love this idea! Pottery Barn can be so darn pricey and you’ve done a brilliant job recreating it !
Thanks Zakkiya. Yes, PB is a bit pricey for me, so I love recreating items from the catalog when I can.
Love this Erlene and have always wanted to do! Pinned!
You should try making one 🙂 It would go well on a table with all your lovely food.
These are too cute! I really like how yours came out and that they were so much cheaper. Thanks for sharing at #HomeMattersParty
Thanks so much. Yes, definitely cheaper and I like that….lol.
Erlene, these are beautiful! I thought for sure it would be better to use just regular moss (what a mess) but you can’t even see any seams here! So pretty. Thanks for sharing. I will be off to buy some moss!
You could use regular moss, but I just thought that a moss mat would be easier since it’s already covered in a nice layer 🙂
Adorable! These are so cute. Thanks for sharing at the Thursday Favorite Thing Blog Hop at Katherine’s Corner. Nina @ Vintage Mama’s Cottage
Thanks for the lovely party and allowing me to share.
I love it! They look gorgeous! Thank you for joining us #pintorials
Thanks for visiting and the fun party 🙂
Erlene, your looks better than PB!! Love these. I was already planning to make the basket I featured at Merry Monday a couple weeks ago, now I want to make these too! I love all these wonderful ideas, especially when they turn out this nice!
These would be so cute inside the basket 🙂
Great job Erlene!! Not sure I would have the patience for that moss..Love those bunnies! Thanks so much for pinning to the P3 Party Board! You are being featured on my blog & social media tomorrow!
Kim
Thanks so much for the opportunity to pin to your board 🙂 Looking forward to seeing all the other features too.
These moss covered bunnies are really beautiful. I’m not sure if I could ever make mine look that good. You are so talented! Thanks for sharing your beautiful post at Together on Tuesdays 🙂
Thanks for visiting and I’m sure you could make one of these 🙂
What a great idea! And a huge savings. They turned out really good. I’m sure I wouldn’t notice if it was a messy craft. I’m messy no matter what I am crafting. Others might but I won’t 😉
Omgosh this was so messy it was kind of funny. I was literally covered in moss bits…lol.
Your moss covered bunnies are simply adorable. I think I like yours even better. I made a moss covered wreath once and it was messy, but in the end it turned out great. I’m going to try my hand at making your bunnies. So cute!!
These would look so cute on your Easter tablescape surrounded by your PEEPS bunnies.
Erlene, I love these, what a great knock-off!
Thank you!
That is adorable!! You could probably use spray glue and then the moss that’s in a bag, too. Love it!!
I thought about that, but I didn’t want to mess with spraying glue and loose moss…lol.
The mess makes it all worth it!! 🙂
I love your moss bunny! Adorable!
Thanks Lauren.
I love this craft! Love how you were able to do this for $15. Happy to co-host this blog hop. Thanks!
Joann’s had a great sale and I was able to use coupons on top of the sale 🙂 I went back to get more and someone wiped out the entire bunny section….lol.
I love your bunnies, Erlene! They remind me of the year my uncle took me to NYC for Easter. The shrubs at Tavern on the Green were shaped like bunnies! 🙂 It’s so great being a part of the Spring Craft Blog Hop!
Thanks Christie. I’ve never been to the Tavern on the Green. Sounds like they have a nice garden to view. Thanks for being a part of the #SCBH2015
I would not even thought about doing this myself without your tutorial. What a great idea. I always admire the bunnies, but think it’s a bit pricey. I might try this myself. #Wednesdaywisdom
You could totally do this yourself. It’s kind of crazy how expensive moss covered things are.
Erlene – What a great project! Your moss covered bunnies are so adorable!
🙂 Thank you. I love them and they have a new home on our mantel.