

There are people that love shopping at dollar stores and people that hate it. Some don’t mind the generic $1 decorations while others prefer something with a little more pizzaz. Whatever your personal preference, I’m here to tell you that there is a way to transform plain dollar store Halloween items into something a little more special.
Personally, I love to shop at my local Dollar Tree for Halloween decorations. Halloween is one of the holidays where you can be extra creative in transforming dollar store decorations to fit your Halloween theme. Since my Halloween theme is Dia de los Muertos or Day of the Dead, I chose to transform Dollar Tree gray skulls into a Halloween sugar skull couple.
Supplies:

- male skull
- paint pen – black and white
- black dry erase marker (optional)
- glue gun/hot glue
- one rose
- gemstones (optional)
- tiny spider (optional for male skull)
- cotton swabs
- nail polish remover/acetone
- drill + 1/8″ or 1/4″ drillbit
- female skull
- paint pens (black, white, and various other colors)
- black dry erase marker (optional)
- glue gun/hot glue
- flowers – orange, yellow, white
- small butterfly
- gemstones (optional)
- cotton swabs
- nail polish remover/acetone
Directions:
To create these sugar skulls, I did not use any templates. I did use sugar skull images from the internet as a reference to create the designs on the skulls, Don’t be afraid to freehand! I think that’s what makes it special and unique.

Sometimes the paint job on the skulls are less than perfect. To clean up the over-spray, take a cotton swab dipped in nail polish remover and clean up any over-spray.

Use a black paint pen to color in the eyes and nose. Set aside to dry.

Use a white paint pen and color over the teeth and extend the teeth out to the edge of the black painted portion on the skull. Let the paint completely dry. Use a black paint pen to fill in the black portion of the mouth. Clean up any messy paint areas with a cotton swab. Let the black paint dry.
MALE SUGAR SKULL
Look online and find a male sugar skull image for reference. Before using paint pens for the pattern on the skull, I used a dry erase pen to draw out my design. Using a dry erase pen made it easy for me to wipe it off with acetone if I made a mistake. You can skip this step and use a paint pen to draw your pattern, but it’s harder to wipe off than the dry erase pen. Once the design was traced and fill in, let the skull completely dry.

Color in the back of the skull to mimic hair by following the natural lines in the skull form. Let dry.
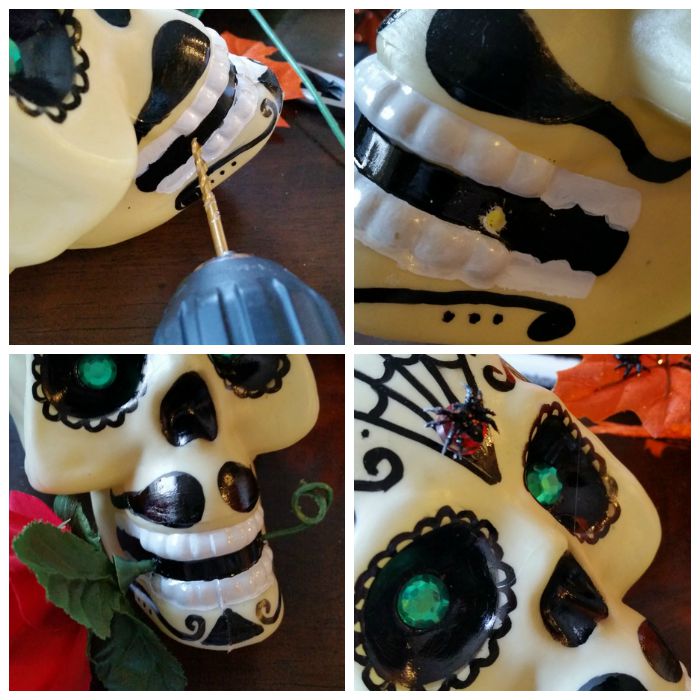
These few details here are optional. To place a rose in the sugar skull mouth, drill a hole between the area between the teeth from one side of the mouth to the other. Insert a rose stem and curl the end to prevent the rose from falling out – wrap the end around a pencil to curl. Hot glue a large gemstone to the web design and add a tiny spider to it (spider from a floral leaf pick used in my Halloween Floral Centerpiece). Next, hot glue one gemstone into each eye socket.
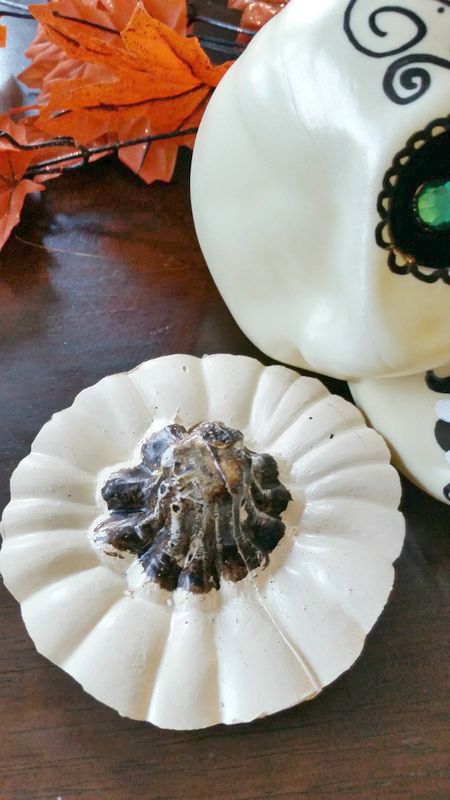
Lastly, I used the top of the craft pumpkin from my Halloween Floral Centerpiece craft as a hat for my male sugar skull. Use a liberal amount of hot glue to attach it to the top of the skull. If you do not have a pumpkin top, you can leave it off or make/buy your own hat.

FEMALE SUGAR SKULL
Prep the skull by cleaning any overspray and paint the eye, nose, and mouth area with black. Paint the teeth white. Let the paint dry.
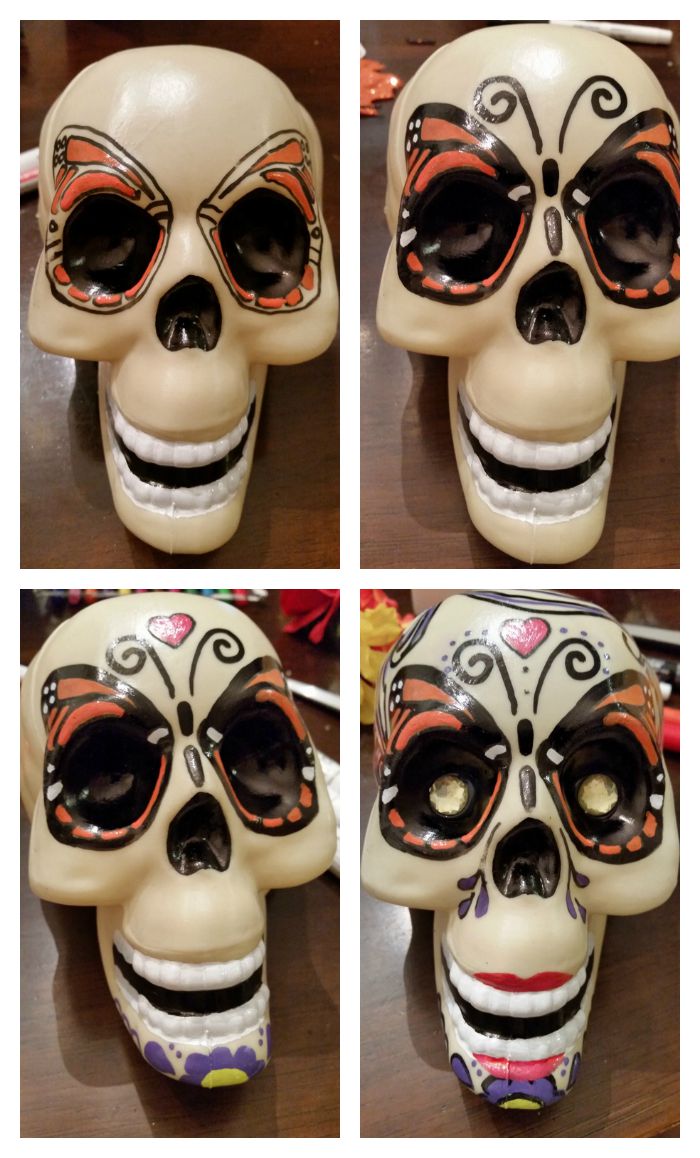
Get an image of a female sugar skull to use for reference – I chose a sugar skull with a butterfly pattern, but use any image you like. Use a dry erase pen to draw the pattern onto the skull. Go over the pattern with a black paint pen and fill it in with the color paint pens. Place gemstones into the eye socket.

For the hair, make swirls or do it in a solid black. Accent the hair with a purple paint pen or leave it all black.

Glue flowers onto the top of the head – two yellow on the side, two orange on top, and white between the orange flowers. Glue a butterfly onto one of the flowers.

Do you shop the Dollar Tree for Halloween decor? Tell my what you created in the comments below.
More Halloween crafts…


Lighted Day of the Dead Wall Art


Love these! You are so talented. Sharing on FB from the Halloween Hop.
Kim
These are really cool! I’ll have to keep my eyes out for skull candles because I know my husband would love to make a pair of sugar skulls with me. Unfortunately there are no Dollar Tree stores in my state (or any other type of dollar store, for that matter), so hopefully I find some!
I love these skulls! These are so creative and awesome! Thanks for sharing at Funtastic Friday.
Oh my goodness! These are cute! I want to decorate some sugar skulls! I bet my daughter would love to make these as well. Thanks for sharing this wonderful craft idea at Submarine Sunday!
I’m a Dollar Store fan. and I love want you’ve done with the skulls. Thanks for sharing on Sunday’s Best Linkup.
SO cute and such a great idea! I’m going to have to pick up a few skulls from the Dollar Store and do this!
How fun! You did an amazing job in transforming these plain skulls into awesome Halloween decor. Thanks for sharing at Snickerdoodle Sunday. Pinned and Tweeted.
How cute and clever! The skulls look so much better! Love the hat!
Good Morning Erlene!! Just popping in to let you know your post has been picked as a feature at the Welcome Home Wednesday Link Party! Stop by this morning to see your feature and link up! Don’t forget to grab your “Featured Button” too!
I love all the fun colors and bright flowers! Thanks for linking up over at the Welcome Home Wednesday Link Party! Your skulls were picked as a feature this week… check it out!
Thank you for linking up with the OMHG WW! Please link up with us again this week and share your great posts! xx
I totally agree with you about shopping at the Dollar Tree. There are so many great things there just waiting to be turned into something awesome. Thanks for sharing these cute little skulls at Inspiration Thursday!
I’m kinda loving on the butterfly eyes up there. What a cute idea, it’s perfect for Halloween, and my new love for sugar skulls. I can’t get enough of them!
I can’t believe you made these yourself! They are soooooooooooo BEAUTIFUL and ARTISTIC !!
You are really super talented and I admire your creativity
These are so cool! I wish I had any artistic talent to create them. Thanks for sharing on the #HomeMattersParty
These are adorable! We are new to our neighborhood and learned last year that ours is “The Neighborhood” in the city for Halloween. The one that decorates in September, runs haunted houses in garages, and that parents drive there kids to in order to participate. We definitely have to up out game this year! Thanks for sharing!!
you’re so talented! these came out amazing… i’m not so sure i’d have the same results. lol
This looks seriously awesome! I don’t know how people do this kind of stuff!
These are so cool! Awesome Job!
WOW girl, you have talent – mine definitely would not turn out this good. Have you thought about selling these? You really should!