
Did you know that March 3 is Girl’s Day or Hina-matsuri in Japan? It’s a day for families in Japan to wish good health and a happy life for their girls. I hate to admit this, but I used to celebrate this when I was younger and had no idea of the real history or meaning behind it. All I knew was that it was a time to celebrate girls, display dolls, dress in kimono and eat lots of yummy treats. Now that I’m older, I’m realizing how much culture was lost in such a short amount of time since my grandparents immigrated to the states.
History of Girl’s Day
Supposedly, the history of Girl’s Day had its roots from a Chinese ritual for getting rid of bad luck and sickness by transferring it to a doll and tossing it in a river. This practice of sending ill fortune away in straw and paper dolls was adopted by the Japanese, which is now called “hina-nagashi”.
While modern day Japanese don’t always practice tossing dolls in a river, many still display special dolls in the home called “hina-ningyo”. These dolls are traditionally bought by the girl’s grandparents and displayed around the middle of February. Then, immediately after the ceremony the dolls are put away. It was believed that putting away the dolls late would cause a delayed marriage for your daughter.

Traditional complete hina-ningyo are 5-7 tiers and are covered in red cloth. The top tier has the emperor and empress. Next are three ladies in waiting, followed by five court musicians. Then on the fourth step are two ministers flanking diamond shaped stands with diamond shaped rice cakes called “hishi-mochi”, a traditional dish for this celebration. Below the ministers are guards with a mandarin orange tree to the left and cherry tree to the right. Then on the sixth step are small items that are found within the imperial palace, such as a tansu (chest of drawers) or kyodai (small chest with mirror). The last step displays items not found within the imperial court, such as goshoguruma (ox drawn carriage) and jubako (lacquered tired food box).
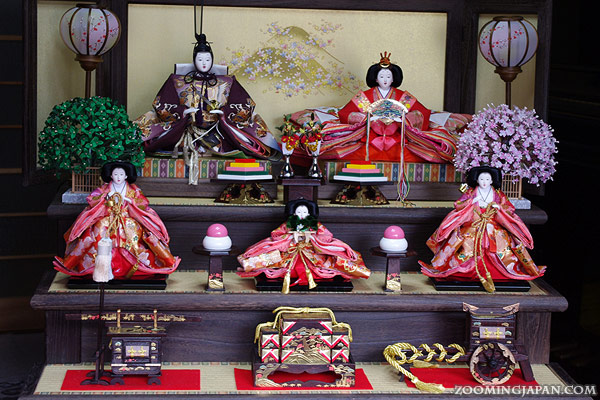
Today, many hina-ningyo aren’t as elaborate as the one above and due to space issues are a condensed version. Some are even flat and have the dolls displayed on one level.
Meaning of Chi Chi Dango Colors
Now that you have a brief explanation of Girl’s Day, I want to share with you a treat I remember eating on this day called “chi chi dango”. Remember the “hishi-mochi” that was mentioned earlier? This rice cake was traditionally ordered from a mochiya or Japanese confectionery to be displayed with the dolls. It was made in three layered colors: Pink for spring or energy, white for snow or purity, and green for summer or fertility. While the hishi-mochi could technically be eaten, it became hard and not so appealing after being displayed for several days. Thus, my grandmother used to make chi chi dango, a sweet and chewy mochi for all the girls to eat on this day.

How to make Chi Chi Dango (recipe card below)

Take a 9″ x 13″ glass pan and grease with Crisco.

Mix dry ingredients and wet ingredients in two separate bowls.
Once all the ingredients are incorporated in each bowl, slowly add the dry ingredients to the wet mix. Mix until everything is combined well.

If making three color chi chi dango, separate the mix into three bowls. Add red food coloring to one bowl and green to another. Mix well. Leave one bowl plain white.


‘Pour green mix into the 9″ x 13″ greased pan and cover tightly with foil.
Place covered mochi pan inside of a another pan that is filled with water in a 350F degree oven for 25 minutes. I used a large cookie sheet and filled it with water. This will help the edges of the mochi from becoming hard and dry.
**You do not have to place the pan inside of a water bath. However, when you do not do this, the edges of the mochi become hard and you will have to cut the edges off.**


After 25 minutes, remove mochi from the oven and pour the white mix over the green layer.
Cover and place back into the oven for 30 minutes. You may have to add more water to the outer pan.

After 30 minutes, pour the pink mix over the white layer.
Cover and place back into the oven for 30 minutes. Check to see if you need to add more water to the outside pan.
Once cooked, remove the mochi from the oven. When the pan is warm, take the foil off and shake off any condensation. Place the foil back onto the pan and let it cool overnight. **The edges will look slightly dry and the center will be soft to the touch. The center should not be runny, but bouncy**
It is highly recommended that you let this cool overnight. If you try to cut this while it is warm, it will be extremely sticky.
Cutting and Storing Chi Chi Dango


To cut mochi, get potato starch and your plastic knife ready. Dust your working surface and the knife with the potato starch.
**If you do not have a plastic knife, you can wrap your knife with saran wrap or place it inside of a plastic bag. This will prevent the mochi from sticking to the knife.**

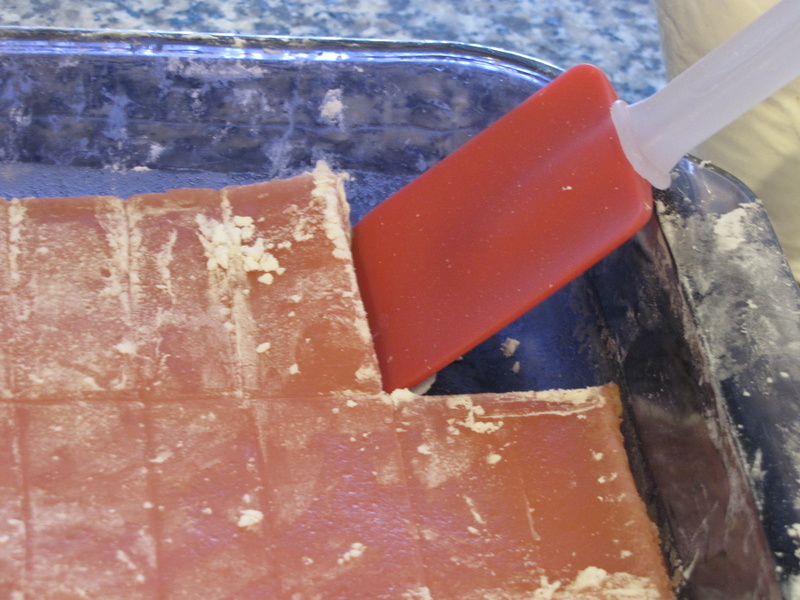
Once you have cut the mochi, gently start to remove them from the pan. The cut edges will be sticky, so dust your fingers with some potato starch and help pull the pieces out.


Dust the cut pieces in potato starch and dust excess off.I like to wrap small pieces with wax paper or parchment paper for the kids to take to school.

I cut some larger pieces for the husband 🙂
I hope you try this Chi Chi Dango recipe and let me know how you like it.
For more Asian recipes, visit my Pinterest Asian foods board
Follow Erlene Amat | My Pinterventures’s board Recipes: Asian Food on Pinterest.

Chi Chi Dango - Girl's Day Mochi
How to make Girl's Day mochi or Chi Chi Dango.
Ingredients
- 1 pound mochiko (16 oz. box of sweet rice flour) Do not use regular rice flour.
- 1 1/2 cups sugar (if you like things sweet, add 2 cups)
- 1 teaspoon baking powder
- 1 can coconut milk ( 14 oz.)
- 1 3/4 cups water
- 1 teaspoon vanilla (optional)
- red and green food coloring (optional if making one color mochi)
- potato starch for dusting
Instructions
ONE COLOR
- Mix mochiko, sugar, and baking powder in a bowl. Set aside.
- Mix coconut milk, water, and vanilla in another bowl until well blended.
- Gradually add the mochiko mix into the wet mix until fully incorporated.
- Pour into a greased 9″ x 13″ pan (Crisco) and cover with foil.
- Place the covered mochi pan into another pan. Put some water in the outside pan.
- Place into a 350F degree oven for 1 hour 15 minutes. Depending on your oven, you may need to cook up to 15 minutes longer.
- Let the mochi cool. When it is warm, shake off any condensation on the foil. Replace the foil and let it cool overnight.
- Using a plastic knife dusted with potato starch, cut mochi into small rectangles or whatever size you prefer. ***Do not use a metal knife because the mochi will stick to it more than a plastic knife***
- Dust cut mochi with potato starch and pat excess starch off.
- Serve
TWO COLOR (PINK/WHITE)
- Follow the first three steps for the one color version.
- Evenly separate the mix into two bowls.
- Add a 3-4 drops of red food coloring into one of the bowls.
- Pour pink mix into a greased 9″ x 13″ glass pan and cover with foil.
- Place the covered mochi pan into another pan. Put some water in the outside pan.
- Place into a 350F degree oven for 25 minutes.
- Take mochi out and pour second color on top. Cover again and place back in oven for 50 minutes. You may need to add more water to the outside pan.
- Follow steps 7 – 10 for the single color mochi.
THREE COLOR MOCHI – PINK/WHITE/GREEN
- This one takes a little longer because the oven is being opened three times during the cooking process.
- Follow the first three steps for the one color version.
- Evenly separate the mix into three bowls.
- Add 3 drops of red food coloring in one bowl and 4-5 drops of green in another. Keep one bowl plain white.
- Pour green mix into a greased 9″ x 13″ glass pan and cover with foil.
- Place the covered mochi pan into another pan. Put some water in the outside pan.
- Place into a 350F degree oven for 25 minutes.
- Take mochi out and pour the white mochi mix onto the green. Cover again and place back in the oven for 30 minutes.
- Take mochi out and pour the pink mochi mix onto the white. Cover again and place back in the oven for 30 minutes.
- Follow steps 7 -10 for the single color mochi.
Notes
**Can be stored at room temperature for two days (mine never lasts past two days before it’s eaten). You can also place in the refrigerator if you need to store it for a few days more, but the edges may get hard.**
Recommended Products
As an Amazon Associate and member of other affiliate programs, I earn from qualifying purchases at no additional cost to you. Thank you for your support.


Hawaiian Chili - Zippy's Inspired Recipe
Zippy's inspired chili using Portuguese sausage and vegetables for a unique chili flavor. Great over rice or on hot dogs.


Hi! Thank you for the great recipe! Over the years I’ve been trying different chichi recipe and combining them all and tweaking for my needs, you know how it goes. But I had to comment to you and let you know that your water bath technique is by far THE game changer. No dried out edges. No waste. I mean, it wasn’t really wasted but I couldn’t give those pieces away. ALSO, I covered for all three layers per your recipe which left the layers nice and stuck together. Other recipes say to cover for only the last layer and I’ve had separation issues. This year, finally, chichi came out great! And I know it’s unconventional, but I make it for new year’s because it’s way easier than regular mochi. Thank you! Happy new year!
I’m so glad that the recipe came out great. I totally get combining recipes…I do it all the time. Thanks so much for giving it a try and taking the time to comment.
The mochi looks very lovely! Can I ask how does baking powder in the recipe work? We make some rice cakes sometimes in japan, but have never put baking powder in them.
You could make this without the baking powder. I just add it to help give the mochi a little ‘lift’, but it really isn’t needed and you won’t notice it missing if it isn’t used.
Absolutely love this recipe, makes perfect mochi every time! I looked forward to Girl’s Day all year growing up in Hawaii. Just wondering, is it possible to not cool it overnight? Would cooling it for an hour or so be sufficient enough? Or, could it be placed in the fridge for a short period to cool? Thank you so much.
I’m so glad you like the recipe. It’s possible to cool it in the refrigerator to speed things up, but make sure to cover well so it doesn’t get hard and don’t forget it or it will harden. An hour wouldn’t be long enough to cool down if leaving it out on the counter. It would still be too sticky and it would be better to cool it down longer if possible.
Thanks for this recipe but you might want to explicitly state that it is GLUTINOUS or SWEET rice flour that is called for. I used regular rice flour (since the recipe above didn’t specifically say sweet rice flour was needed) and it didn’t work out 🙁
Sorry it didn’t work out. I put Mochiko in the recipe ingredients, but I’ll clarify that it is sweet rice flour. Regular rice flour is made from long grain rice and doesn’t have the starch to make a thick mochi. Mochi needs to be made with Mochiko or sweet rice flour, which is made from short grain sticky rice.
Wow, thanks for the brief history lesson! I used to eat this type of chi chi dango every year for girl’s day, I never knew what the colors represented!
I think the superstition came true in my family, both my sister and I got married very late (we always forgot to put the dolls away, lol!).
Tried this recipe and thought it was great. Thought the sweetness was just right and glad I didn’t go for more as called for in other recipes.
One question: Do you know any recipes to make a flavored chi chi dango? A shop in San Jose, California makes a variety of flavors like guava and raspberry. I’m not sure how they accomplish this. Using juice or nectar in place of water? I have seen some recipes online that involve using jello, but that seems like it could change the consistency. Thanks.
Thanks for trying the recipe and glad you liked it.
I’ve tried Jell-o mochi and I personally don’t care for the flavor (my kids didn’t like it either). I usually use flavored filling instead of flavoring the mochi. If I were to flavor the mochi, I would use powders like green tea powder, strawberry powder, guava powder etc… Good luck trying it.
Thank you for allowing me to learn something new Erlene! Pinned and shared!
#ibabloggers
Such an interesting story behind these! They also look delicious! Pinned!
Following your Asian food board now. 🙂 The sweets look great.
This is so pretty Erlene! And it looks yummy, I pinned this. I hope I can try this soon….not sure if I can find rice flour here in Brazil…but I will look. Found this at Anna can do it foods of the world. Have a great week.
Loved this recipe! Kids enjoy it too! Very similar to the chichi dango I buy in Hawai’i. Thanks so much for the thorough instructions to make the layers 🙂
Thank your for linking up to my #1 National Saturday linkparty! It’s a really yummie recipe! I can’t wait to buy the ingredients and try it! Thanks for sharing it with me!
So interesting. Thank you for sharing this on Traffic Jam Weekend, Erlene. I love seeing posts about other cultures.
I haven’t heard of this ceremony before and I would love to try this out!
My kids LOVE this stuff. Hope you give it a try.
Thank you for sharing! I always find it so interesting to read about other cultures! And the displays are absolutely beautiful. It is sad, though, how often we follow rituals as children and don’t fully understand them until we get older and we end up missing so many years of being able to completely appreciate what was in front of us all along! Stopping by {late} from #throwbackthursdaylinkup
Thank you for co-hosting with us at the Let’s Get Real party this week.
Thanks for having me. I enjoyed it!
This is great! That recipe looks delicious!! Thanks so much for joining us at the MaMade Blog Hop! I hope you’re having a great weekend 🙂
Thank you so much for stopping by Saturday Dishes and linking up.
Blessings,
Diane Roark
recipesforourdailybread com
What a yummy looking treat! And I absolutely love the story behind it. It’s so important to hold on to our heritage. Thanks for sharing yours. I also appreciate you linking at All Things Pretty!
I grew up eating this treat and we all love it. The great thing about blogging is that I get to share what I’ve learned on this blog. Plus, it’s great to stop by all the linkups and learn even more from all the other great bloggers.
Erlene, this is just one of the things I love about blogging- I get to meet so many interesting people and find out so many things that I wouldn’t ordinarily be exposed to. I enjoyed your explanation of Girl’s Day and seeing the great pictures of the dolls and of the candy! Thank you for sharing this with us at Treasure Box Tuesday! 🙂
This was a fun post to write and a learning experience for me too. Thanks for hosting another great linkup.
I have never heard of Chi Chi Dango. It sounds very interesting. I will have to try it. Thanks for sharing at Saturday Dishes.
Erlene, I was reading your recipe for the Chi Chi Dango and I was thinking to myself, this sounds a lot like mochi. I just recently bought all the ingredients necessary to make mochi but haven’t made it before.
I enjoy learning about international customs. The Girl and Boy Days on Japan are very interesting. Thanks so much for sharing this. I learned a great deal.
Thanks so much for co-hosting the Let’s Get Real Friday Link Party with us this week. I hope you’ll enjoyed all the great links and the people. I look forward to following you from now on all your site and social media.
It is mochi 🙂 It’s a sweet and chewy mochi without all azuki beans or bean paste filling, which my kids don’t care for.
Thanks for stopping by and for having me as a guest co-host.
Erlene, I am finding this so interesting! What a lovely post and thank you for sharing with all of us about this special tradition!
Thanks for visiting. I’m just glad I got to share this wonderful Japanese tradition with all of you.
Such an interesting tradition and that looks amazing!
Thanks. It’s nice to finally understand the reason for the celebration.
How very interesting & so colorful!! Thank you so much for sharing with us on the Wake Up Wednesday Linky!
Angie
Gods Growing Garden Blog
Yes it was really neat to research the meaning of the colors in the mochi and learn more about the history of Girl’s Day.