
* I was given the Liquid Chalkers pens to test and review. All opinions expressed about this product are my own – see bottom of post for review. This post contains affiliate links and I may receive compensation when these links are used to purchase products.*
Every year, a senior community next to us holds an annual garage sale. It’s a HUGE sale and draws a lot of traffic, so you have to be quick if you want to find hidden treasures. Unfortunately, we were a little late, but I did manage to find an old beat up picture frame.

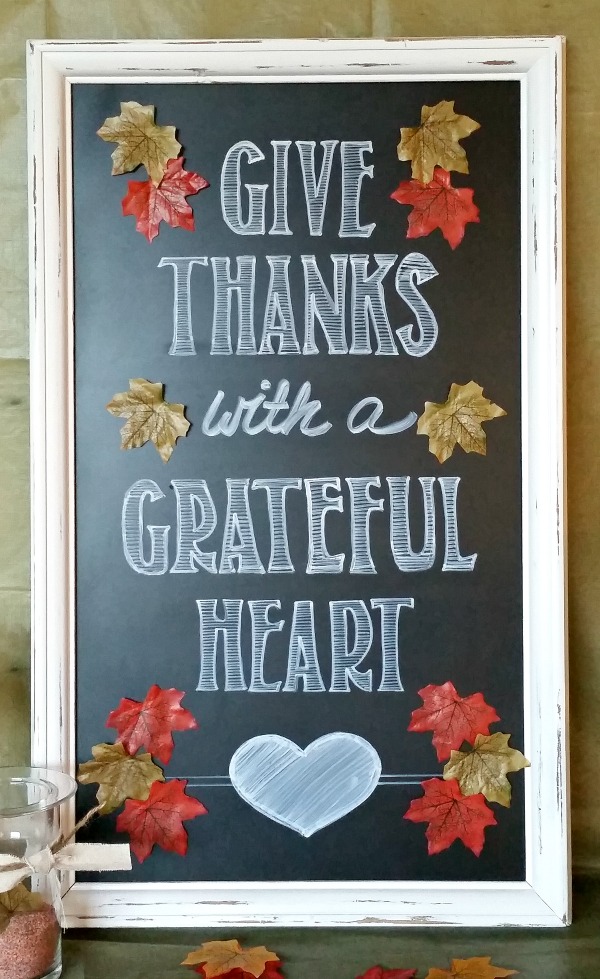
The frame was nicked, covered in dust, had no backing, and the mat frame was yellowed and warped. I had no idea what I was going to do with this frame, but I knew it had the potential to become something wonderful, so I paid the $2.00 asking price and walked away with an unpolished gem. For several months, this frame has been sitting in our garage waiting for its makeover day and it’s finally here 🙂 It’s been polished and reborn into a Fall Give Thanks Chalkboard Sign!
Supplies:
- Frame with glass (mine is rather large and measures 19″ x 30.5″ on the outside – it’s going on the mantle!)
- Liquid Chalk Markers – Strong, Bold White 4 Pack of Liquid Chalkers with 60 Day Happiness Refund Guarantee – Wet Erase Marker Pens with Chalk as Ink – The Reliable, Strong 6mm Chalk Pen
- Chalkboard Paint (I used Krylon Chalkboard Spray Paint)
- Krylon While spray paint
- Sand paper or sander with fine grit sand paper
- Chalk
- PicMonkey: crazy-awesome photo editing
- Printer
- Fall leaves
- Tape (I used painter’s tape)

1. Remove the glass from the frame. Wipe down the frame and glass to remove any dust and oils. Let the pieces dry completely.
2. Spray glass or paint chalkboard paint on the glass. Let the paint dry completely – at least 24 hours. ***Optional – prime glass with a primer to help paint adhere – using just chalkboard paint on glass without a primer can peel off. I recommend priming the glass if you plan on using the chalkboard regularly. ***
3. While the chalkboard paint is drying, spray paint the frame with white spray paint. Once dry, distress the frame edges using a sander or sand paper. Wipe and dust off any particles and set aside.

4. Prep the chalkboard surface by dusting the entire glass chalkboard with chalk. I did this by rubbing a large sheet of paper with the side of a chalk and then rubbing that paper all over the glass chalkboard. I did it this way because I did not prime my glass and writing directly on the glass without an under layer of primer can scratch the surface chalkboard paint. ***You can skip prepping the surface if you don’t plan on changing out the writing.***
6. Use PicMonkey to print out your quote and font style. I enlarged the words to the 720 size.
7. Flip over the printed quote and rub chalk all over the wrong side of the paper.
8. Position the quote, right side up, on your chalkboard and tape down. Using the chalk, trace the lettering. Remove the paper and you should see the faint outline of the letters.
9. Using the liquid chalkers, trace the letters and fill in. Don’t worry about being perfect…it’s supposed to look like it’s hand written 🙂 However, do use a ruler or paper to help keep your letters straight
10. Repeat steps 4-7 until the entire quote is done.

11. Add any other artwork to enhance your design. *** I added a heart using a cardboard template and some lines.***
12. Once all the lettering and artwork is complete, position fall leaves around the board. Adhere the leaves using painter’s tape or regular tape. ***I use painter’s tape because it leaves less residue and I may want to change these out at a later time.***
13. Place the glass chalkboard back in the frame and display.
Liquid Chalkers Review –
Pros:
- Dries quickly
- Easy to use
- Writes nicely on glass and is easily wiped off – I recommend using on a glass surfaces only (mirrors, bottles, windows, etc…)
- Glows in the dark with black light
Cons:
- Does not wipe off chalkboard paint! It leaves a residue and has to be scraped off, which can damage a painted on chalkboard finish
- Is permanent on non-porous surfaces
This chalkboard sign was my first one, but I can totally see myself making a ton of signs. Have you made a chalkboard sign?


You are always unique with your projects. This is a good tutorial on how to revamp any old painting, really. Thank you for linking it up to our linky party. It’s always a pleasure partying with you. Can’t wait to see what you’ll bring us in just a few hours!
I love how this project turned out. Your lettering is so cute. Thanks for sharing at my Creative Ways Link Party. Hope to see you again this week.
Blessings,
Nici
Thanks for linking up at Two Uses Tuesday! Although I’d need something for the chalkboard part, I do have a frame that would be good for this.I’m alwasy leery of those chalk markers. I’ll stick to plai ole chalk =) Thanks for sharing
I always wondered how people made such pretty chalk signs. Thanks for linking up at Show Me Saturday. Hope to see you there again this week!
Hi Erlene! You are so creative. I wish I had it in me. I love seeing what you bring to our #TheWeekendSocial. Fun stuff! You’re always invited back Thursdays 9:00 PM EST.
I am adding all of these supplies to my list! I love how you created a chalk board!
I would love for you to share your post at my Show Me Saturday party! We go live each Saturday at 7:00 am EST are live now! My readers would love this craft!
~ Ashley
Love, love this! So creative and great for this harvest/thanksgiving season! Thanks so much for sharing this on Wine’d Down Wednesday!
Cathy
Thanks Cathy! Love your party and always find great link-ups to get inspired by. Thanks for stopping by.
Erlene, this is lovely- you did a beautiful job! Thank you for sharing it with us at Treasure Box Tuesday- I’m pinning for future inspiration! 🙂
Thanks Joy. I think making this sign has given me chalkboard fever 🙂
Oh, by the way, thanks for coming by and linking up at the #HomeMatters linky party! We hope to see you again this coming Wednesday!
This really came out great! Thanks for sharing at Pin-Worthy Wednesday, pinned!
Thanks for the party Roxanne 🙂
this is fabulous! looks fairly simple to make as well…definitely need to try out those chalk markers!!
I actually really like these markers. You just can’t use them on anything porous or it’s pretty permanent. I would recommend using on only glass.
I absolutely love this! Pinned. It is so fun to party with you. Thank you. I hope to see you at our party on Monday at 7 pm. http://loulougirls.blogspot.com/
Happy Saturday! Lou Lou Girls
Thanks so much for pinning. I always appreciate the shares and I really love that you come over to remind me to link-up 🙂 to your fun party.
I luv this Erlene. I want a big one like that in my dining room for xmas dinner menu. Thanks for linking up to Pin Worthy Wednesday.
You should do it! It would be a nice addition to your lovely home decorations.
I LOVE how that turned out! I’ve only made small chalkboard signs, like, for when I’m doing a photo shoot. But this one is lovely!
Thanks Kristen. I probably should have started out with a small sign…lol. I do plan on making more though and I love the idea of using them in photo shoots.
You did such a good job that now I want some of those pens! Thanks so much for sharing with the Thursday Blog hop. Hope you will join us. Have a great weekend!
Turned out beautiful! I recently started a Chalkboards Group Board on Pinterest which is where I’m about to Pin this 🙂 I have a Fall Chalkboard project which I began a couple weeks ago but got sidetracked by all the remodeling. I love those Fall Chalkboards!
Thanks for sharing Shirley. I can’t wait to see your chalkboard when you finish.
This turned out adorable! Nice job! I love reusing old things that seemingly don’t have value. Nice DIY!
Thanks Alyssa. Now that I’m older 🙂 , I have more of an appreciation to reuse old things.
I love how this turned out! The leaves are the perfect finishing touch!
Thanks Amy. I almost went out and bought some colored liquid chalk pens, but I like how the leaves added some dimension.
I love these markers Erlene. They could be used for so many things. Your sign looks fantastic!
Thanks Nicky. I like the markers too, I just wish they could write on normal chalkboards. I really think these are more for glass or white board type surfaces.
Wow, this looks fabulous and so festive! The blogosphere is certainly exploding with a love for fall. This is my first fall blogging so maybe it is all just new to me. Your project is goregous and so well done. And for $2?!
Thanks Rachel. I started blogging around the fall season last year, but I really didn’t know what the heck I was doing. So this is actually my first real fall post too 🙂
Really nice project! And you can’t go wrong with the price 🙂 I’ve been thinking about doing one of these.. thanks for the inspiration!
Do it Renee! Once you make one you’ll want to make more 🙂
The piece looks fabulous!! Perfect for this time of the year! $2 VERY well spent!!
-Tanya
Thanks Tanya. I agree…$2 was a steal for this large wooden frame. I wish I had time to do more garage sale shopping.
Your chalkboard sign is beautiful and I love the message!
I’ve never done a chalkboard sign that big, but I have made 5×7 signs to use on dessert tables, etc. at parties.
Thanks Alli. I’m definitely making more chalkboard signs. It was really fun and I love the look. I don’t know why it took me so long.